Configure host storage with NFS for Kasm Workspaces
Overview
This guide covers host considerations when you configure storage for persistent data, which apply to volume map profiles. It sets up an NFS share so that all Kasm Agents in a multi-server deployment read and write the same central store, and it explains how host file permissions control access to that data.
Prerequisites
- A multi-server deployment with one host for the NFS server and one or more Kasm Agent hosts as NFS clients.
- Root or
sudoaccess on each host.
Solution approach
This guide progresses through the following phases:
- Set up the NFS server.
- Set up the NFS client.
- Reference the share in a volume mapping.
- Control file permissions and isolation.
Detailed steps
Using NFS
For any multi-server deployment, use NFS for all persistent data. Without a central file share across all Kasm Agents, each agent stores different data, and a user receives different data depending on which agent the session launched on.
Set up the NFS server
Install an NFS server on the host:
- Ubuntu/Debian
- RHEL/Oracle
sudo apt-get update
sudo apt-get install -y nfs-kernel-server
sudo yum install -y nfs-utils
sudo systemctl enable rpcbind
sudo systemctl enable nfs-server
sudo service rpcbind start
sudo service nfs-server start
Create the folder to host the share:
sudo mkdir /kasmdata
sudo chown -R 1000:1000 /kasmdata/
Add the entry to /etc/exports. In this example, the NFS client IP address is 192.168.1.3. The all_squash, anonuid, and anongid settings ensure that all files are accessed and written as the default Kasm session UID 1000. For details, see the exports man page.
/kasmdata 192.168.1.3(rw,sync,all_squash,anonuid=1000,anongid=1000,no_subtree_check)
Export the new additions:
sudo exportfs -ar
Set up the NFS client
Install an NFS client on the host:
- Ubuntu/Debian
- RHEL/Oracle
sudo apt-get update
sudo apt-get install -y nfs-common
sudo yum install -y nfs-utils
Create a directory for the mount:
sudo mkdir -p /mnt/kasm-nfs
Add an entry to /etc/fstab for the NFS mount. In this example, the NFS server IP address is 192.168.1.2:
192.168.1.2:/kasmdata /mnt/kasm-nfs nfs defaults 0 0
Mount the share:
sudo mount /mnt/kasm-nfs
Test creating a file:
sudo touch /mnt/kasm-nfs/example.txt
Inspect the file from the NFS server to confirm the permissions are UID and GID 1000:
ls -la /kasmdata/
total 8
drwxr-xr-x  2 1000 1000 4096 Feb 24 08:39 .
drwxr-xr-x 20 root root 4096 Feb 23 16:00 ..
-rw-r--r--  1 1000 1000    0 Feb 24 08:39 example.txt
Reference the share in a volume mapping
You can now reference the NFS share in volume mappings or persistent profile configurations. This example configures a shared directory at /share for all users with access to the Workspace, using a volume mapping. For details, see the volume mapping documentation.
{
   "/mnt/kasm-nfs":{
      "bind":"/share",
      "mode":"rw",
      "uid": 1000,
      "gid": 1000,
      "required": true,
      "skip_check": false
   }
}
Control file permissions and isolation
By default, users inside Kasm Workspaces sessions run under the Linux UID and GID of 1000. When you create persistent data paths, note that an exposed path gives one user the same access to another user's files, and the reverse. This is particularly important with volume mappings. When you map a non-user-scoped directory such as /mnt/kasm/ and then use that path for user-scoped directories such as /mnt/kasm/desktop/{username}, anyone with access to the Workspace and the initial /mnt/kasm volume mapping also has read and write access to every other user's storage in /mnt/kasm/desktop/. Because of this single-user design, administrators can limit access to specific files by modifying their owner and file permissions at the host level.
This example creates a read-only folder inside the volume mapping. To create a universal share folder where users save, load, and delete files, the host-level directory is /mnt/kasm_docs_share, mounted into the launched Workspaces sessions as /share/. On the host with access to /mnt/kasm_docs_share, create the folder to make read-only and place files into it:
mkdir /mnt/kasm_docs_share/read_only_documents
cp -ax /my_data/documents/* /mnt/kasm_docs_share/read_only_documents/
Then modify the owner of the directory and the permissions. This example uses root, but any user outside 1000:1000 works:
sudo chown root:root /mnt/kasm_docs_share/read_only_documents/
sudo chmod -R 664 /mnt/kasm_docs_share/read_only_documents/
The user can open and copy the files in this directory, but cannot modify them from inside the Workspaces session:
default:~$ rm /share/read_only_documents/test.doc
rm: remove write-protected regular empty file '/share/read_only_documents/test.doc'? y
rm: cannot remove '/share/read_only_documents/test.doc': Permission denied
default:~$ cp /share/read_only_documents/test.doc /home/kasm-user/Desktop/
default:~$ ls -l /home/kasm-user/Desktop/test.doc
-rw-r--r-- 1 kasm-user kasm-user 0 Jan 26 20:49 /home/kasm-user/Desktop/test.doc
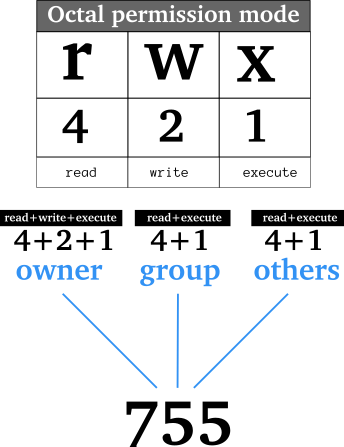
This is a simple example, and Linux user and file permissions are more complex. Here, the owner is set to root, and the 664 mode tells the file system the following:
- First digit, 6: the root user has read and write access.
- Second digit, 6: anyone in the group root has read and write access.
- Third digit, 4: everyone else has read-only access.
For a fuller explanation, review the following infographic.