Microsoft (public) OpenID setup
Be mindful when configuring public OpenID providers. Any user who authenticates with the provider gains access to your Kasm Workspaces deployment. Kasm group permissions can restrict access to Workspace apps and desktops, but any user of the public authentication provider can still log in to your deployment. Use a private OpenID provider unless you intend to allow access to all users of the OpenID platform provider.
This guide walks through a basic setup that allows Microsoft users to authenticate with your Kasm deployment.
Reference Docs:
- https://docs.microsoft.com/en-us/azure/active-directory/develop/quickstart-register-app
- https://docs.microsoft.com/en-us/azure/active-directory/develop/active-directory-v2-protocols
Create a Microsoft OAuth app
- Log in to the Microsoft Azure portal: https://portal.azure.com/
- Select Azure Active Directory.

- Select App Registrations.

- Select New Registration.
- Give the app a Name (e.g
Kasm). - In the Supported account types select Accounts in any organizational directory (Any Azure AD directory - Multitenant) and personal Microsoft accounts (e.g. Skype, Xbox).
This example creates an integration where any Microsoft user can authenticate with the Kasm app, which is ideal for a public-facing deployment. Other options are available for single-tenant and multi-tenant configurations.

- On the next page, the Application (client) ID is shown, save this value as the Client ID to be used in the next section.
- Select Add a certificate or secret next to Client credentials.

- Select the Client secrets tab, then click New client secret.
- Enter a description and expiration then click Add.
- The credentials are shown, save the Value as the Client Secret to be used in the next section.

-
Select Token configuration.
-
Select Add Optional Claim
-
Under Token Type select ID, then check the box for sid. Click Add.
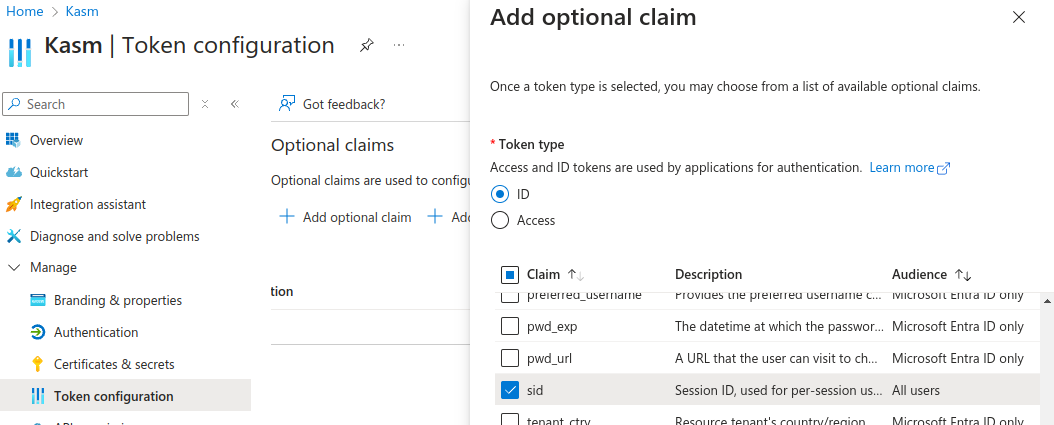
-
Select Authentication
-
In Front-channel Logout URL, provide the Kasm
/api/oidc_frontchannel_logoutendpoint as shown. Click Save.

Kasm OpenID configuration
- Log into the Kasm UI as an administrator.
- Select Access Management -> Authentication -> OpenID -> Add Config.
- Update the form with the following entries, using the Client ID and Client Secret gathered in the previous section.
| Property | Value |
|---|---|
| Enabled | Checked |
| Display Name | Continue with Microsoft |
| Logo URL | https://www.microsoft.com/favicon.ico |
| Auto Login | Unchecked |
| Hostname | <Empty> |
| Default | Checked |
| Client ID | <Client ID From Microsoft OAuth App> |
| Client Secret | <Client Secret from Microsoft OAuth App> |
| Authorization URL | https://login.microsoftonline.com/common/oauth2/v2.0/authorize |
| Token URL | https://login.microsoftonline.com/common/oauth2/v2.0/token |
| User Info URL | https://graph.microsoft.com/oidc/userinfo |
| Scope | openid email profile |
| Username Attribute | email |
| Groups Attribute | Unchecked |
| Debug | Unchecked |
| Redirect URL | https://<Kasm hostname>/api/oidc_callback |
| OpenID Connect Issuer | https://login.microsoftonline.com/common/v2.0 |
| Logout with OIDC Provider | Checked |
| Enable OIDC SLO Frontchannel Endpoint | Checked |

- Click Save to save the changes.
Test Microsoft login
- Logout of the Kasm to display the login screen. The OpenID configuration should be shown.

- Click Continue with Microsoft
- The user is redirected to Microsoft for auth.

- On completion, the user is logged into the Kasm app.