Docker Agents
A Kasm Agent is any compute resource where a containerized Workspace is provisioned. The compute resource must have the Kasm Agent role installed. This reference describes the Docker Agents view in the Kasm UI, the settings that govern how each agent reports resources, GPU support, and the procedure to change the manager token.
Resource overrides and GPU passthrough let administrators scale workspace capacity across the available hardware and deliver accelerated, browser-accessible sessions inside governed workspace boundaries.
View Agents
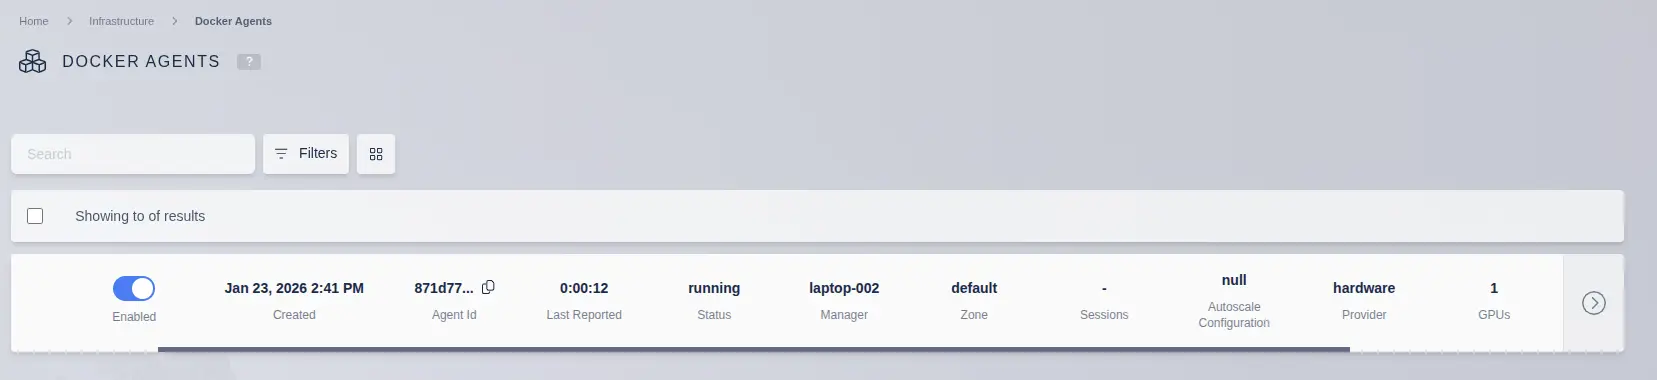
View a list of agents by selecting Infrastructure > Docker Agents in the Kasm UI.

Agent actions
Click the arrow for an agent to display the available actions.
| Action | Description |
|---|---|
| Edit | Edit and view details for the selected agent. |
| Delete Sessions | Mark all sessions on the agent as "deleting". The sessions are deleted within a few moments. Sessions resumed from a stopped state retain their previous files, but previously running programs must be restarted. |
| Delete | Delete the agent from the Kasm deployment. |
| Drain | Mark the agent as "Draining". An agent in Draining mode does not accept new sessions. After all existing sessions close, the agent is deleted. This option applies only to agents created from an AutoScale pool. |
Agent details
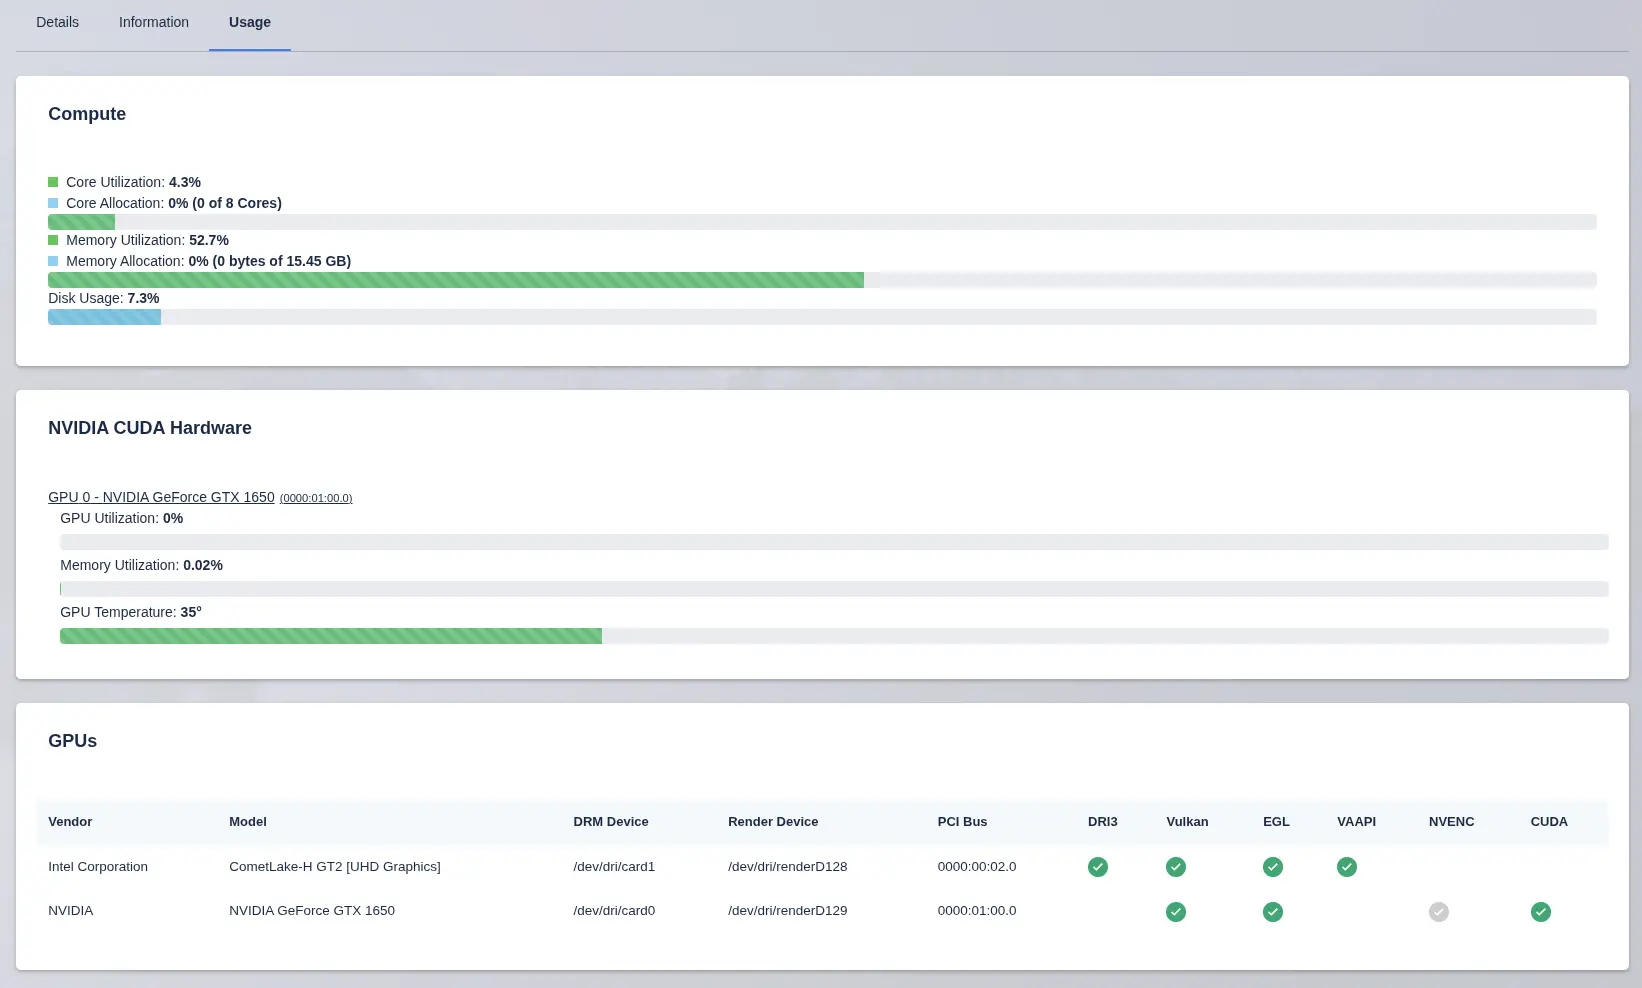
View more details about an individual agent by clicking the Edit (pencil) icon, then opening the Details and Usage tabs.
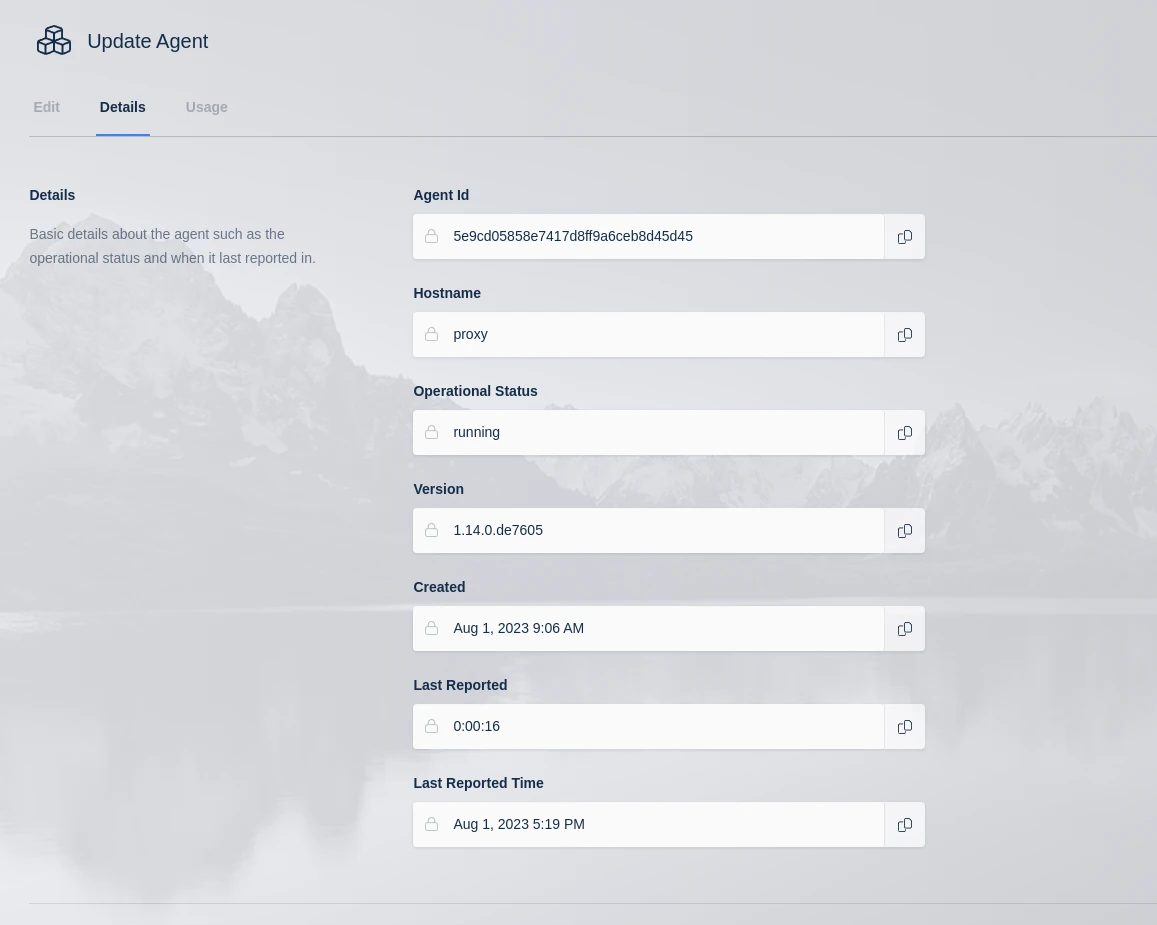
The bar chart shows two statistics each for RAM and CPU. It shows how much RAM and CPU are currently used, and how much are currently allocated. Consider an agent that has 6 CPUs, is overridden to 12 CPUs, and has two desktops allocated at 2 CPUs and 3 CPUs. The chart shows 5 of 12 CPUs allocated. The chart also shows the CPU utilization measured during the last check-in.
Agent chart
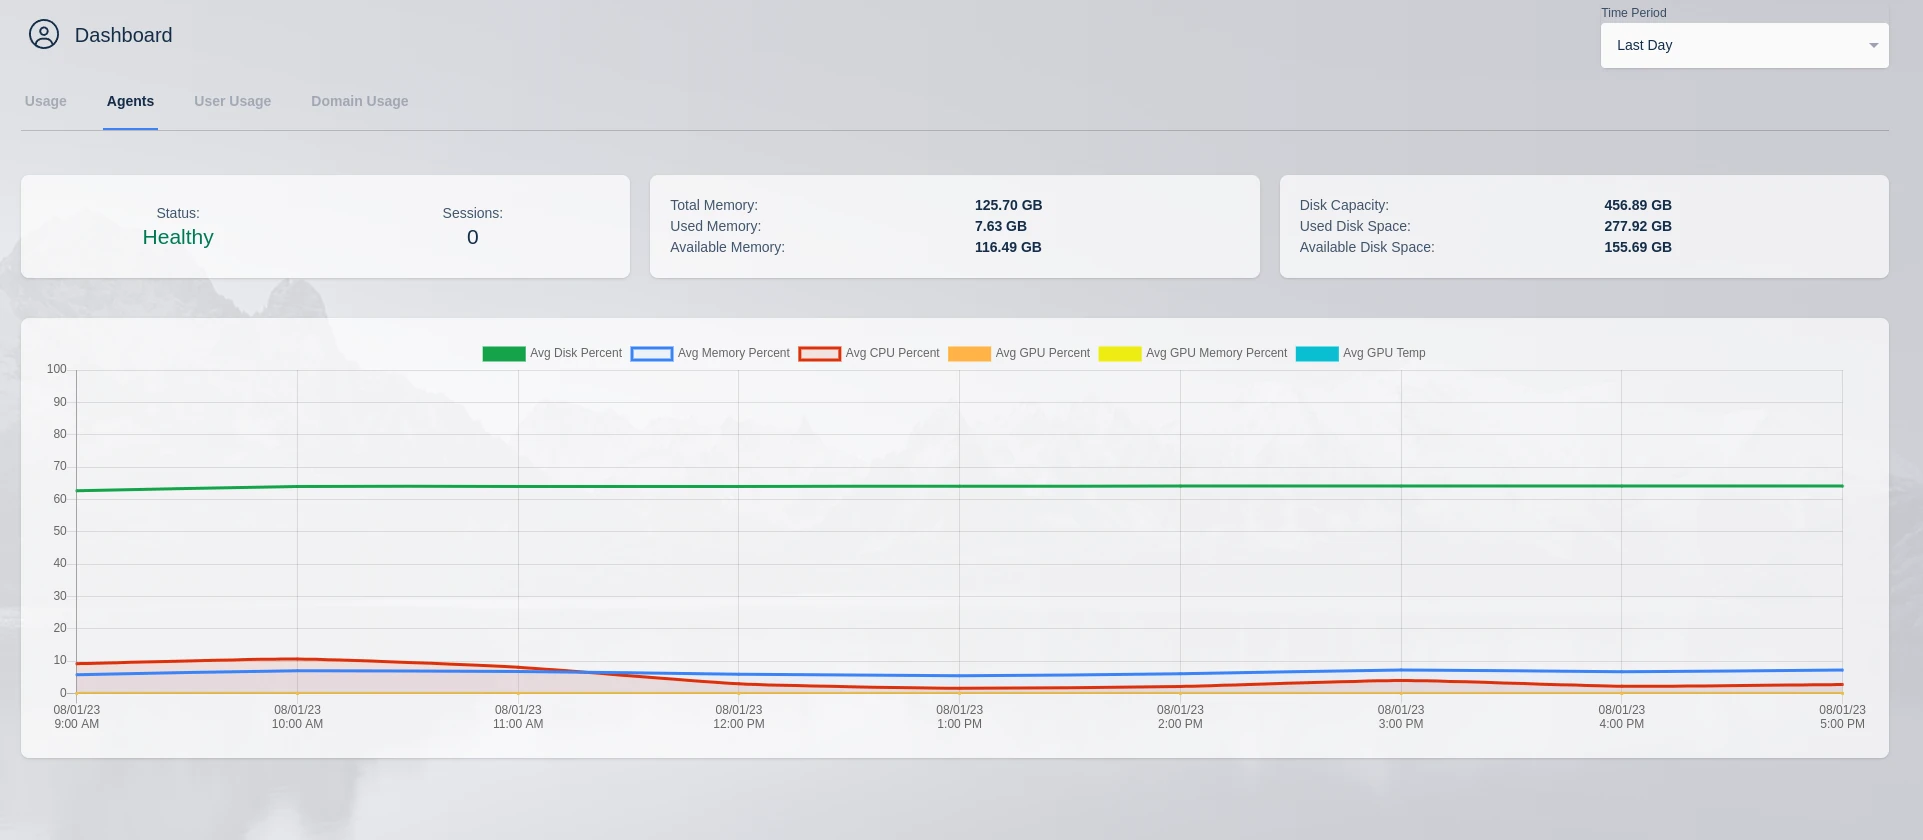
Track historical CPU, memory, and disk utilization for an agent by viewing the Dashboard in the Kasm UI.
Agent settings
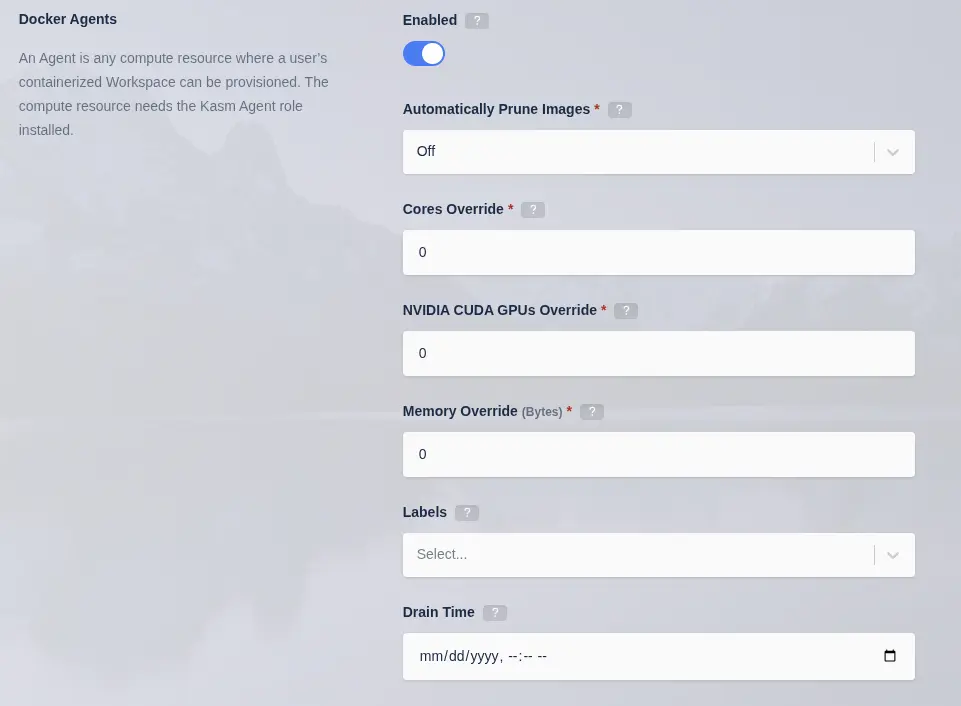
Configure agent settings from the Kasm UI by selecting Infrastructure > Agents > Edit (pencil icon).
| Field | Description |
|---|---|
| Enabled | When checked, the agent services requests to create sessions. When disabled, the agent is not considered for new session requests. Disabling is useful to drain sessions from an agent before maintenance. |
| Automatically Prune Images | Instruct the agent to automatically delete (prune) unneeded images. Only Kasm Workspaces images are pruned. Off disables pruning. Normal prunes untagged (dangling) images. Aggressive prunes untagged images and any image no longer defined in the application. |
| Cores Override | Instruct the system to treat the agent as if it has this number of CPU cores. Useful to tactically oversubscribe the agent. A value of 0 indicates no override, and the system uses the actual CPU cores of the system. |
| NVIDIA CUDA GPUs Override | Instruct the system to treat the agent as if it has this number of NVIDIA CUDA GPUs. Useful to tactically oversubscribe the agent. A value of 0 indicates no override, and the system uses the actual number of GPUs for the system. |
| Memory Override | Instruct the system to treat the agent as if it has this amount of memory, in bytes. Useful to tactically oversubscribe the agent. A value of 0 indicates no override, and the system uses the actual memory of the system. |
| Drain Time | The time when this agent switches to Draining mode. In Draining mode, the agent does not accept new sessions. After all active sessions end, the agent is automatically deleted. |
| Labels | Labels assigned to this agent. Labels control where Workspace sessions launch. Specify these labels in a Workspace's "Include Labels" or "Exclude Labels" settings to ensure sessions run only on certain agents. |
CPU / Memory / GPU override
An agent reports how much RAM, how many CPU cores, and what GPU resources are available on the system. Consider an agent with 6 CPU cores and 6 GB of RAM where every image is set to 1 CPU and 1 GB of RAM. Only 6 sessions can be provisioned on that agent at one time.
Administrators can override CPU, RAM, and GPU resources to allow oversubscription. A value of 0 means no override. Consider an agent server with 6 CPUs. An override of 12 CPUs allows the system to provision 12 instances of a user desktop when each image is set to 1 CPU. The agent still needs 12 GB of RAM to provision 12 users when each image is set to 1 GB of RAM. Administrators can override RAM in the same manner as CPUs.
Ensure each server has a SWAP partition that is adequate in size to overcome over-utilization of RAM. A server without a swap file can destroy user desktops when RAM is oversubscribed. Overriding the GPU count allows the agent to assign more user sessions to one or more GPUs. The system must have at least one physical GPU to override.
CPU and GPU overrides allow administrators to oversubscribe resources. The overrides do not allow administrators to provide a single session with more resources than the system has. Consider a system with 1 GPU and a GPU override set to 10. That override allows 10 sessions requiring 1 GPU each to be created. The system does not allow an image set to 10 GPUs to be assigned to an agent that has only 1 physical GPU, even when an override of 10 GPUs is used.
GPU support
The Update Agent form includes a GPU Hardware section. This section shows the GPUs detected on the system and the features each GPU supports. From here, administrators enable and disable features on each GPU. In the example screenshot below, the NVIDIA GPU supports video encoding acceleration, but the administrator has disabled it. Disabling a feature ensures that GPU is not assigned to containers for the selected feature.

The following video demonstrates detecting, monitoring, and configuring GPU hardware from the Docker Agent interface.
Kasm Workspaces supports passing through NVIDIA-based GPUs to streaming containers using the NVIDIA container toolkit. For a full list of supported GPUs and operating systems, see the NVIDIA GPU Operator platform support matrix. The NVIDIA drivers and container toolkit must be installed on every Kasm Agent server with GPUs intended for passthrough to containers.
GPUs serve several purposes inside a streaming container, including graphics, gaming, running applications that use CUDA, and developing with GPU-accelerated frameworks such as PyTorch or TensorFlow. Kasm Workspaces allows organizations to manage and provide access to GPU-backed resources through governed, browser-accessible workspaces. Follow the GPU installation guide for a detailed walkthrough of a deployment.
Kasm Workspaces shows administrators how many GPUs an agent has. The displayed number includes only NVIDIA CUDA GPUs as seen by the NVIDIA container runtime. Other GPUs appear in the agent details view.
Administrators view all GPU details for an agent in the Update GPU form, on the Usage tab. NVIDIA CUDA hardware appears in the middle section with usage statistics. All GPUs appear in the lower GPU section along with the features each GPU supports. In the example screenshot, the NVIDIA GPU supports NVENC, but the administrator has disabled it. Enable and disable features in the Details tab of the same view.
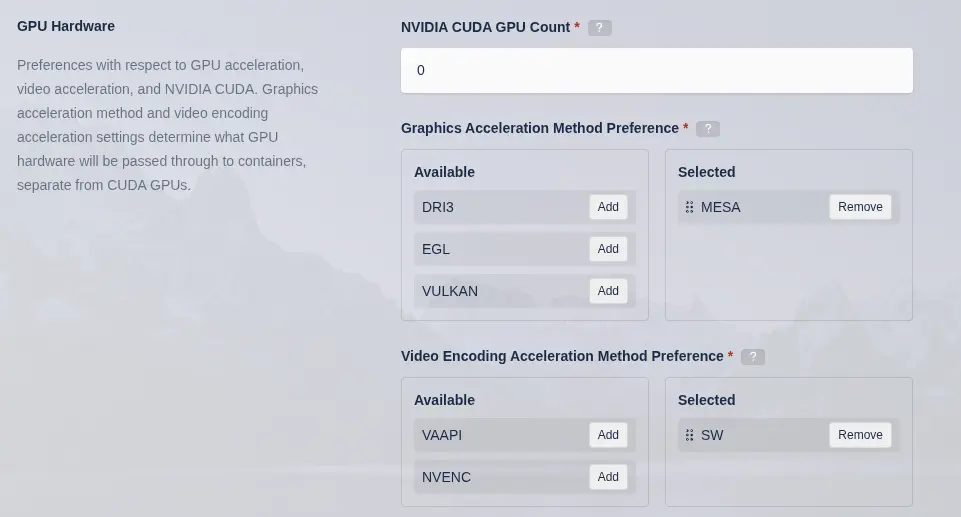
Workspace images allow administrators to define GPU requirements. Set the number of GPUs the container should be assigned, the required graphics methods, and the required video acceleration methods. A requested session using that image is provisioned only on an agent that has the selected number of CUDA GPUs or a GPU with the requested features. Only NVIDIA GPUs are explicitly passed through and have a count defined. Other GPUs are passed through automatically based on the features needed, for example VAAPI video acceleration.
GPU-accelerated graphics
Kasm Workspaces images may support DRI3, EGL, or VULKAN for GPU acceleration. The Workspace image settings allow administrators to specify which method to use. DRI3 is natively supported by KasmVNC and is the preferred method, but NVIDIA does not support DRI3. Intel and AMD GPUs generally support DRI3. NVIDIA GPUs generally support EGL and VULKAN, with the exception of enterprise-grade GPUs that may not have DRM devices exposed.
EGL is supported through the use of VirtualGL. Vulkan is supported through the use of Zink. VirtualGL is generally pre-installed on Kasm-maintained Workspace images based on Ubuntu. Zink is generally included in the MESA package that is installed on all Kasm-maintained Workspaces images. Test with your specific application and desktop environment to determine which graphics acceleration method is the right choice. The image must be based on a Kasm Workspaces image version 1.19.0 or higher. See the Workspace Images documentation for details on which core images support which GPU features.
The security of multi-tenant container GPU acceleration is not well established. Use this feature with caution and with full understanding of the potential security implications. These features are provided by the GPU manufacturer and are merely orchestrated by Kasm Workspaces. Kasm Technologies Inc provides no warranty of the security of such features provided by GPU vendors. Kasm Technologies recommends that GPUs not be shared between different security contexts or boundaries. NVIDIA provides the MIG feature on enterprise-grade GPUs for creating smaller instances from a single GPU, which Kasm supports.
GPU video acceleration
Kasm detects support for VAAPI and NVENC hardware-based video encoding and decoding acceleration. Administrators enable these features in the Workspaces image settings, and the appropriate DRM devices are passed through to the resulting containers. KasmVNC currently supports VAAPI for h.264 and h.265 encoding and automatically uses the hardware when detected.
NVIDIA MIG support
NVIDIA Multi-Instance GPU (MIG) is a feature available on select NVIDIA data center GPUs, such as the A100 and H100. MIG partitions a single physical GPU into multiple isolated GPU instances. Each MIG instance functions as an independent GPU slice with dedicated compute, memory, and bandwidth resources. MIG enables more efficient and secure GPU utilization by allowing multiple Workspaces or user sessions to securely share the same GPU hardware without contention or interference.
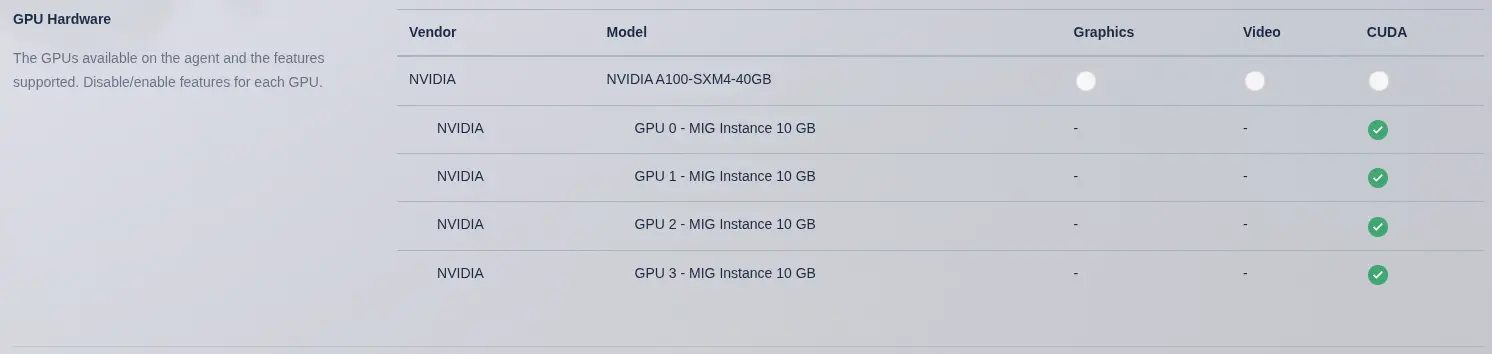
Kasm automatically disables the physical GPU from use by Kasm sessions when MIG instances are detected, as shown in the screenshot below. MIG instances are listed under the physical GPU and indented slightly.
Enable MIG on supported NVIDIA GPUs
-
Use the
nvidia-smicommand to list GPUs and get the GPU index for the target GPU. Each GPU has a unique index, usually starting at 0. The example below uses0. -
Check whether your GPU supports the MIG feature. Change
-i 0to reference your GPU index if it is not 0.
# This GPU supports MIG but it is currently disabled.
nvidia-smi -i 0 --query-gpu=pci.bus_id,mig.mode.current --format=csv
pci.bus_id, mig.mode.current
00000000:00:04.0, Disabled

# This GPU does not support the MIG feature
nvidia-smi -i 0 --query-gpu=pci.bus_id,mig.mode.current --format=csv
pci.bus_id, mig.mode.current
00000000:21:00.0, [N/A]
- Enable MIG.
sudo nvidia-smi -i 0 -mig 1
Warning: MIG mode is in pending enable state for GPU 00000000:00:04.0:Not Supported
Reboot the system or try nvidia-smi --gpu-reset to make MIG mode effective on GPU 00000000:00:04.0
All done.
-
Reboot the system.
-
List the available MIG profiles.
nvidia-smi mig -lgip
+-------------------------------------------------------------------------------+
| GPU instance profiles:                                                        |
| GPU   Name               ID    Instances   Memory     P2P    SM    DEC   ENC  |
|                                Free/Total   GiB              CE    JPEG  OFA  |
|===============================================================================|
|   0  MIG 1g.5gb          19     7/7        4.75       No     14     0     0   |
|                                                               1     0     0   |
+-------------------------------------------------------------------------------+
|   0  MIG 1g.5gb+me       20     1/1        4.75       No     14     1     0   |
|                                                               1     1     1   |
+-------------------------------------------------------------------------------+
|   0  MIG 1g.10gb         15     4/4        9.75       No     14     1     0   |
|                                                               1     0     0   |
+-------------------------------------------------------------------------------+
|   0  MIG 2g.10gb         14     3/3        9.75       No     28     1     0   |
|                                                               2     0     0   |
+-------------------------------------------------------------------------------+
|   0  MIG 3g.20gb          9     2/2        19.62      No     42     2     0   |
|                                                               3     0     0   |
+-------------------------------------------------------------------------------+
|   0  MIG 4g.20gb          5     1/1        19.62      No     56     2     0   |
|                                                               4     0     0   |
+-------------------------------------------------------------------------------+
|   0  MIG 7g.40gb          0     1/1        39.38      No     98     5     0   |
|                                                               7     1     1   |
+-------------------------------------------------------------------------------+
- Create MIG instances. The example below uses the 1g.10gb profile to create 4 instances, each with 10 GB of VRAM.
sudo nvidia-smi mig -cgi 1g.10gb,1g.10gb,1g.10gb,1g.10gb -C
Successfully created GPU instance ID  4 on GPU  0 using profile MIG 1g.10gb (ID 15)
Successfully created compute instance ID  0 on GPU  0 GPU instance ID  4 using profile MIG 1g.10gb (ID  0)
Successfully created GPU instance ID  3 on GPU  0 using profile MIG 1g.10gb (ID 15)
Successfully created compute instance ID  0 on GPU  0 GPU instance ID  3 using profile MIG 1g.10gb (ID  0)
Successfully created GPU instance ID  5 on GPU  0 using profile MIG 1g.10gb (ID 15)
Successfully created compute instance ID  0 on GPU  0 GPU instance ID  5 using profile MIG 1g.10gb (ID  0)
Successfully created GPU instance ID  6 on GPU  0 using profile MIG 1g.10gb (ID 15)
Successfully created compute instance ID  0 on GPU  0 GPU instance ID  6 using profile MIG 1g.10gb (ID  0)
- Verify that
nvidia-smishows the newly created instances.
nvidia-smi
Tue Mar 31 13:13:13 2026
+-----------------------------------------------------------------------------------------+
| NVIDIA-SMI 590.48.01              Driver Version: 590.48.01      CUDA Version: 13.1     |
+-----------------------------------------+------------------------+----------------------+
| GPU  Name                 Persistence-M | Bus-Id          Disp.A | Volatile Uncorr. ECC |
| Fan  Temp   Perf          Pwr:Usage/Cap |           Memory-Usage | GPU-Util  Compute M. |
|                                         |                        |               MIG M. |
|=========================================+========================+======================|
|   0  NVIDIA A100-SXM4-40GB          Off |   00000000:00:04.0 Off |                   On |
| N/A   33C    P0             44W /  400W |     119MiB /  40960MiB |     N/A      Default |
|                                         |                        |              Enabled |
+-----------------------------------------+------------------------+----------------------+

+-----------------------------------------------------------------------------------------+
| MIG devices:                                                                            |
+------------------+----------------------------------+-----------+-----------------------+
| GPU  GI  CI  MIG |              Shared Memory-Usage |        Vol|        Shared         |
|      ID  ID  Dev |                Shared BAR1-Usage | SM     Unc| CE ENC  DEC  OFA  JPG |
|                  |                                  |        ECC|                       |
|==================+==================================+===========+=======================|
|  0    3   0   0  |              30MiB /  9984MiB    | 14      0 |  1   0    1    0    0 |
|                  |               0MiB /  6105MiB    |           |                       |
+------------------+----------------------------------+-----------+-----------------------+
|  0    4   0   1  |              30MiB /  9984MiB    | 14      0 |  1   0    1    0    0 |
|                  |               0MiB /  6105MiB    |           |                       |
+------------------+----------------------------------+-----------+-----------------------+
|  0    5   0   2  |              30MiB /  9984MiB    | 14      0 |  1   0    1    0    0 |
|                  |               0MiB /  6105MiB    |           |                       |
+------------------+----------------------------------+-----------+-----------------------+
|  0    6   0   3  |              30MiB /  9984MiB    | 14      0 |  1   0    1    0    0 |
|                  |               0MiB /  6105MiB    |           |                       |
+------------------+----------------------------------+-----------+-----------------------+

+-----------------------------------------------------------------------------------------+
| Processes:                                                                              |
|  GPU   GI   CI              PID   Type   Process name                        GPU Memory |
|        ID   ID                                                               Usage      |
|=========================================================================================|
|  No running processes found                                                             |
+-----------------------------------------------------------------------------------------+
The following video demonstrates enabling MIG mode, creating instances with nvidia-smi, and assigning them to Kasm Workspaces.
Change the manager token
An administrator may want to change the token that agents use to check in to the manager. The steps below change the token on each agent and on the manager.
Changing the manager token involves restarting Kasm services and results in an interruption in service.
First, enter the Kasm Admin UI, select Settings > Global, and change the value of "Token" in the manager settings to your new desired token.
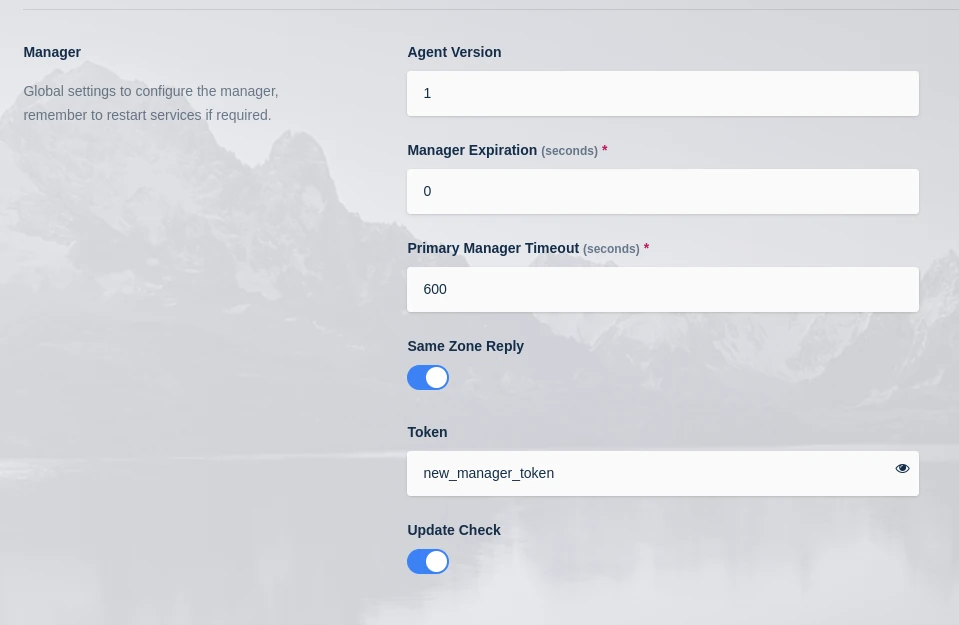
Log in to each server with the agent role and complete the following steps.
-
Stop the agent services.
sudo systemctl stop kasm -
Replace the value of
tokenin the agent config with the new manager token.sudo vi /opt/kasm/current/conf/app/agent/agent.app.config.yaml -
Start the agent services.
sudo systemctl start kasm
After one minute, all agents should check back in to the manager, as shown on the Infrastructure > Agents page in the Kasm Admin UI.