Configure Kasm Workspaces AutoScale on Nutanix AHV
Overview
Workspace demand on Nutanix AHV rises and falls through the day, and paying for idle virtual machines during quiet periods wastes cluster capacity. This guide configures Kasm Workspaces AutoScale to provision and destroy agents on Nutanix AHV automatically in response to demand. The result is elastic capacity that meets peak load and reclaims compute between sessions. AutoScale on Nutanix keeps on-premises infrastructure efficient without manual provisioning of each agent.
Prerequisites
Confirm the following before you begin:
- Administrator access to your Nutanix Prism Central environment, including permission to create roles, projects, images, and virtual machines.
- A directory service or identity provider configured in Nutanix.
- Two Nutanix users: one to administer the project and build virtual machines, and one for Kasm to authenticate against the Nutanix APIs.
- A working Kasm Workspaces deployment. See the single-server installation guide if you need to deploy Kasm first.
- Knowledge of the deployment zone and pool that the AutoScaled agents will join. A deployment zone is a logical grouping of Kasm infrastructure components, and a pool groups Docker Agents and Server Pools for load balancing.
- Your Nutanix infrastructure details, including the target cluster, project, storage container, and subnet for the provisioned virtual machines.
Solution approach
This guide progresses through the following phases:
- Prepare the Nutanix role and project.
- Build a virtual machine template for the agents.
- Configure the Nutanix VM provider in Kasm.
- Validate that provisioning and downscaling work.
Detailed steps
Prepare the Nutanix role and project
Create a dedicated role and project in Prism Central so Kasm authenticates with least privilege and provisions resources into an isolated boundary.
Create a new Nutanix role
- Log into your Nutanix Prism Central UI as an administrator.
- Navigate to the Admin Center dashboard.
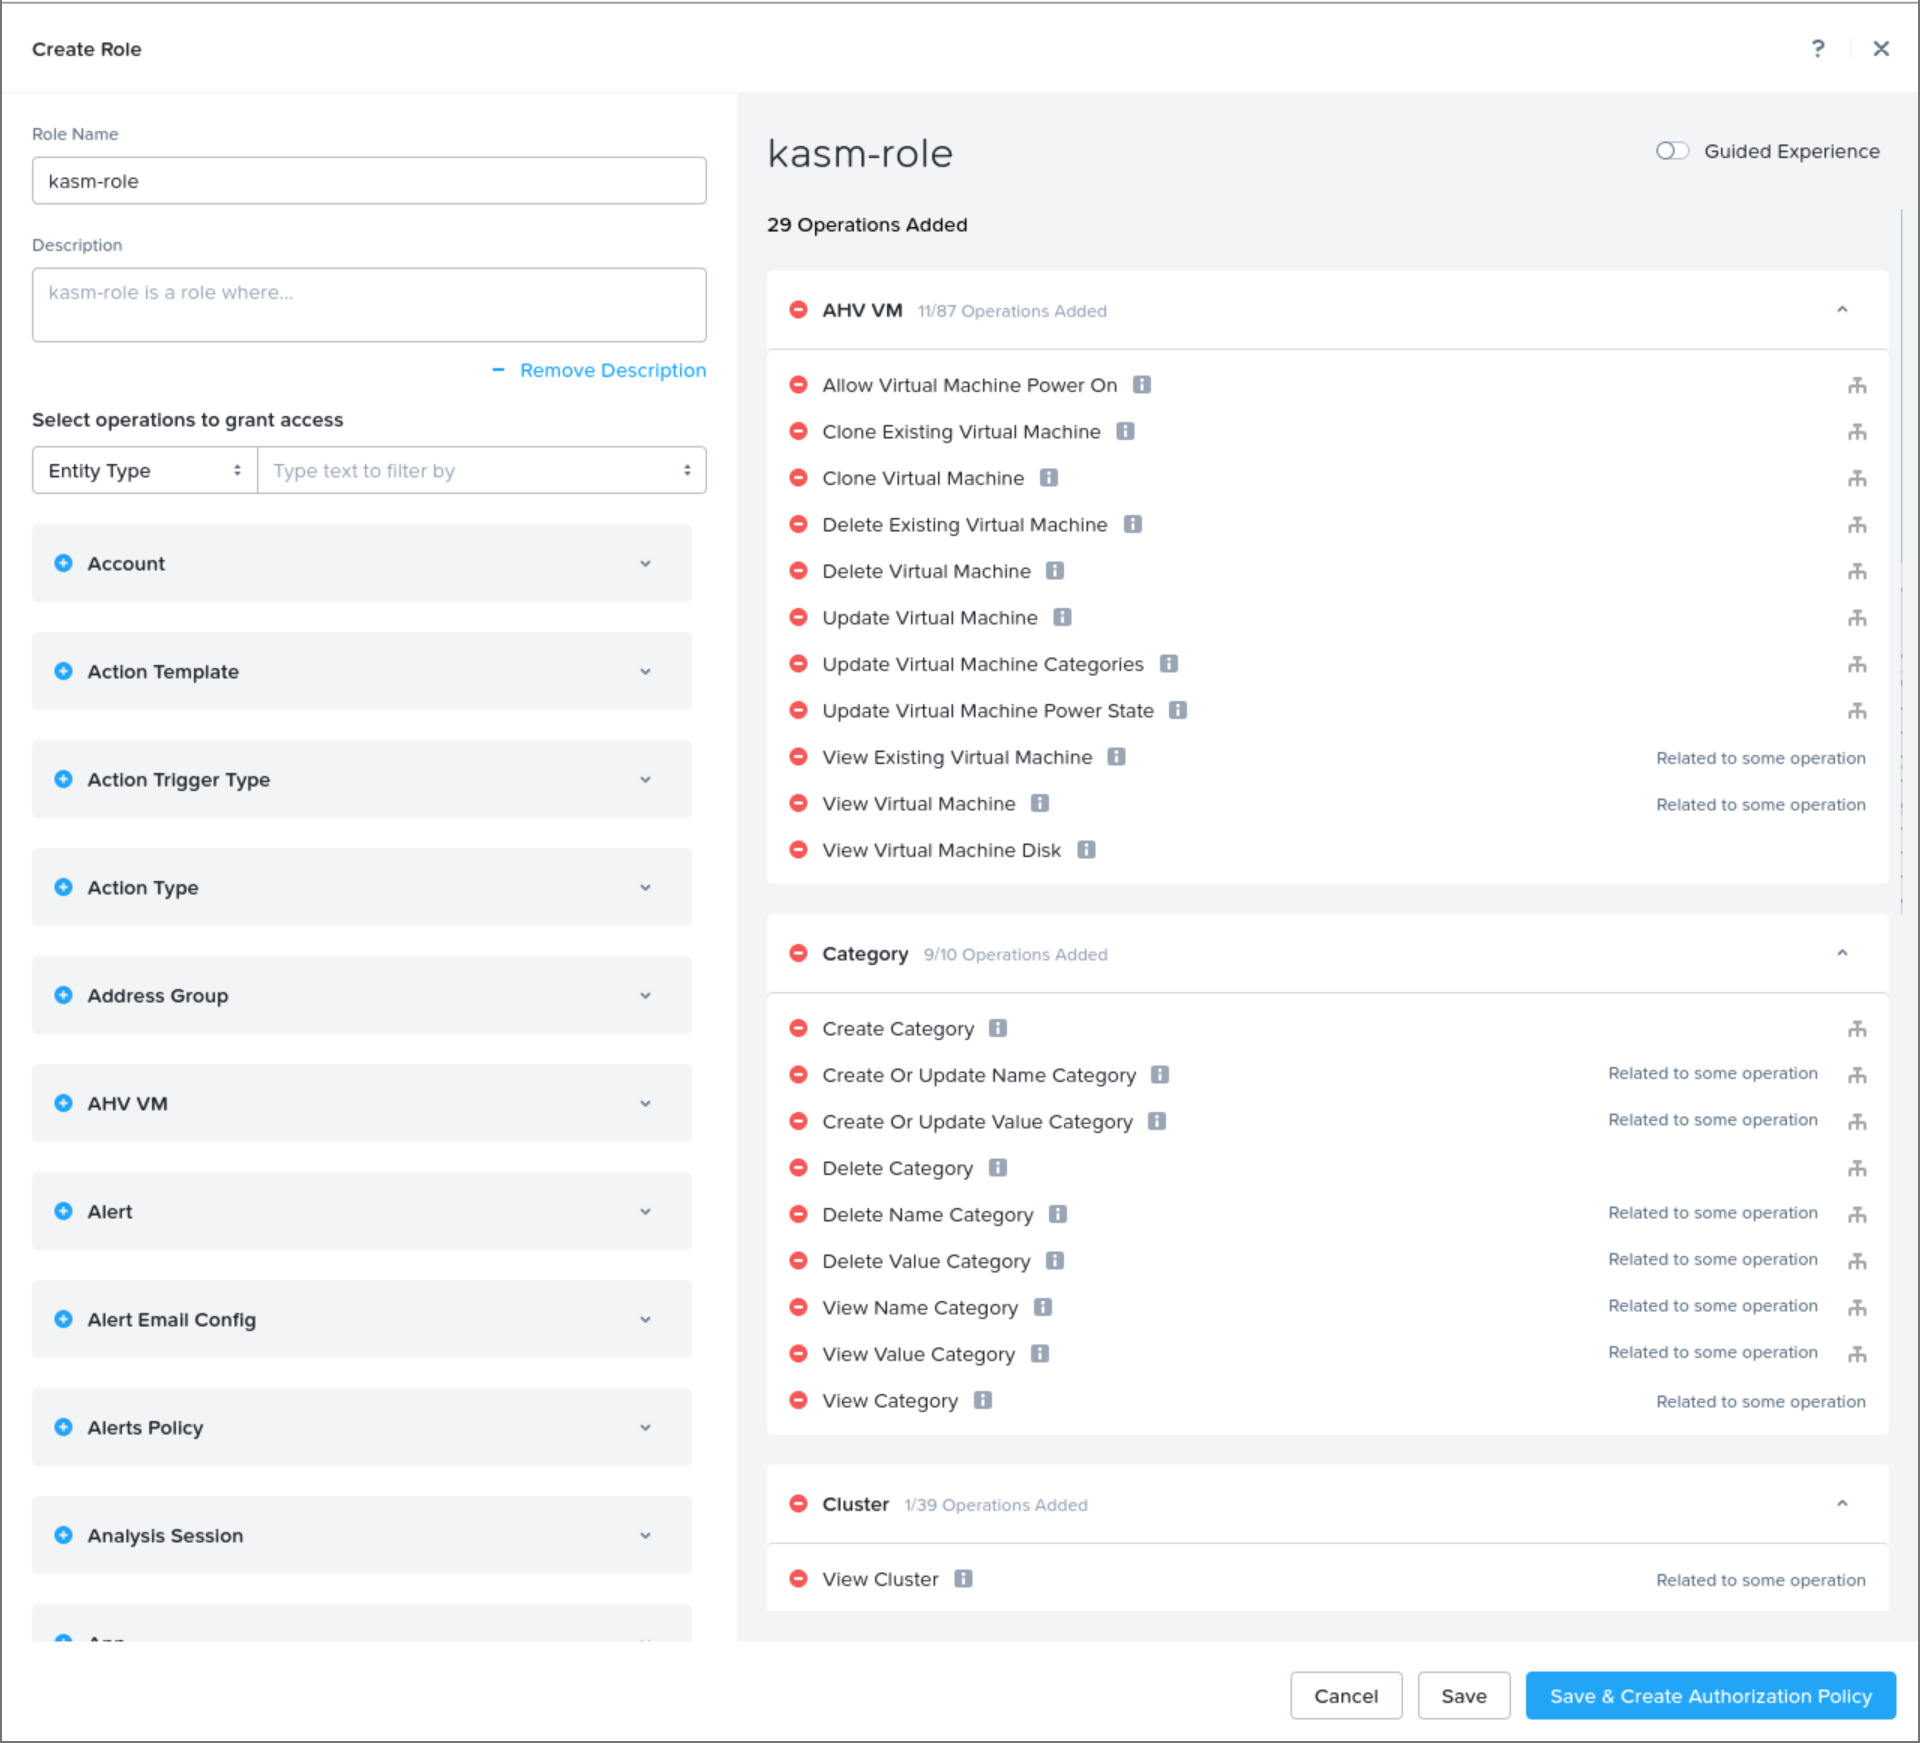
- Select IAM > Roles > Create Role > New role.
- Enter a value for the Role Name field, for example
kasm-role. - Add all the operations from the list of required permissions that correspond to the Nutanix API version you plan to use, and ensure that any related operations are also added.
- Select Save.
Create a new Nutanix project
- Log into your Nutanix Prism Central UI as an administrator.
- Navigate to the Admin Center dashboard.
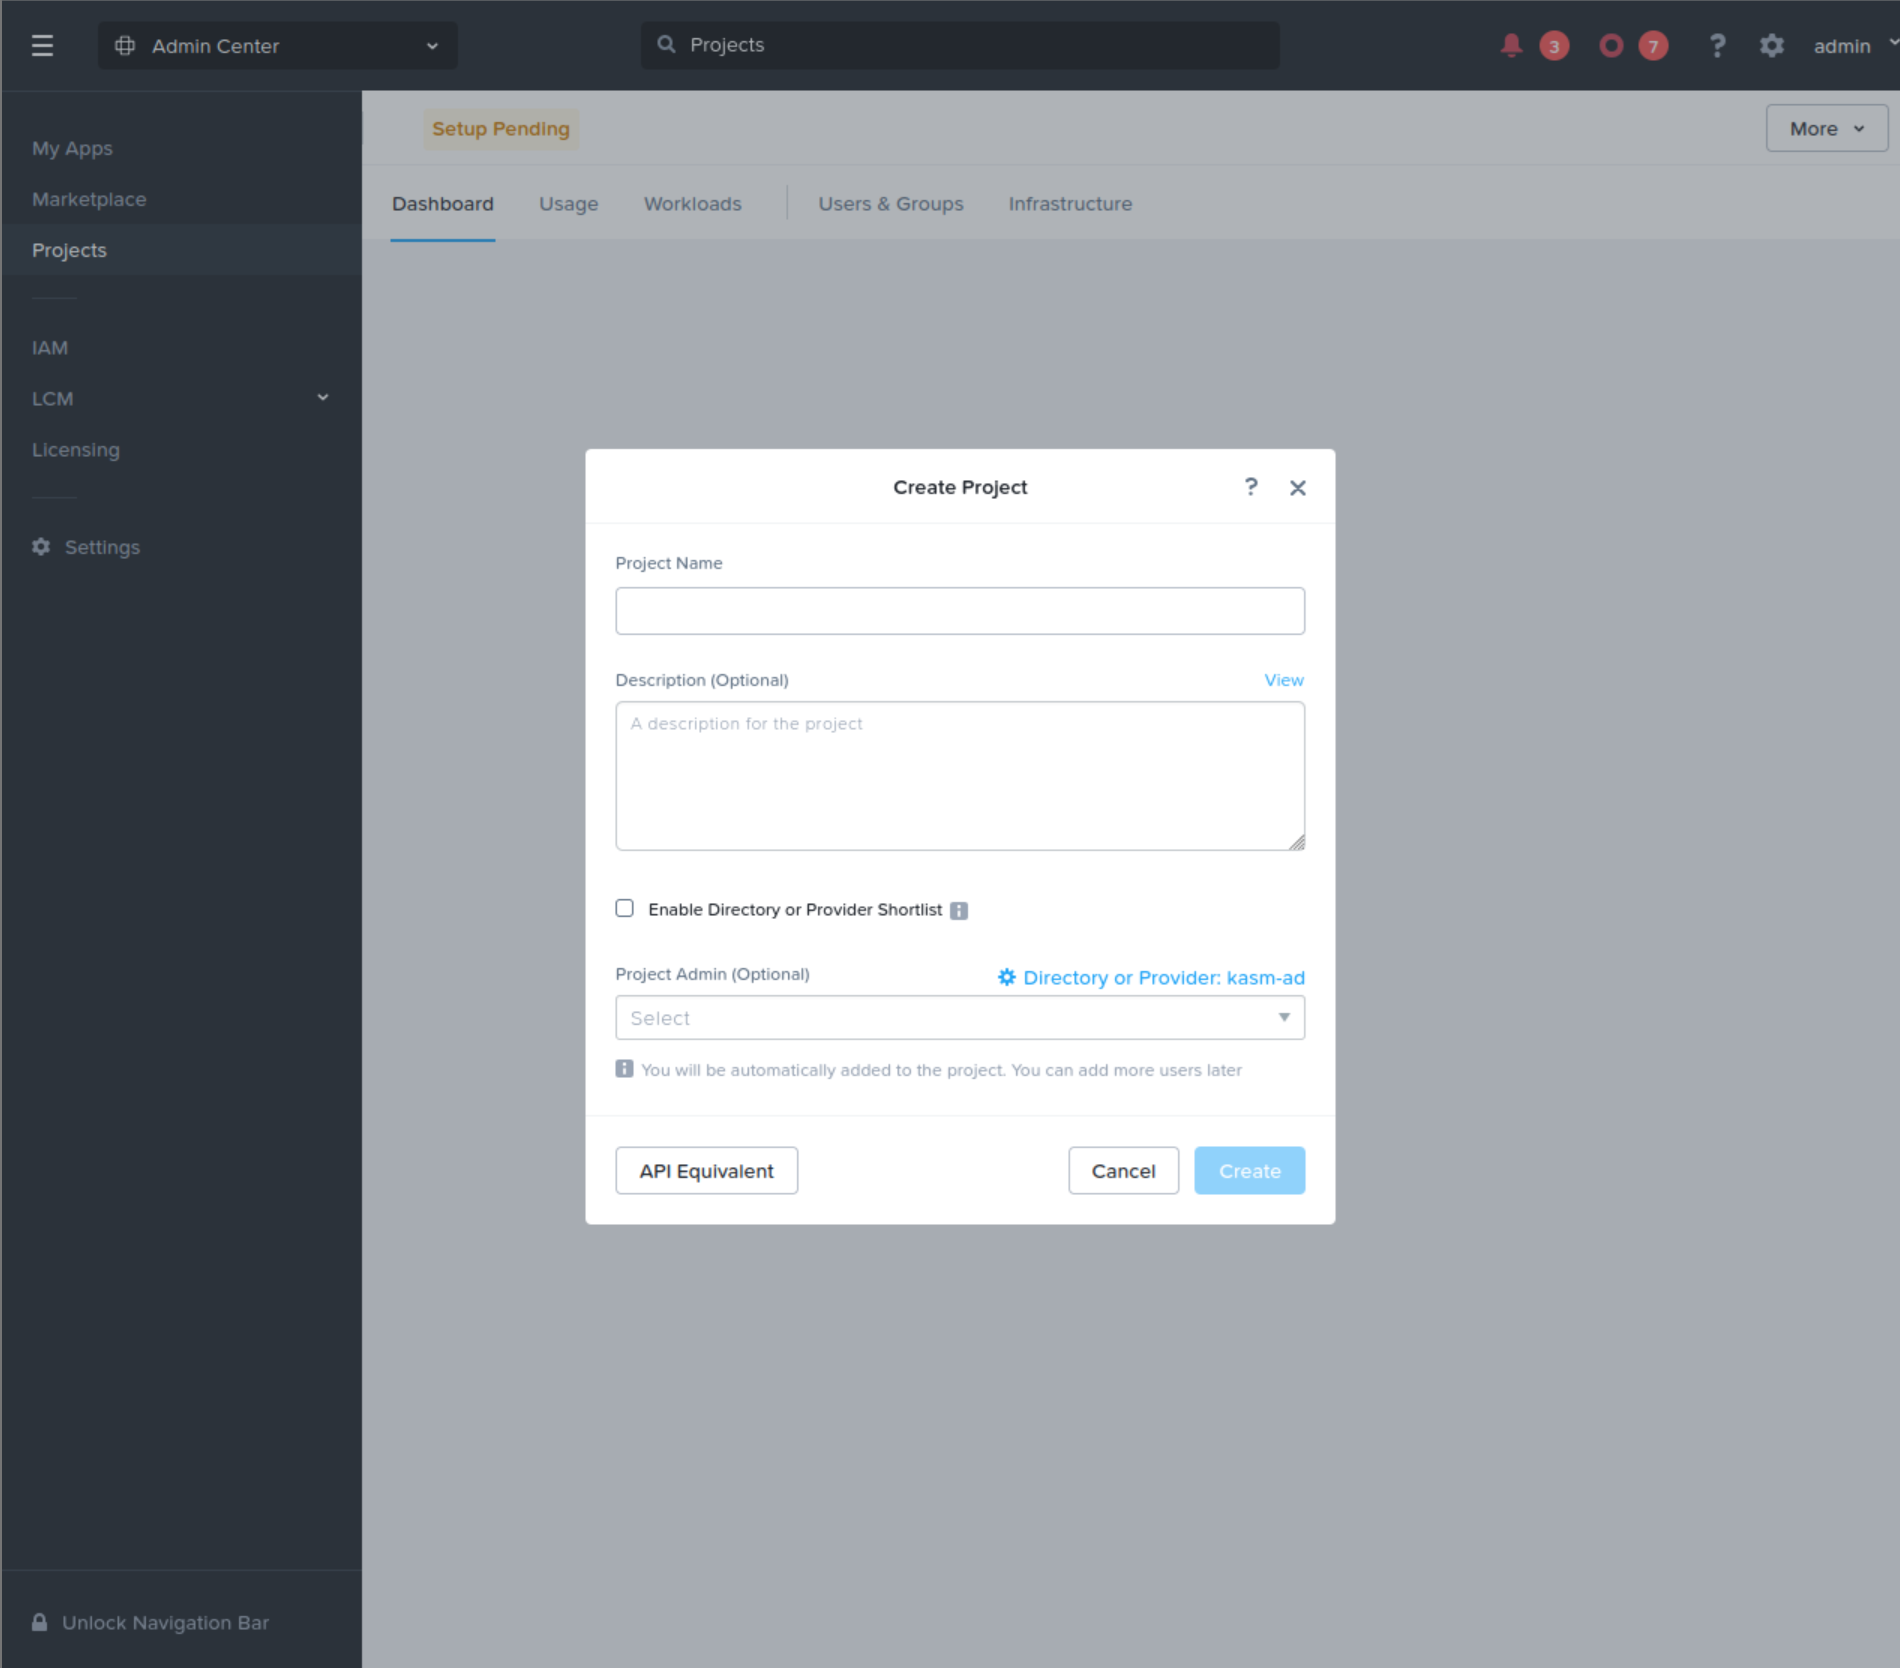
- Select Projects > Create Project.
- Enter a value for the Project Name field, for example
kasm-autoscale.
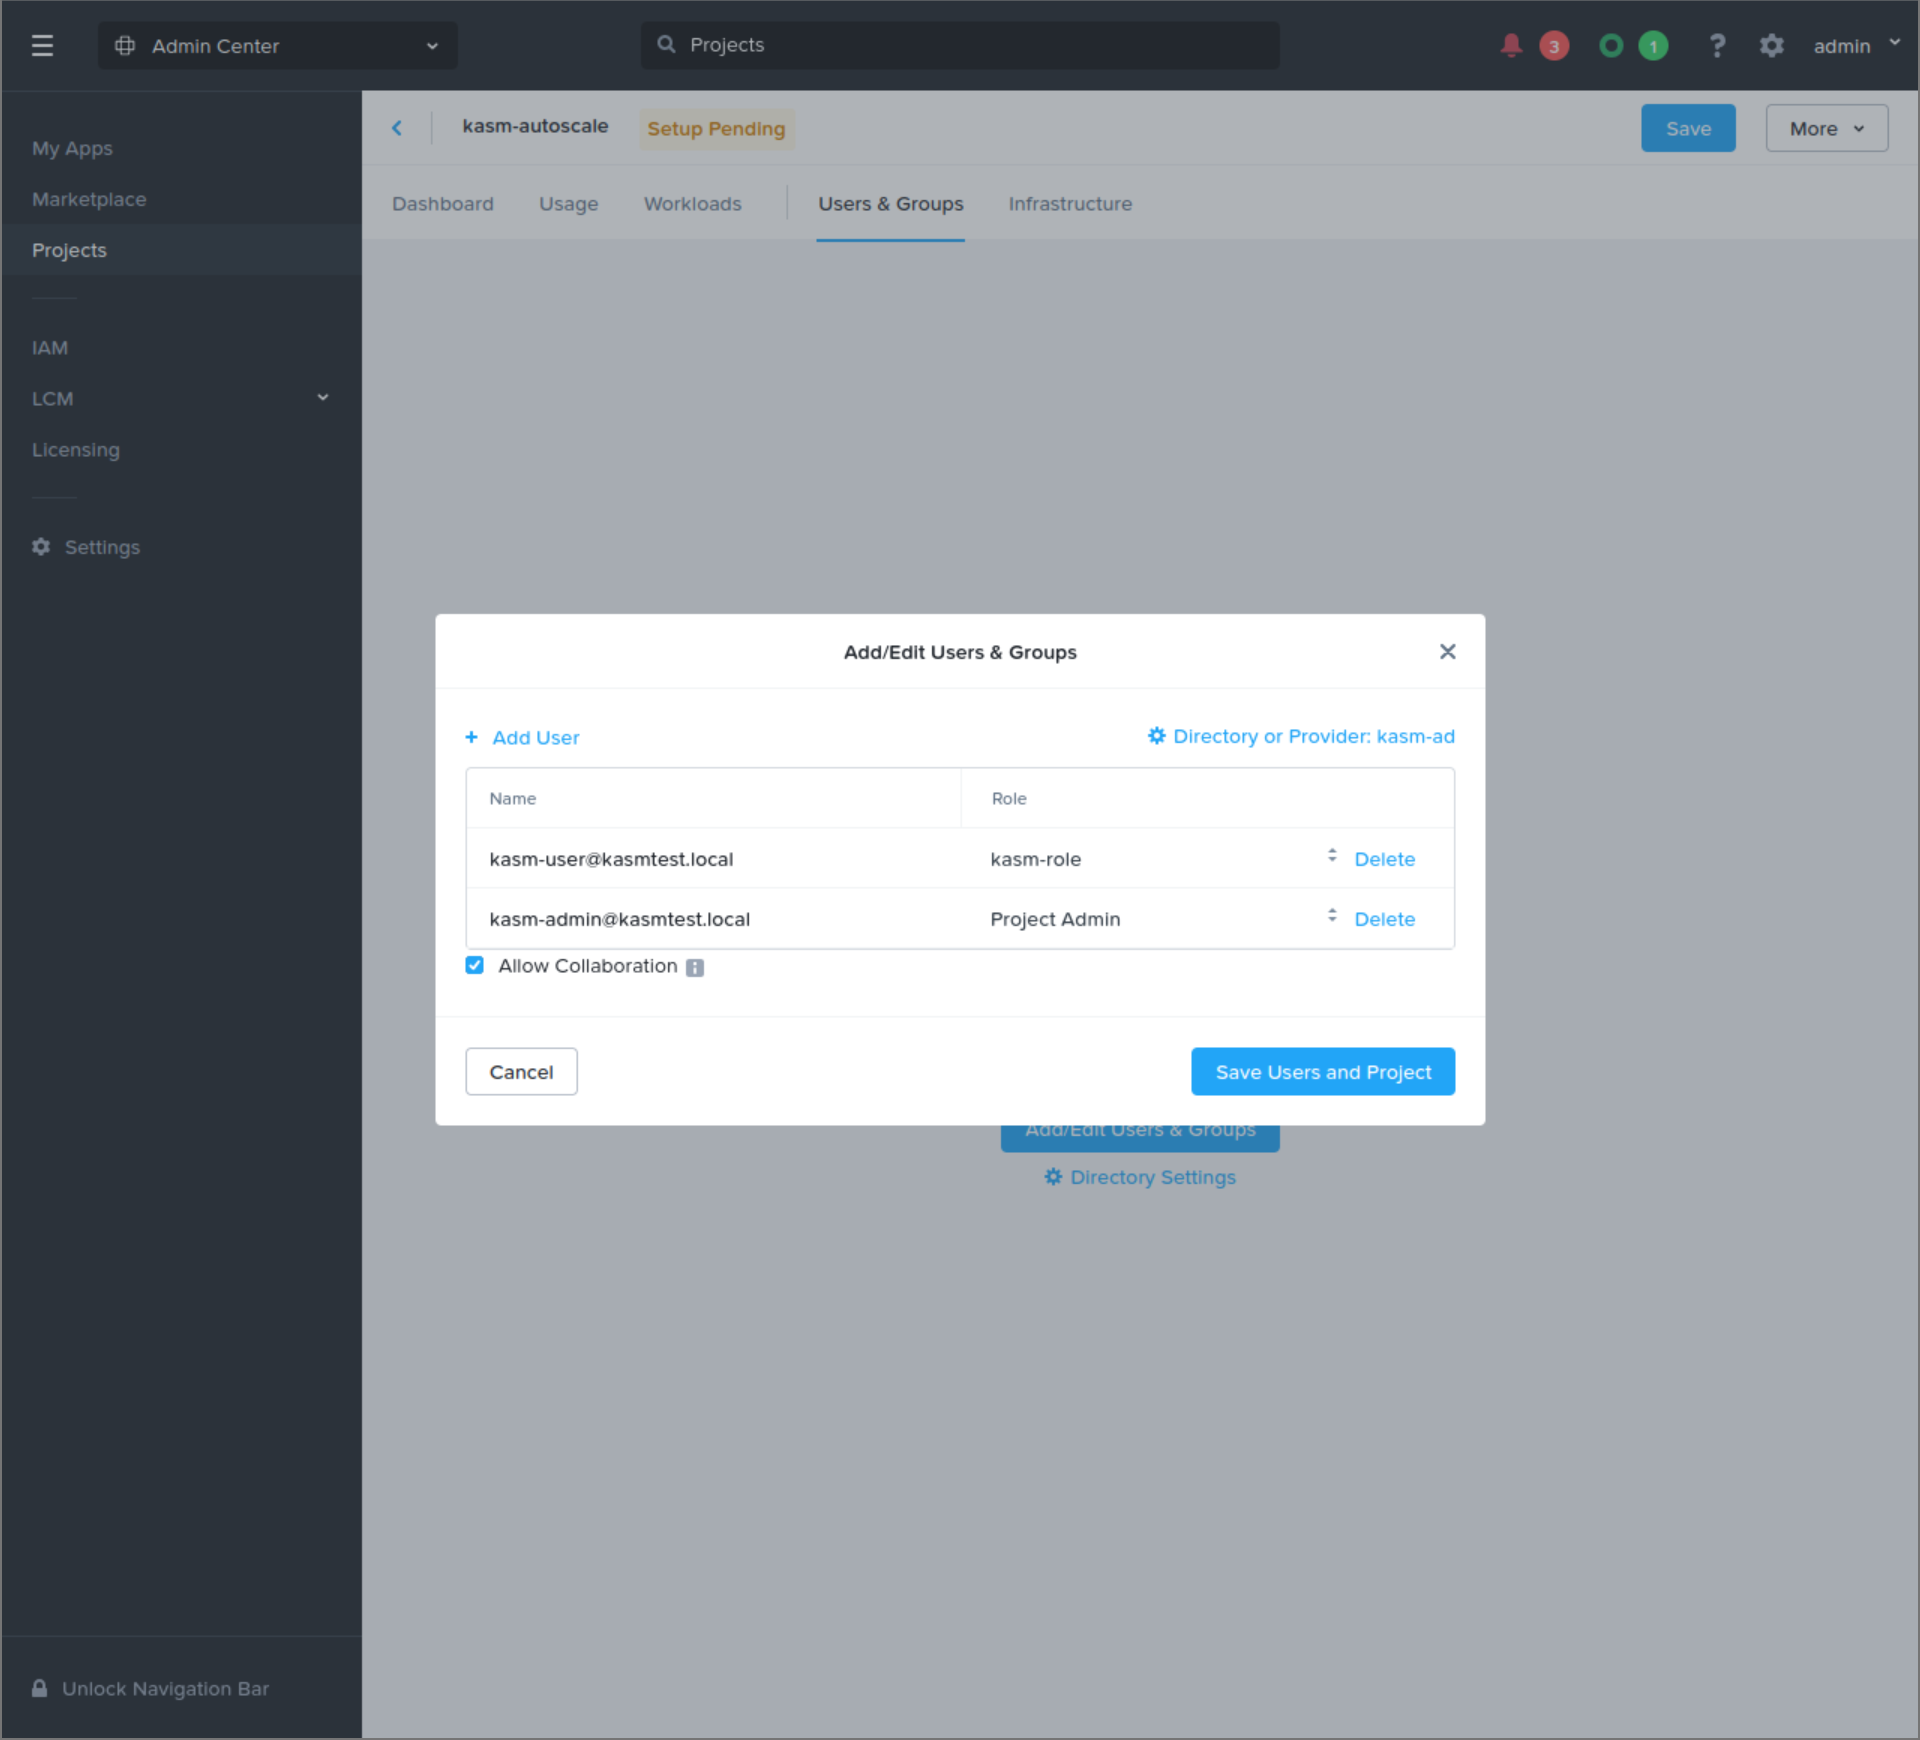
- Select Add Users > Add/Edit Users & Groups.
- Select Add User.
- Enter the name of a valid user in the Name field. This user administers the project, builds virtual machine templates, and uploads images.
- From the Role drop-down menu, select the default Project Admin role.
- Select Add User.
- Enter the name of a valid user in the Name field. Kasm uses this user in the provider configuration to authenticate against the Nutanix APIs.
- From the Role drop-down menu, select the role you created above, for example
kasm-role. - Ensure Allow Collaboration is enabled.
- Select Save Users and Project.
- Select Add Infrastructure > Add Infrastructure.
- From the drop-down menu, select the Infrastructure Endpoint that will provision Kasm AutoScale resources.
- Select Configure Resources.
- From the drop-down menu, select the Cluster.
- Select Select VLANs.
- Select the checkbox next to the VLAN that will provide network access for Kasm AutoScale resources.
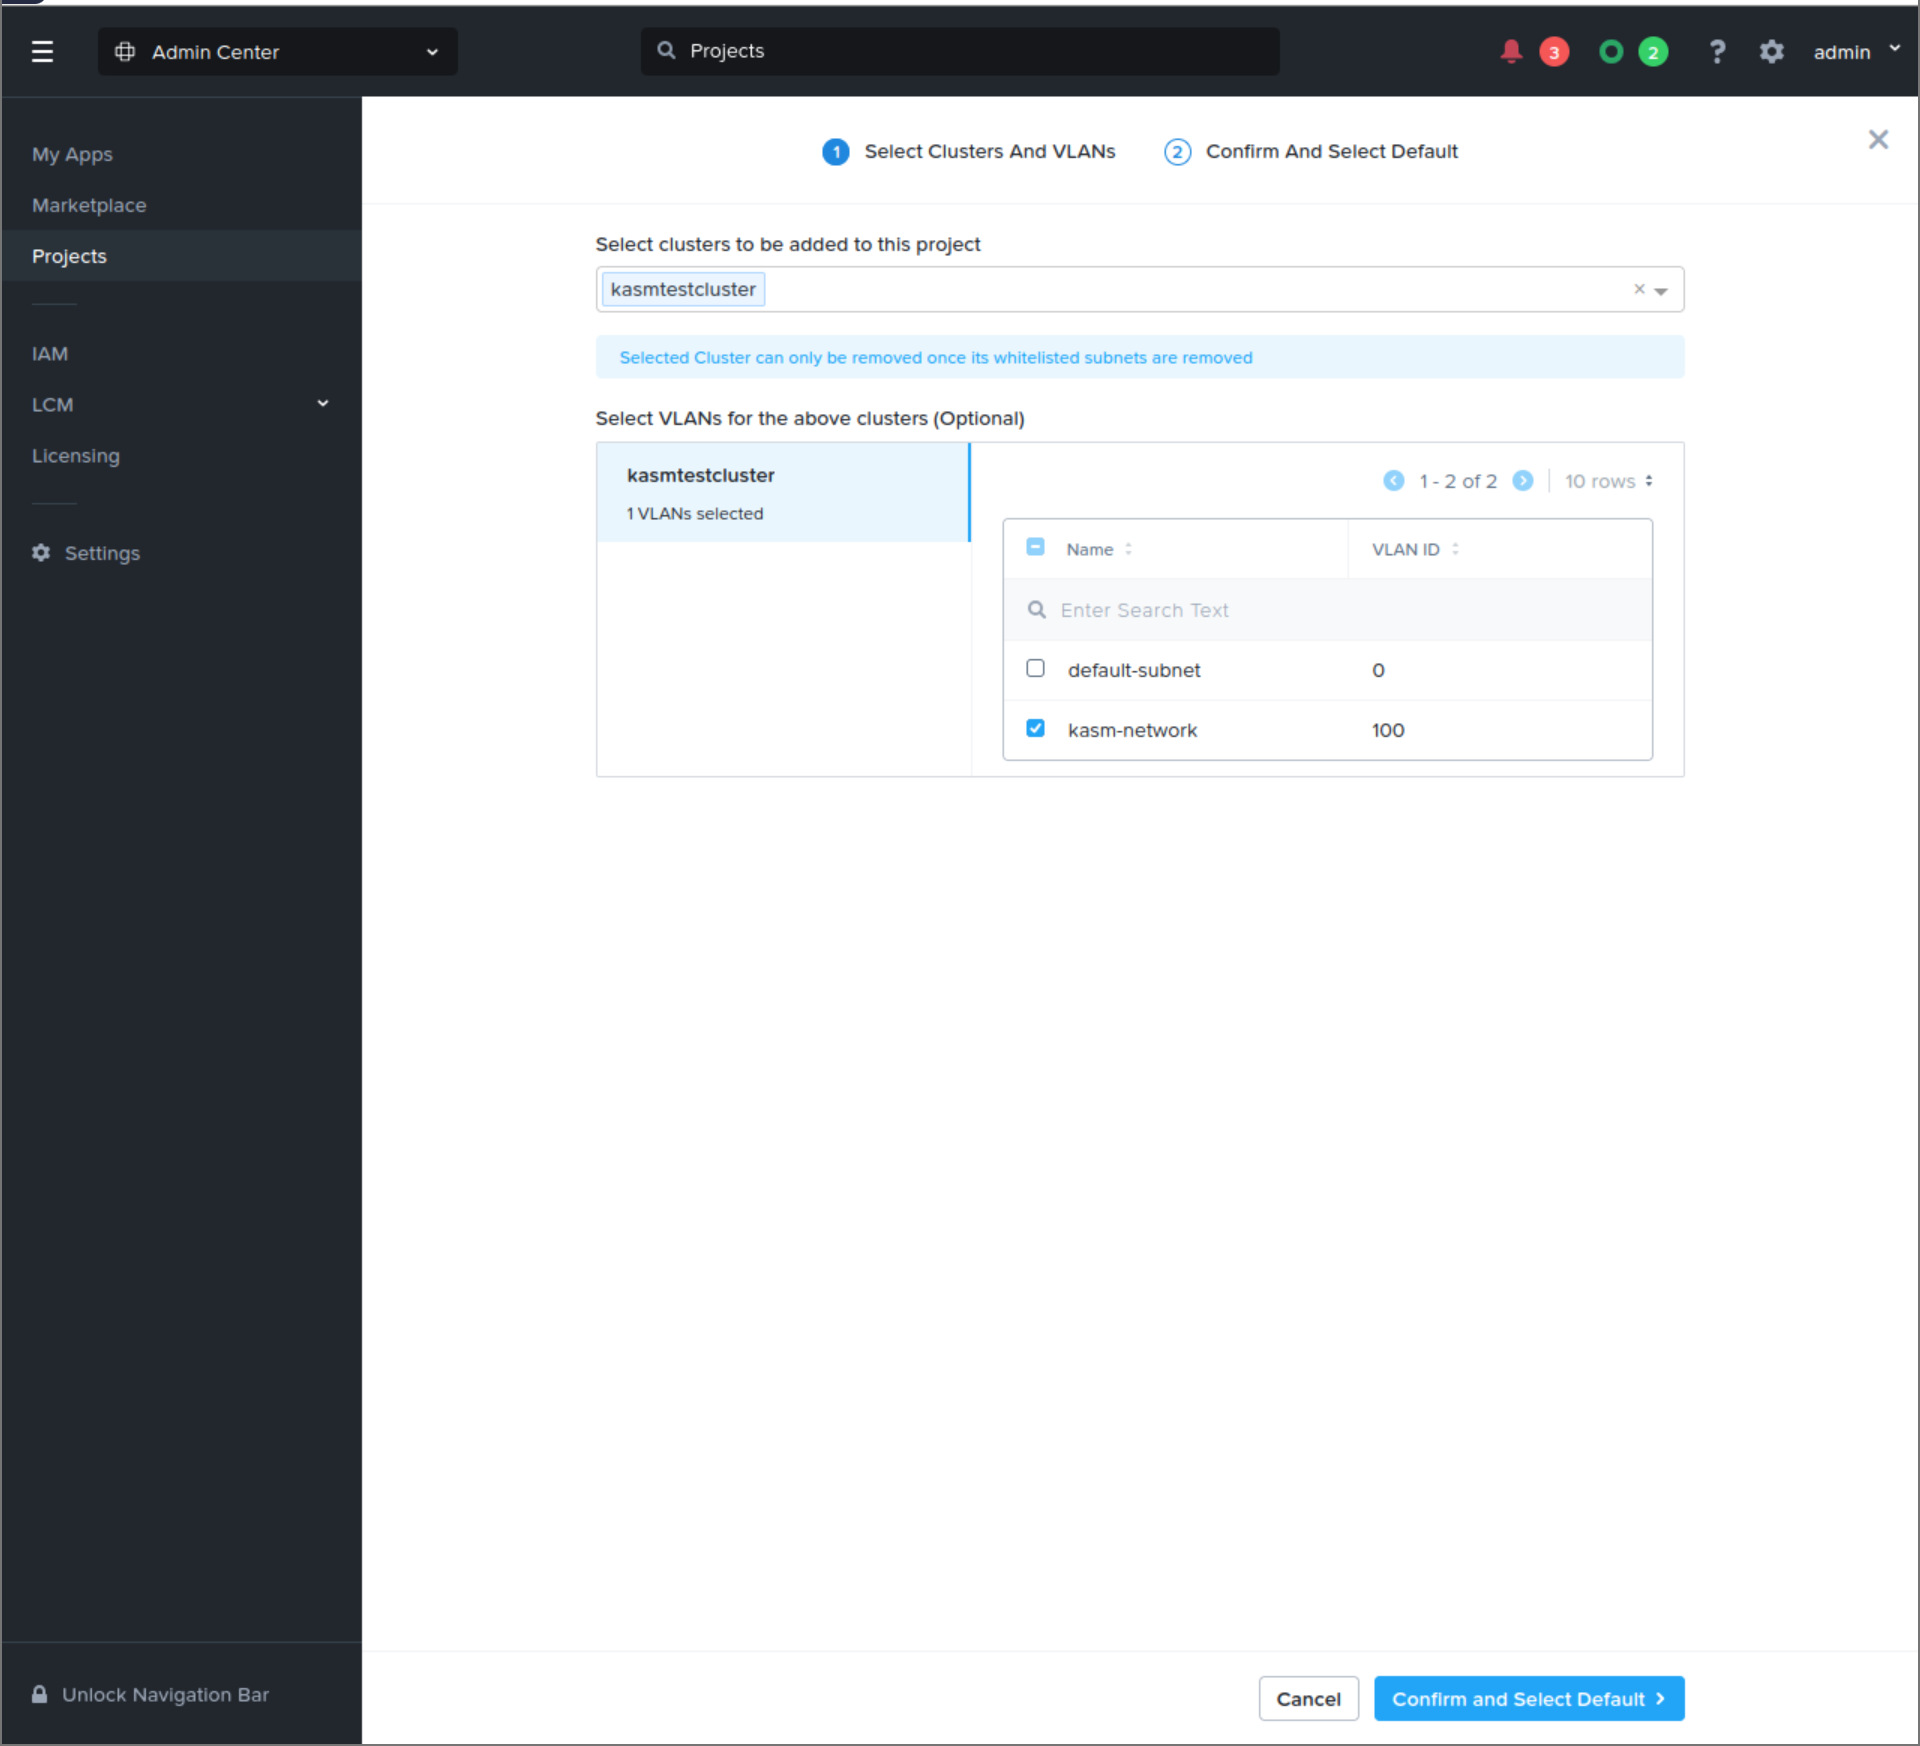
- Select Confirm and Select Default.
- Select Confirm.
- Select Save.
Build a virtual machine template for the agents
AutoScale clones a prepared template each time it provisions an agent. Build an Ubuntu template, a Windows template, or both, depending on the workspaces you intend to run.
Create an Ubuntu 24.04 LTS template
First, upload the Ubuntu installation image to Prism Central.
- Log into your Nutanix Prism Central UI as an administrator.
- Navigate to the Infrastructure Center dashboard.
- Select Images > Add Image.
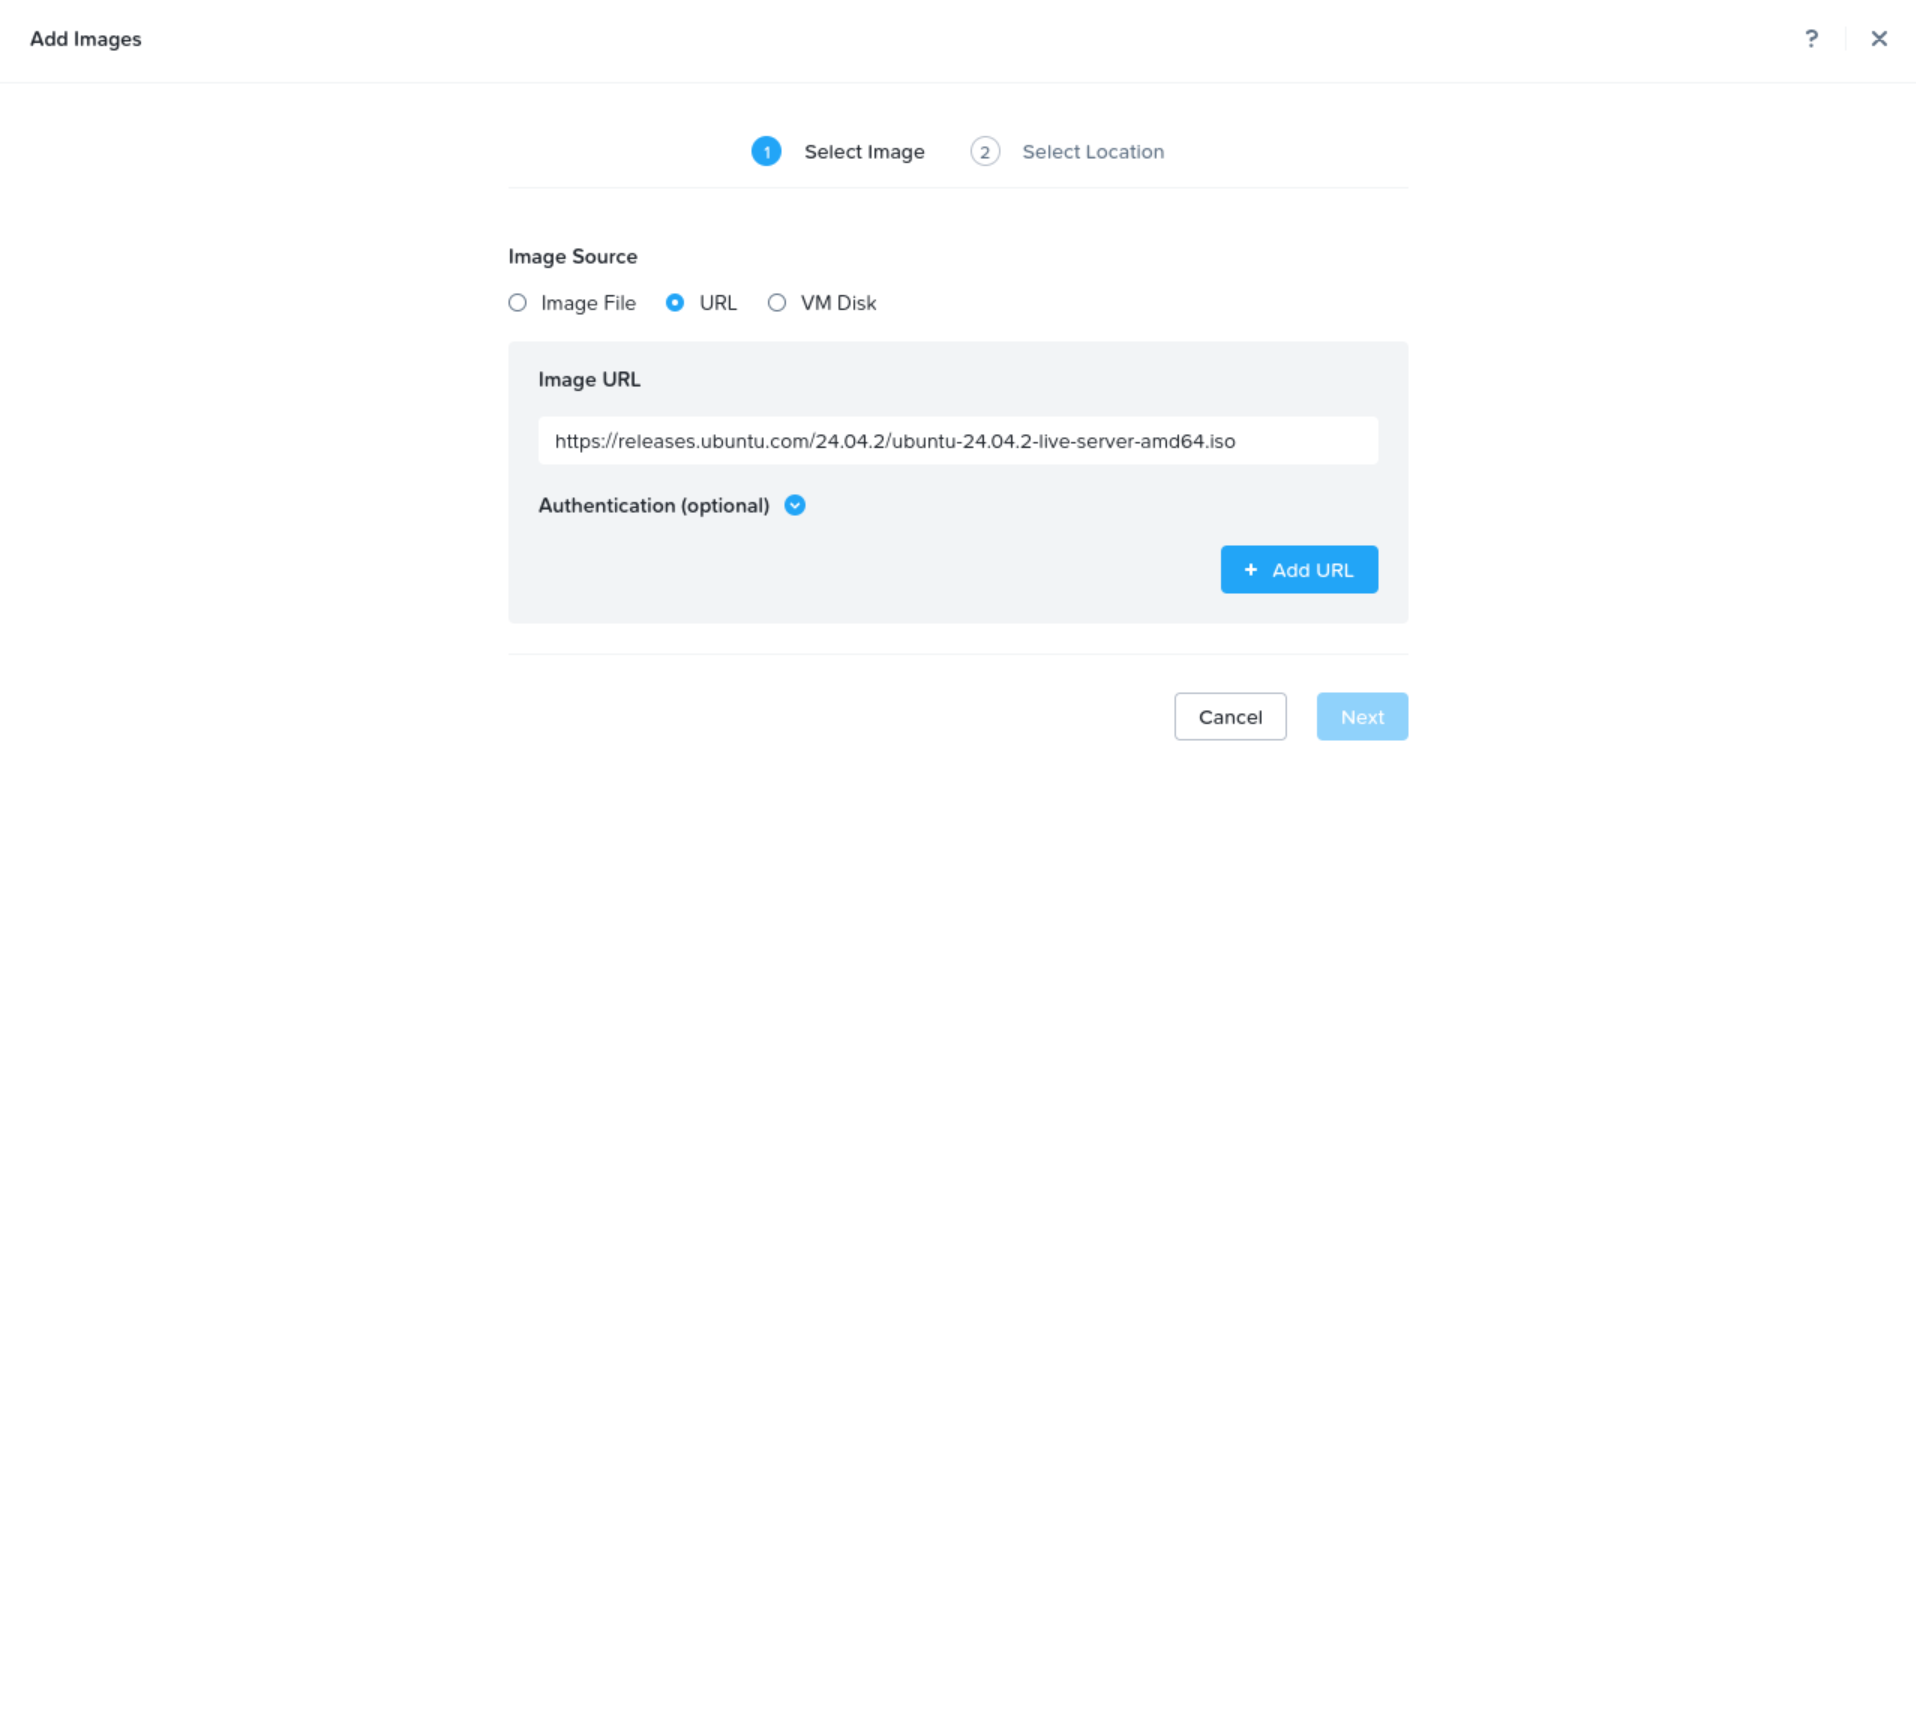
- From the Image Source options list, select the URL option.
- Enter the URL for a valid Ubuntu 24.04 LTS ISO in the Image URL field, for example the Ubuntu 24.04.2 live server image.
- Select Add URL.
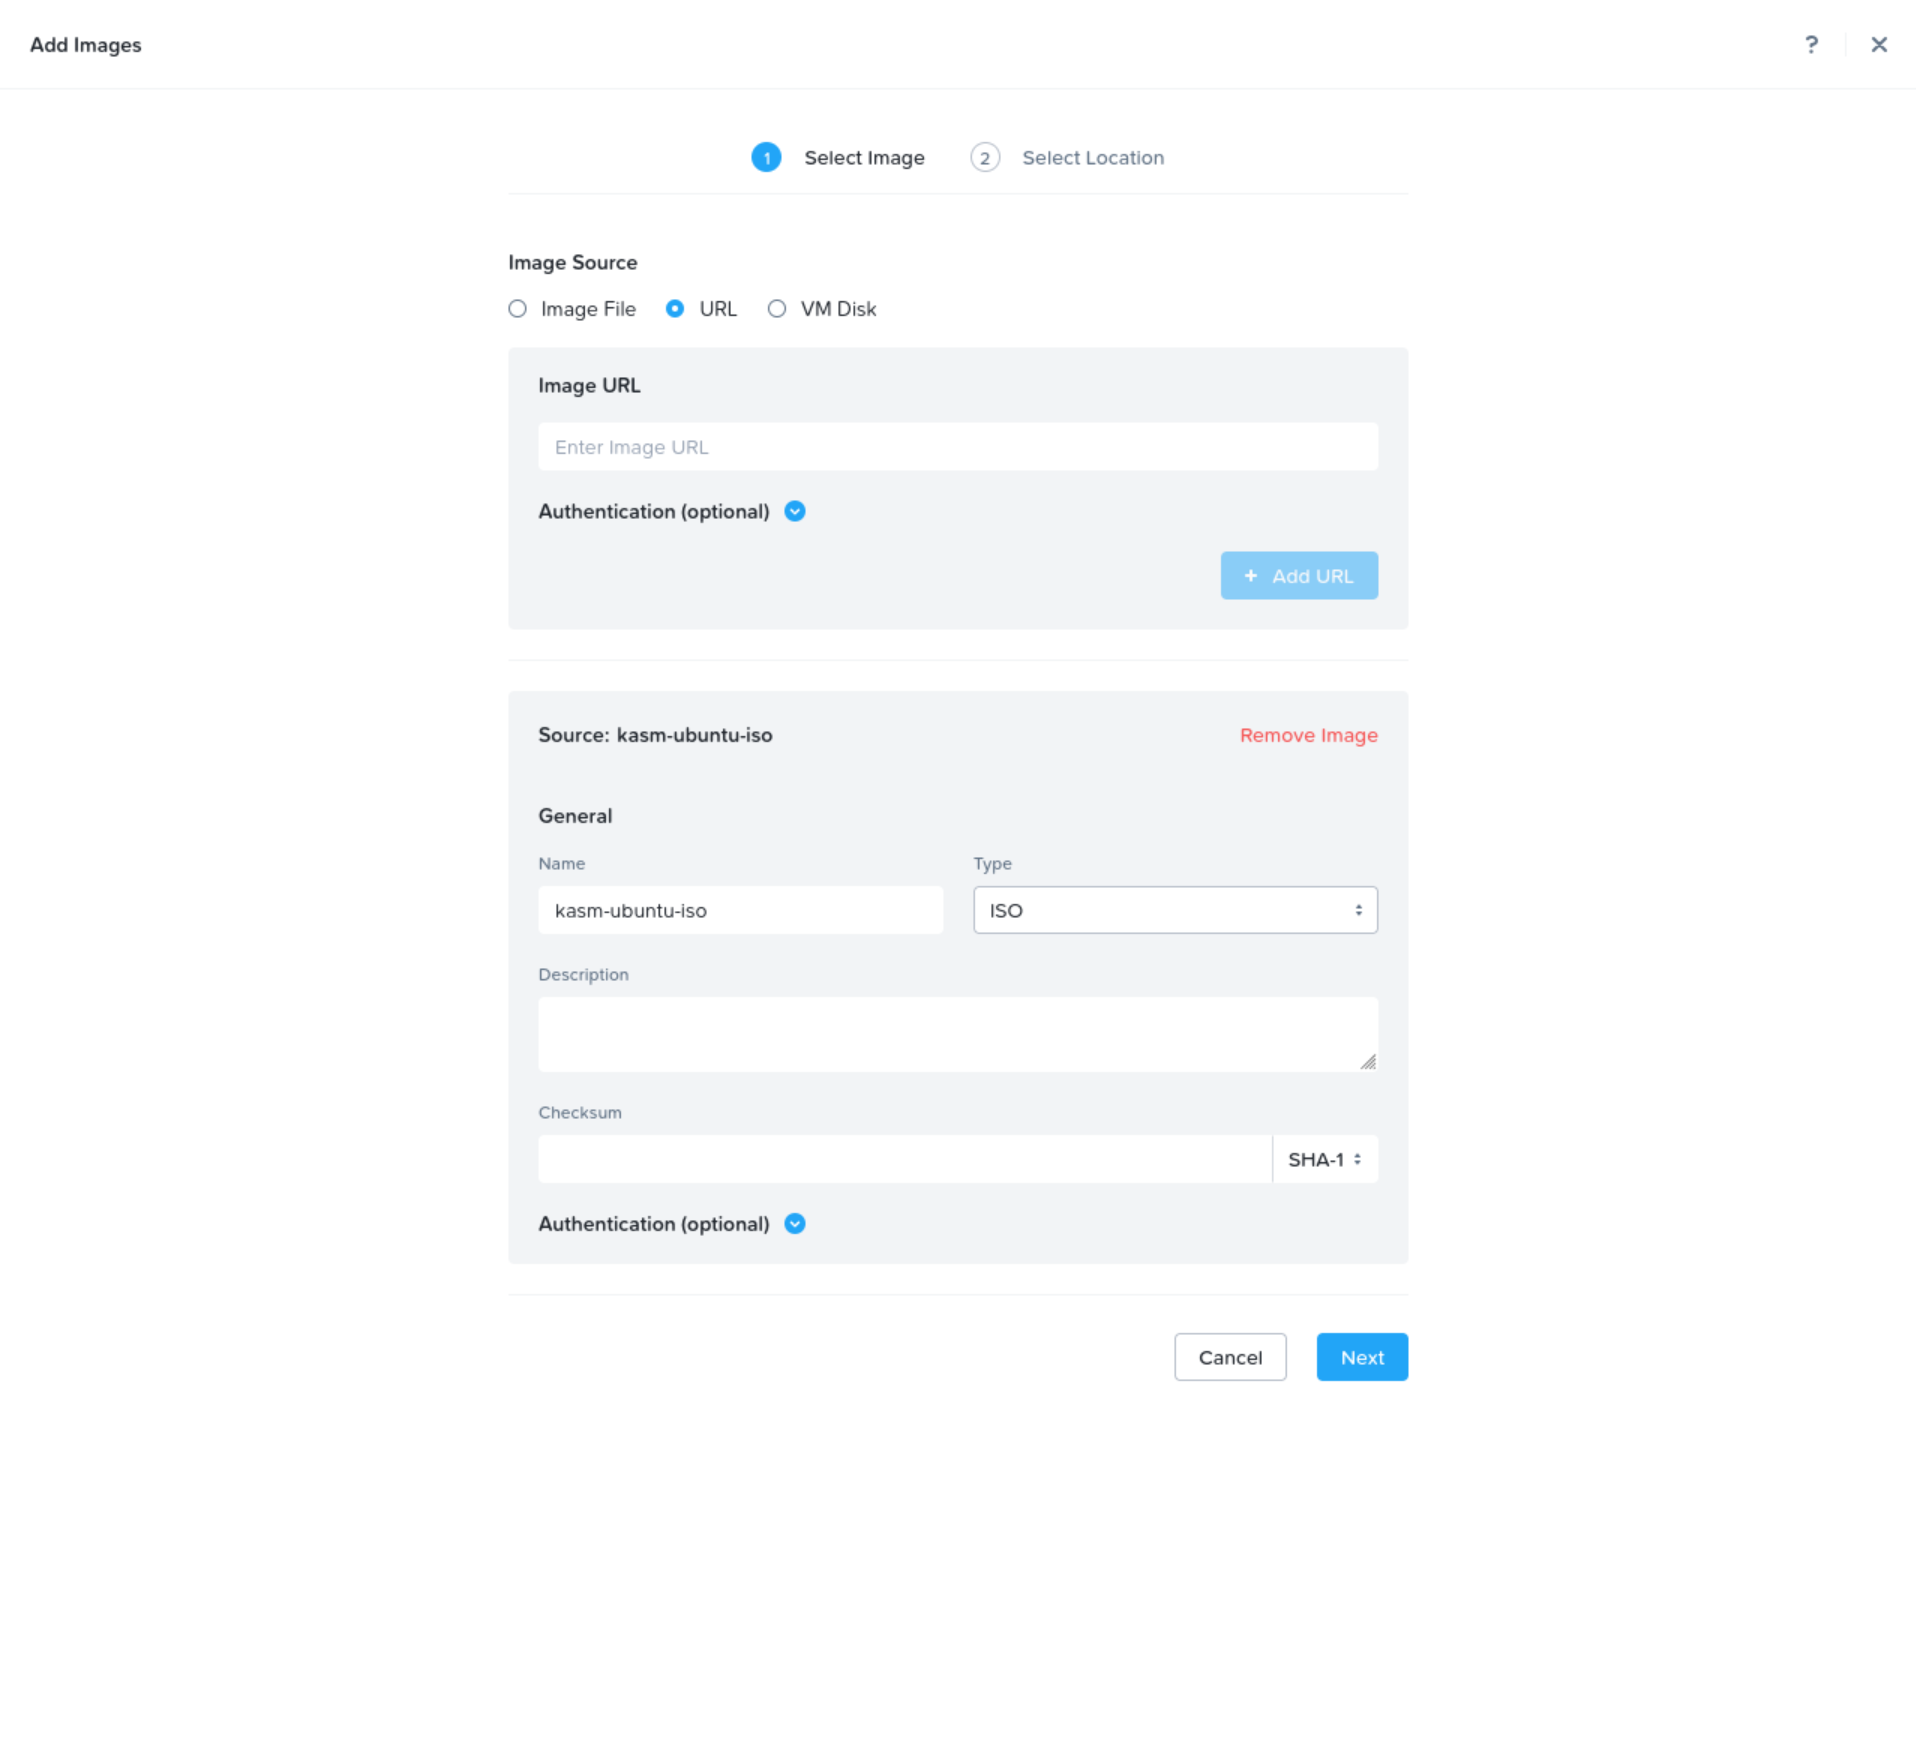
- Enter the name for the ISO in the Name field, for example
kasm-ubuntu-iso. - Ensure that ISO is selected from the Type drop-down menu.
- Select Next.
- Select Save.
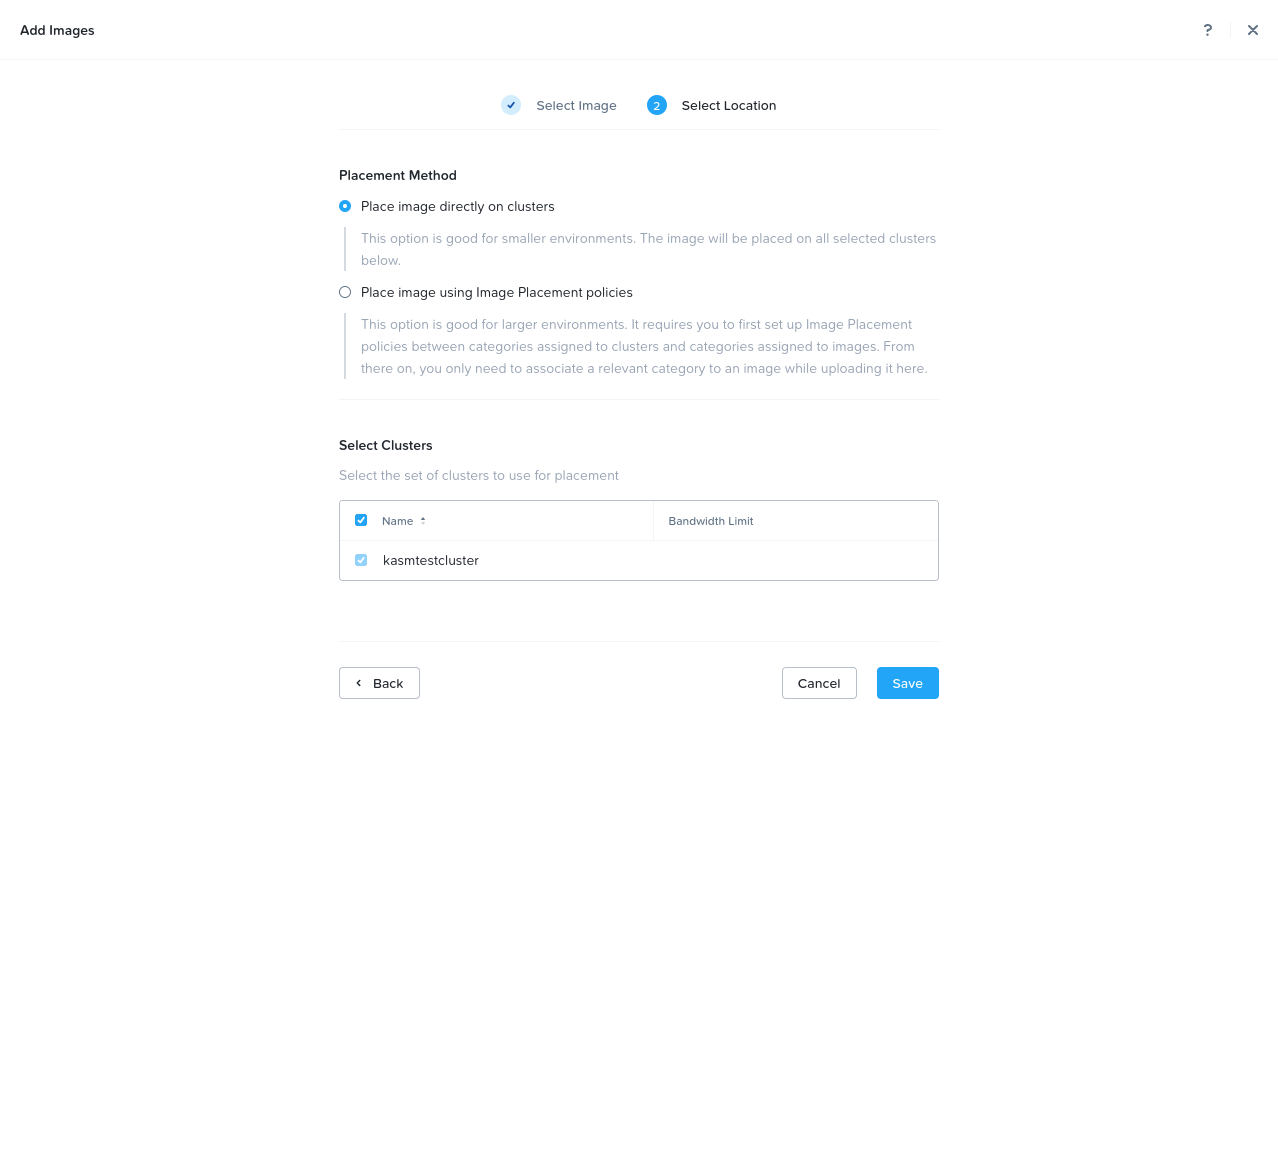
- Wait for the upload to complete.
Next, build the virtual machine that becomes the template.
- Log into your Nutanix Prism Central UI as an administrator.
- Navigate to the Infrastructure Center dashboard.
- Select VMs > Create VM.
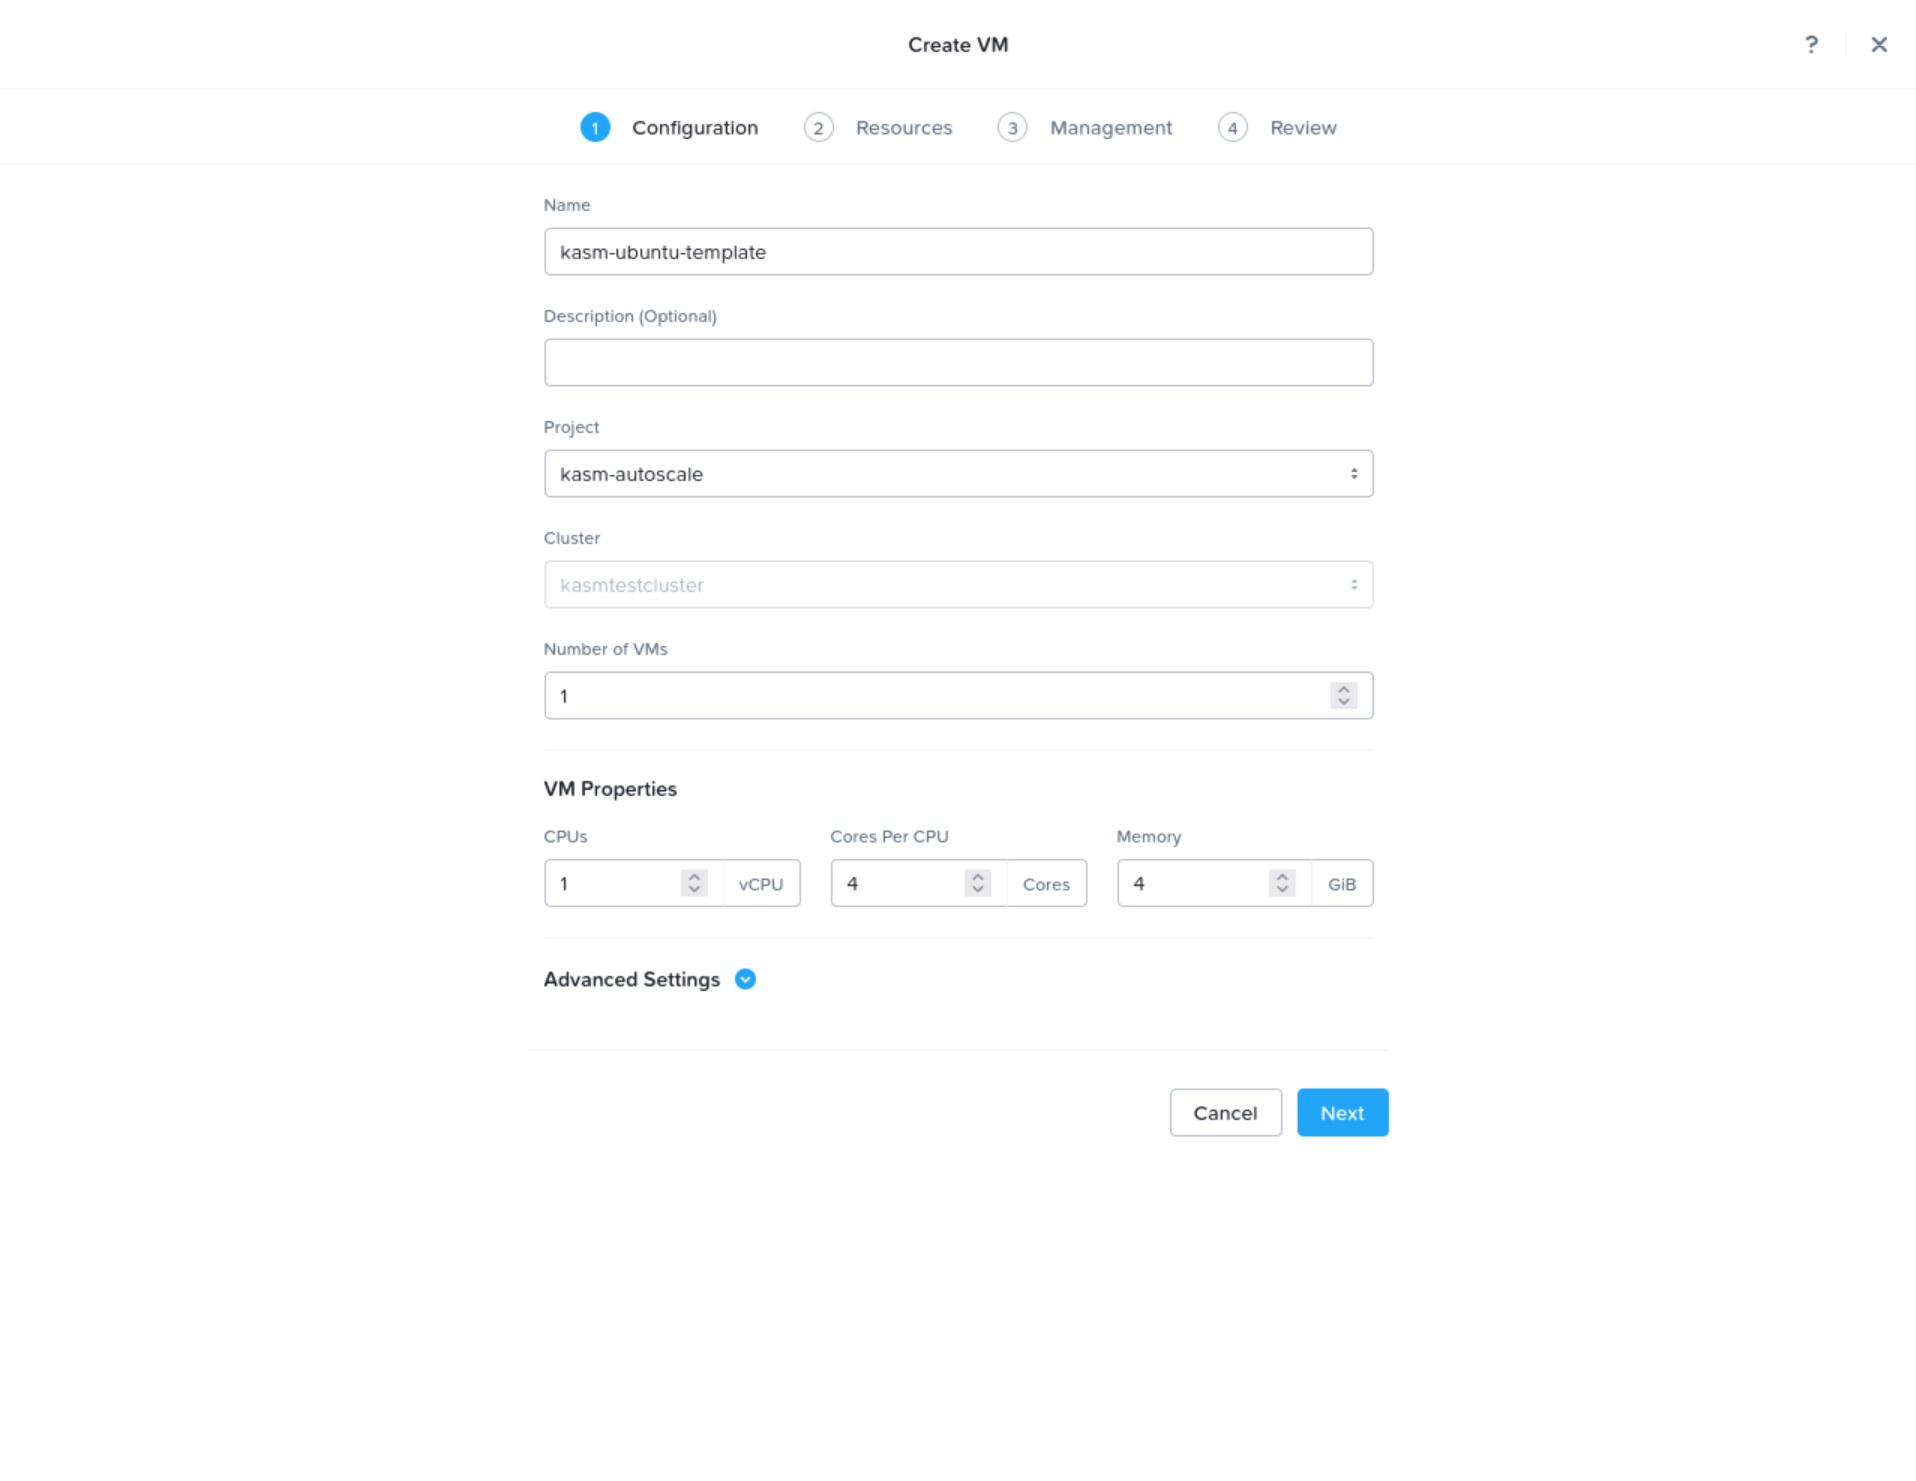
- Enter a value for the Name field, for example
kasm-ubuntu-template. - From the Project drop-down menu, select the Nutanix project you created, for example
kasm-autoscale. - From the Cluster drop-down menu, select the Nutanix cluster that will provision Kasm AutoScale resources.
- In the Cores Per CPU section, enter the number of cores to provision for this VM, for example
4. - In the Memory section, enter the amount of memory to provision for this VM, for example
4.
- Select Next.
- Select Attach Disk.
- Ensure that Disk is selected from the Type drop-down menu.
- Ensure that Allocate from Storage Container is selected from the Operation drop-down menu.
- From the Storage Container drop-down menu, select the Nutanix storage container to use when provisioning this VM.
- In the Capacity section, enter the amount of storage to provision for this VM, for example
150. - Ensure that SCSI is selected from the Bus Type drop-down menu.
- Select Save.
- Select Attach Disk.
- Ensure that CD-ROM is selected from the Type drop-down menu.
- Ensure that Clone from Image is selected from the Operation drop-down menu.
- From the Image drop-down, select the Ubuntu installation image you uploaded previously.
- Ensure that SATA is selected from the Bus Type drop-down menu.
- Select Save.
- Select Attach to Subnet.
- From the subnet drop-down, select the Nutanix subnet to use when provisioning this VM.
- Ensure that Connected is selected from the Network Connection State drop-down menu.
- Select Save.
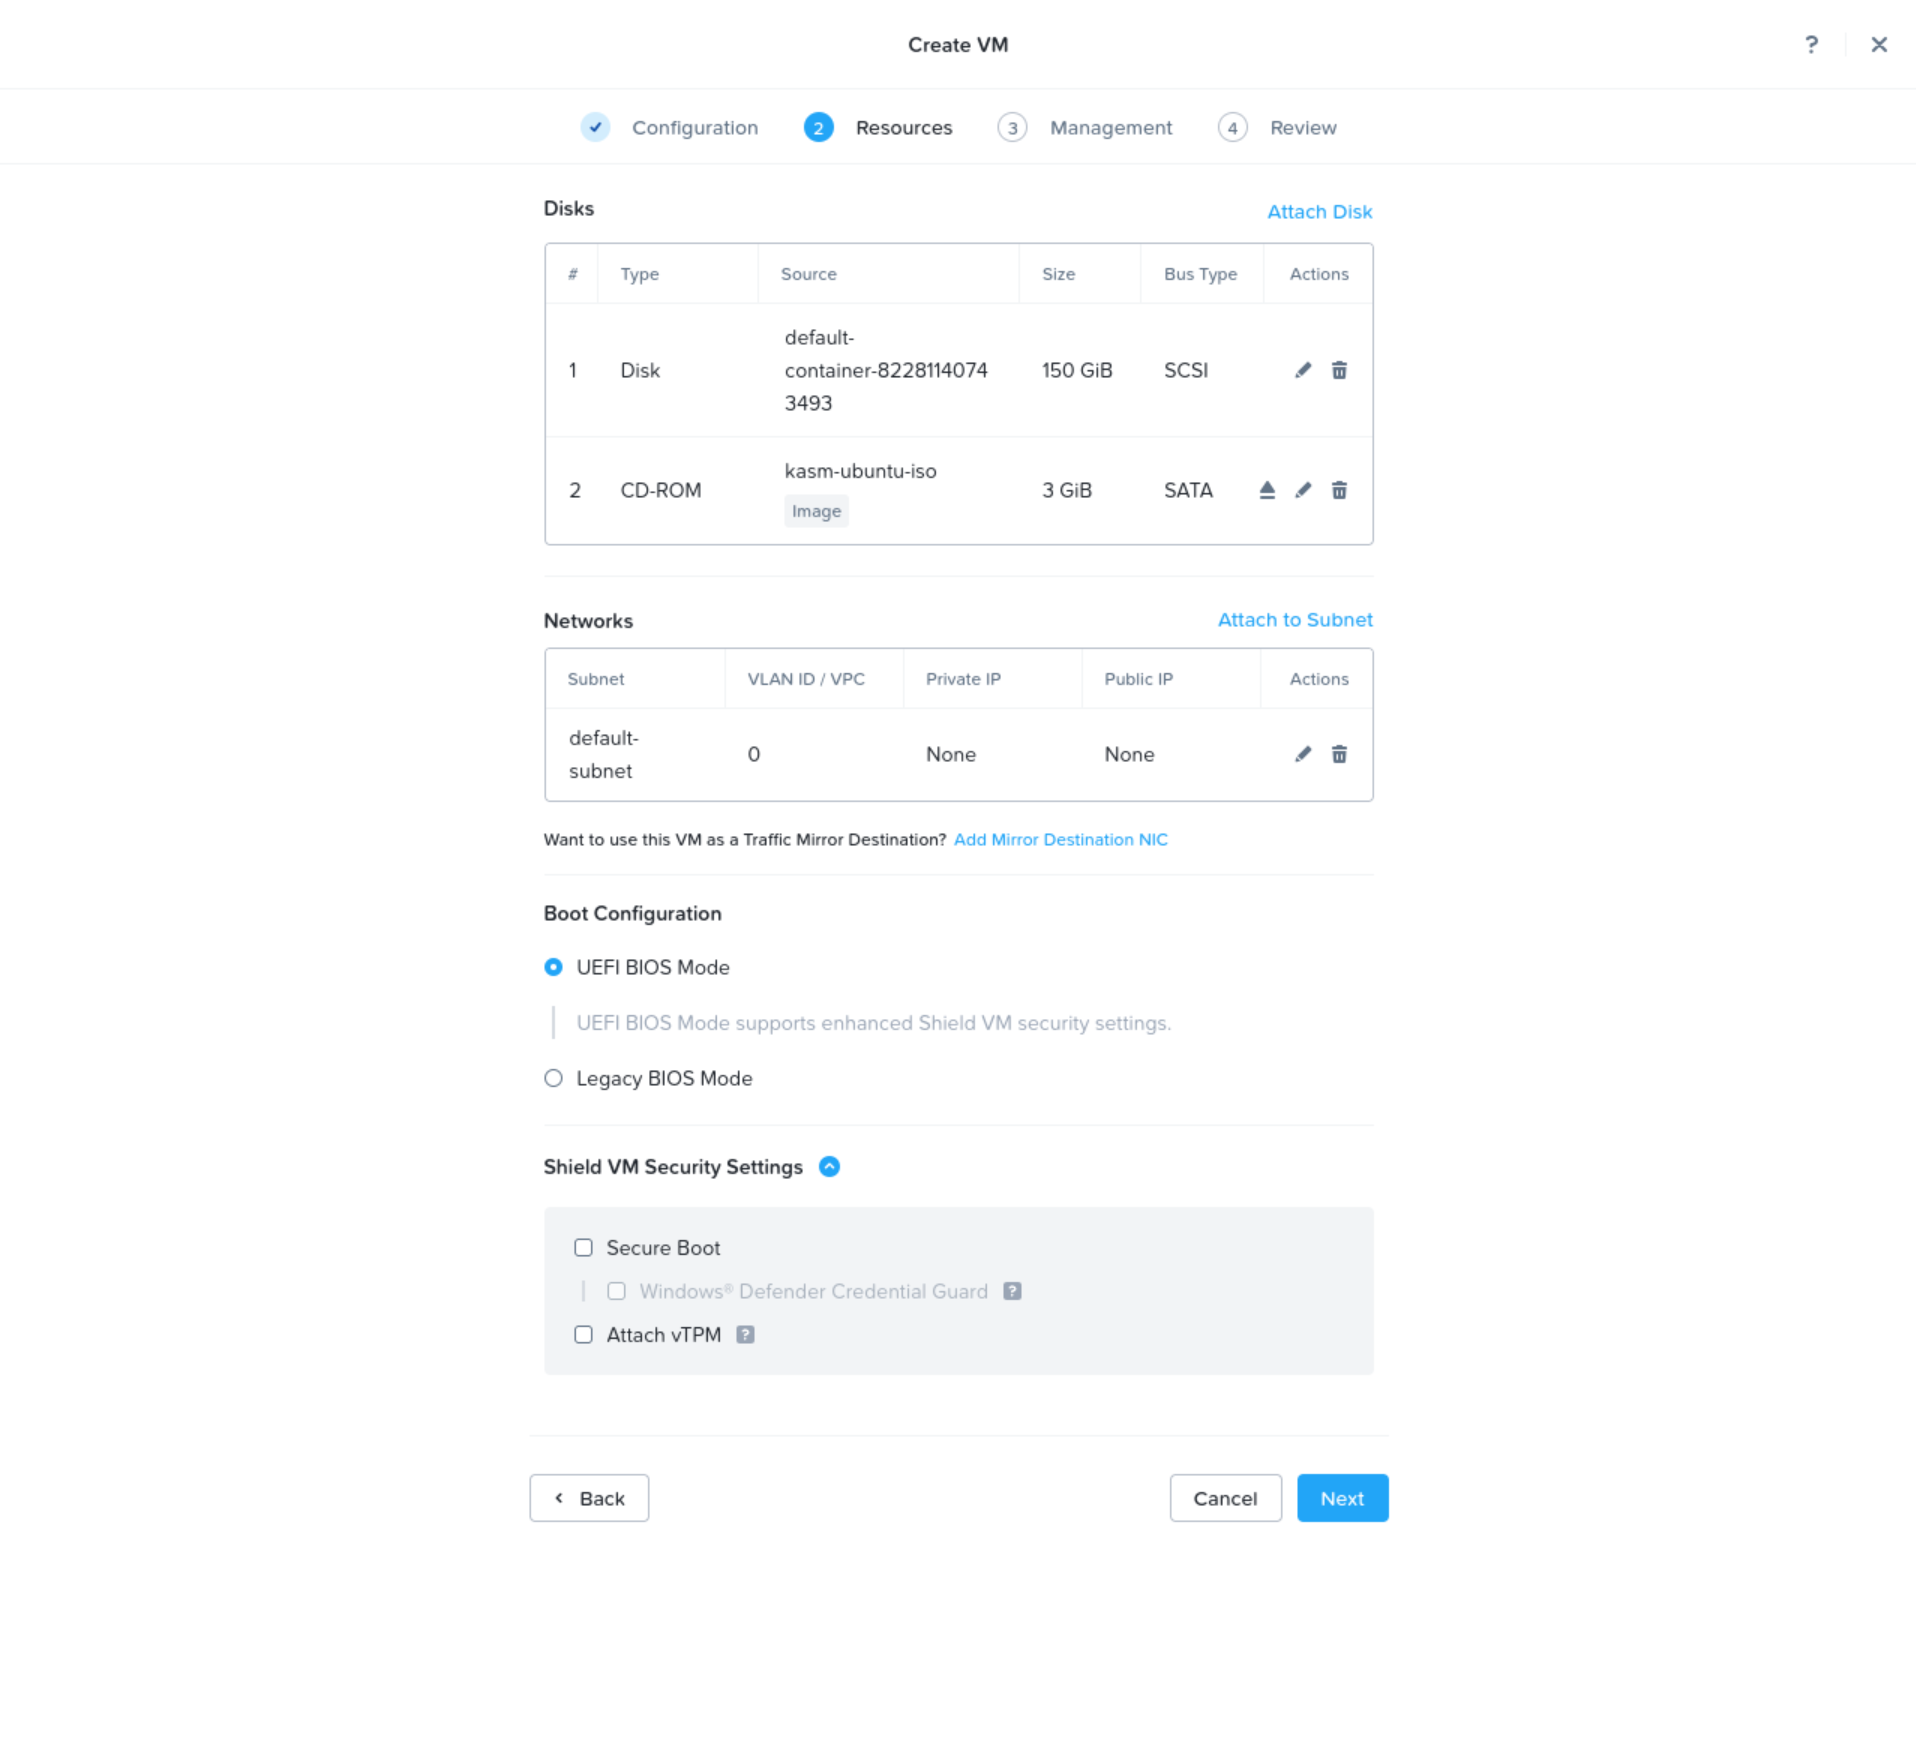
- Select Next.
- Select Next.
- Select Create VM.
- From the list of VMs, right-click the new VM, select Power Operations, and then select Power On.
- Install the operating system.
- From the list of VMs, right-click the new VM and select Update.
- Select Next.
- In the list of Disks, select the delete icon next to the CD-ROM that contains the installation ISO image.
- Select Save.
- Connect to the new VM over SSH with the credentials created during operating system installation.
- Run the following cleanup commands to prepare this VM as a reusable template:
sudo truncate -s 0 /etc/machine-id
sudo truncate -s 0 /var/lib/dbus/machine-id
sudo cloud-init clean --logs
- Shut down the VM:
sudo shutdown -P now
Create a Windows Server 2025 template
First, upload the Windows installation image to Prism Central.
- Log into your Nutanix Prism Central UI as an administrator.
- Navigate to the Infrastructure Center dashboard.
- Select Images > Add Image.
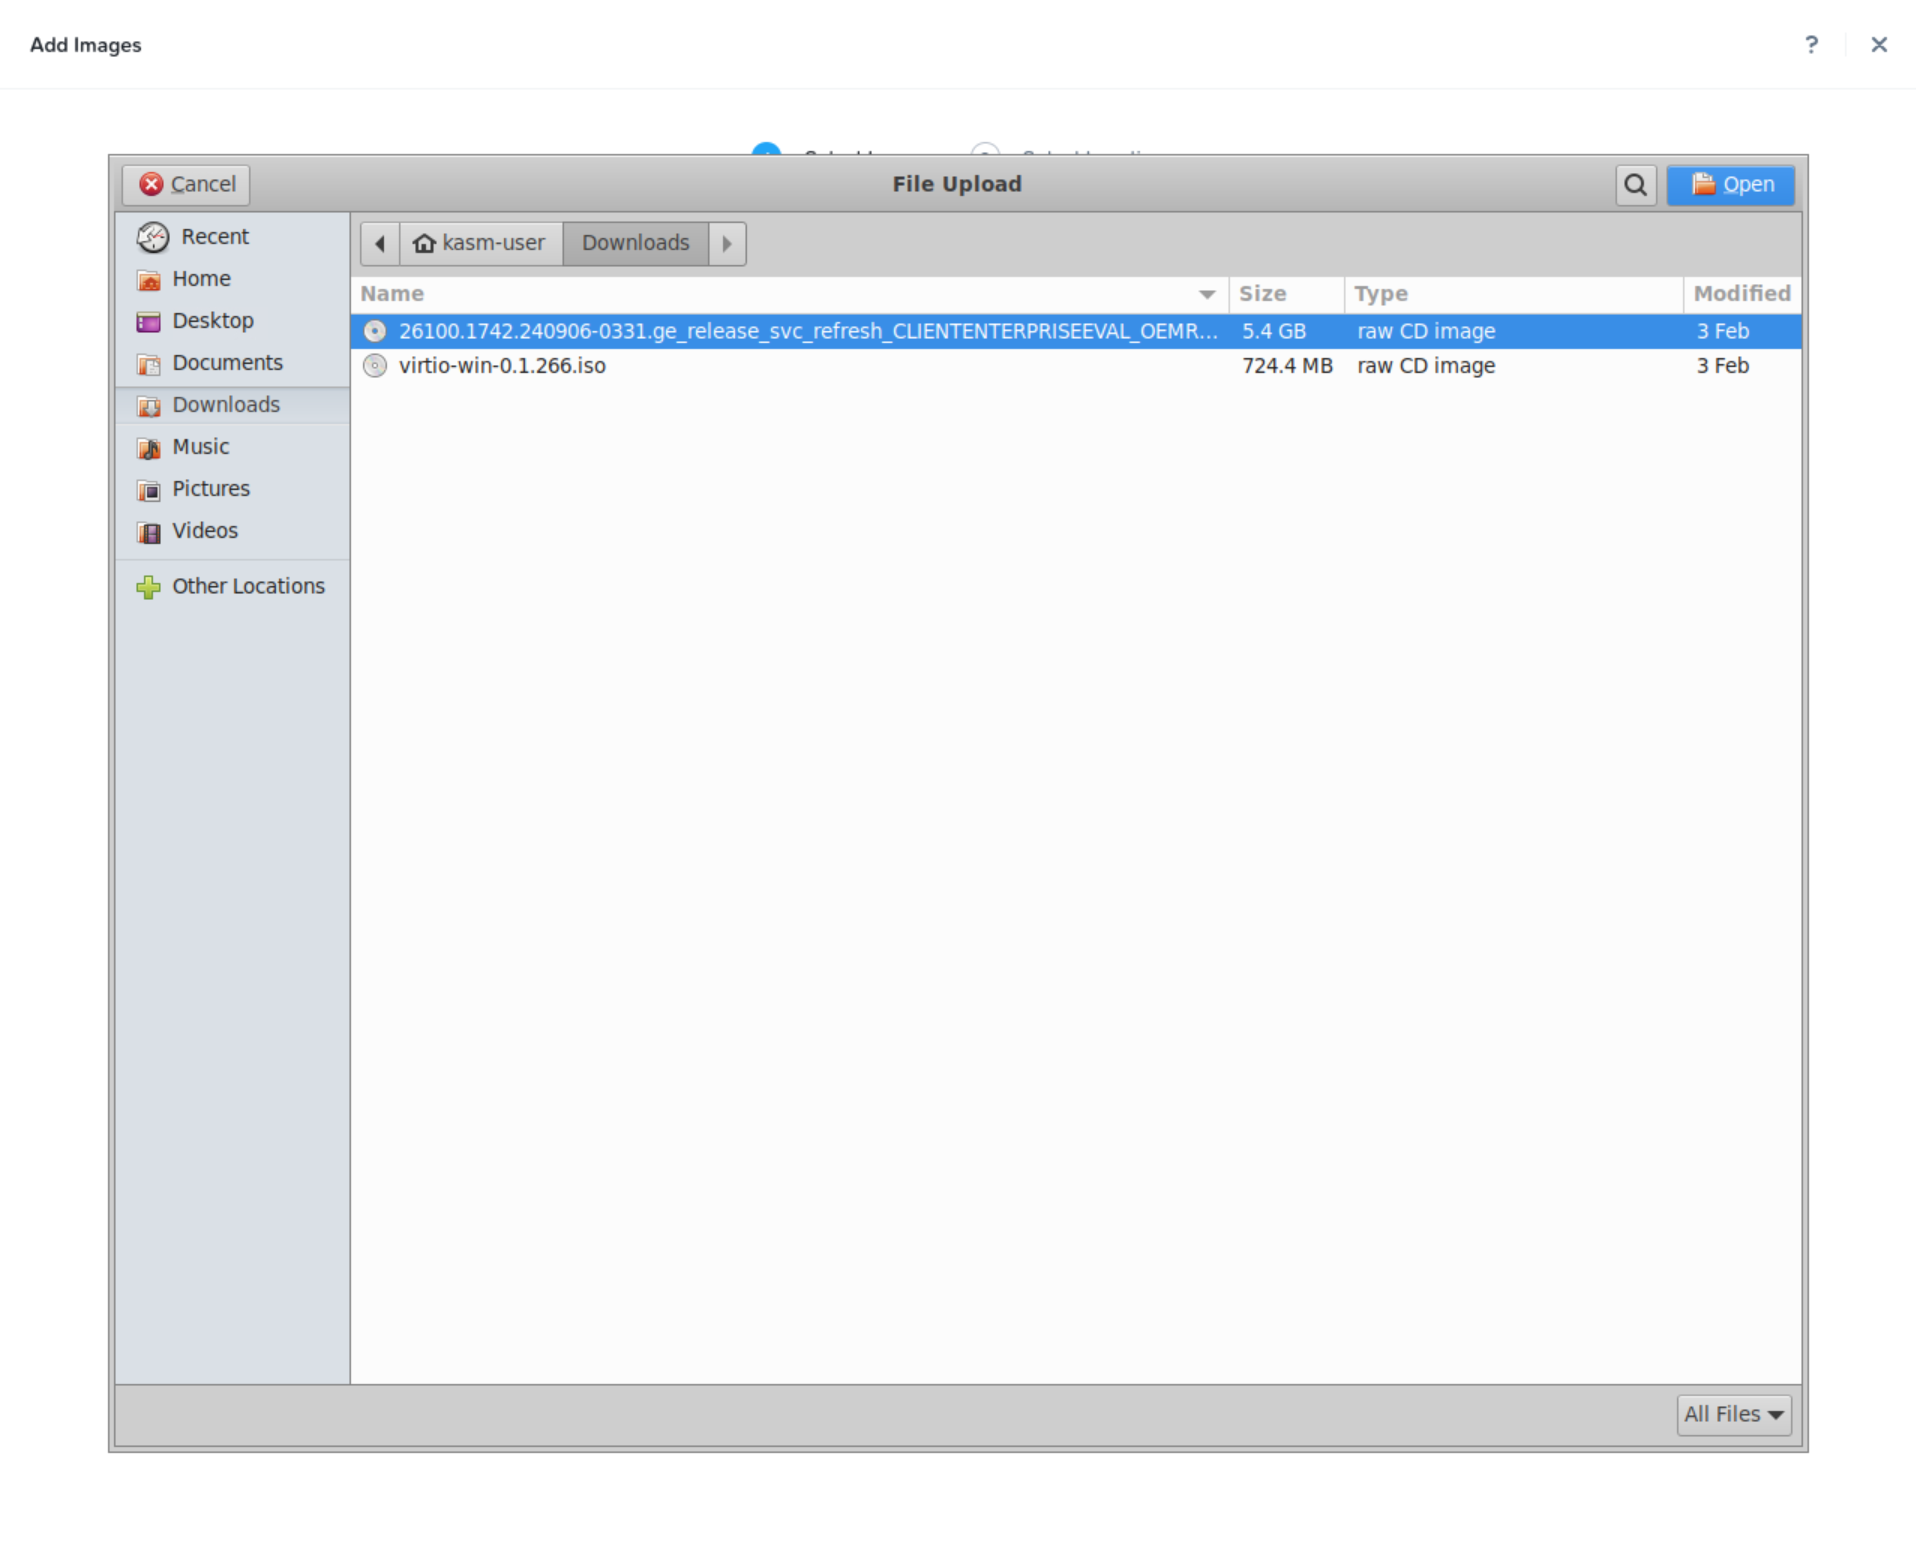
- Select Add File.
- Select a valid Windows Server 2025 ISO from the File Upload window.
- Select Open.
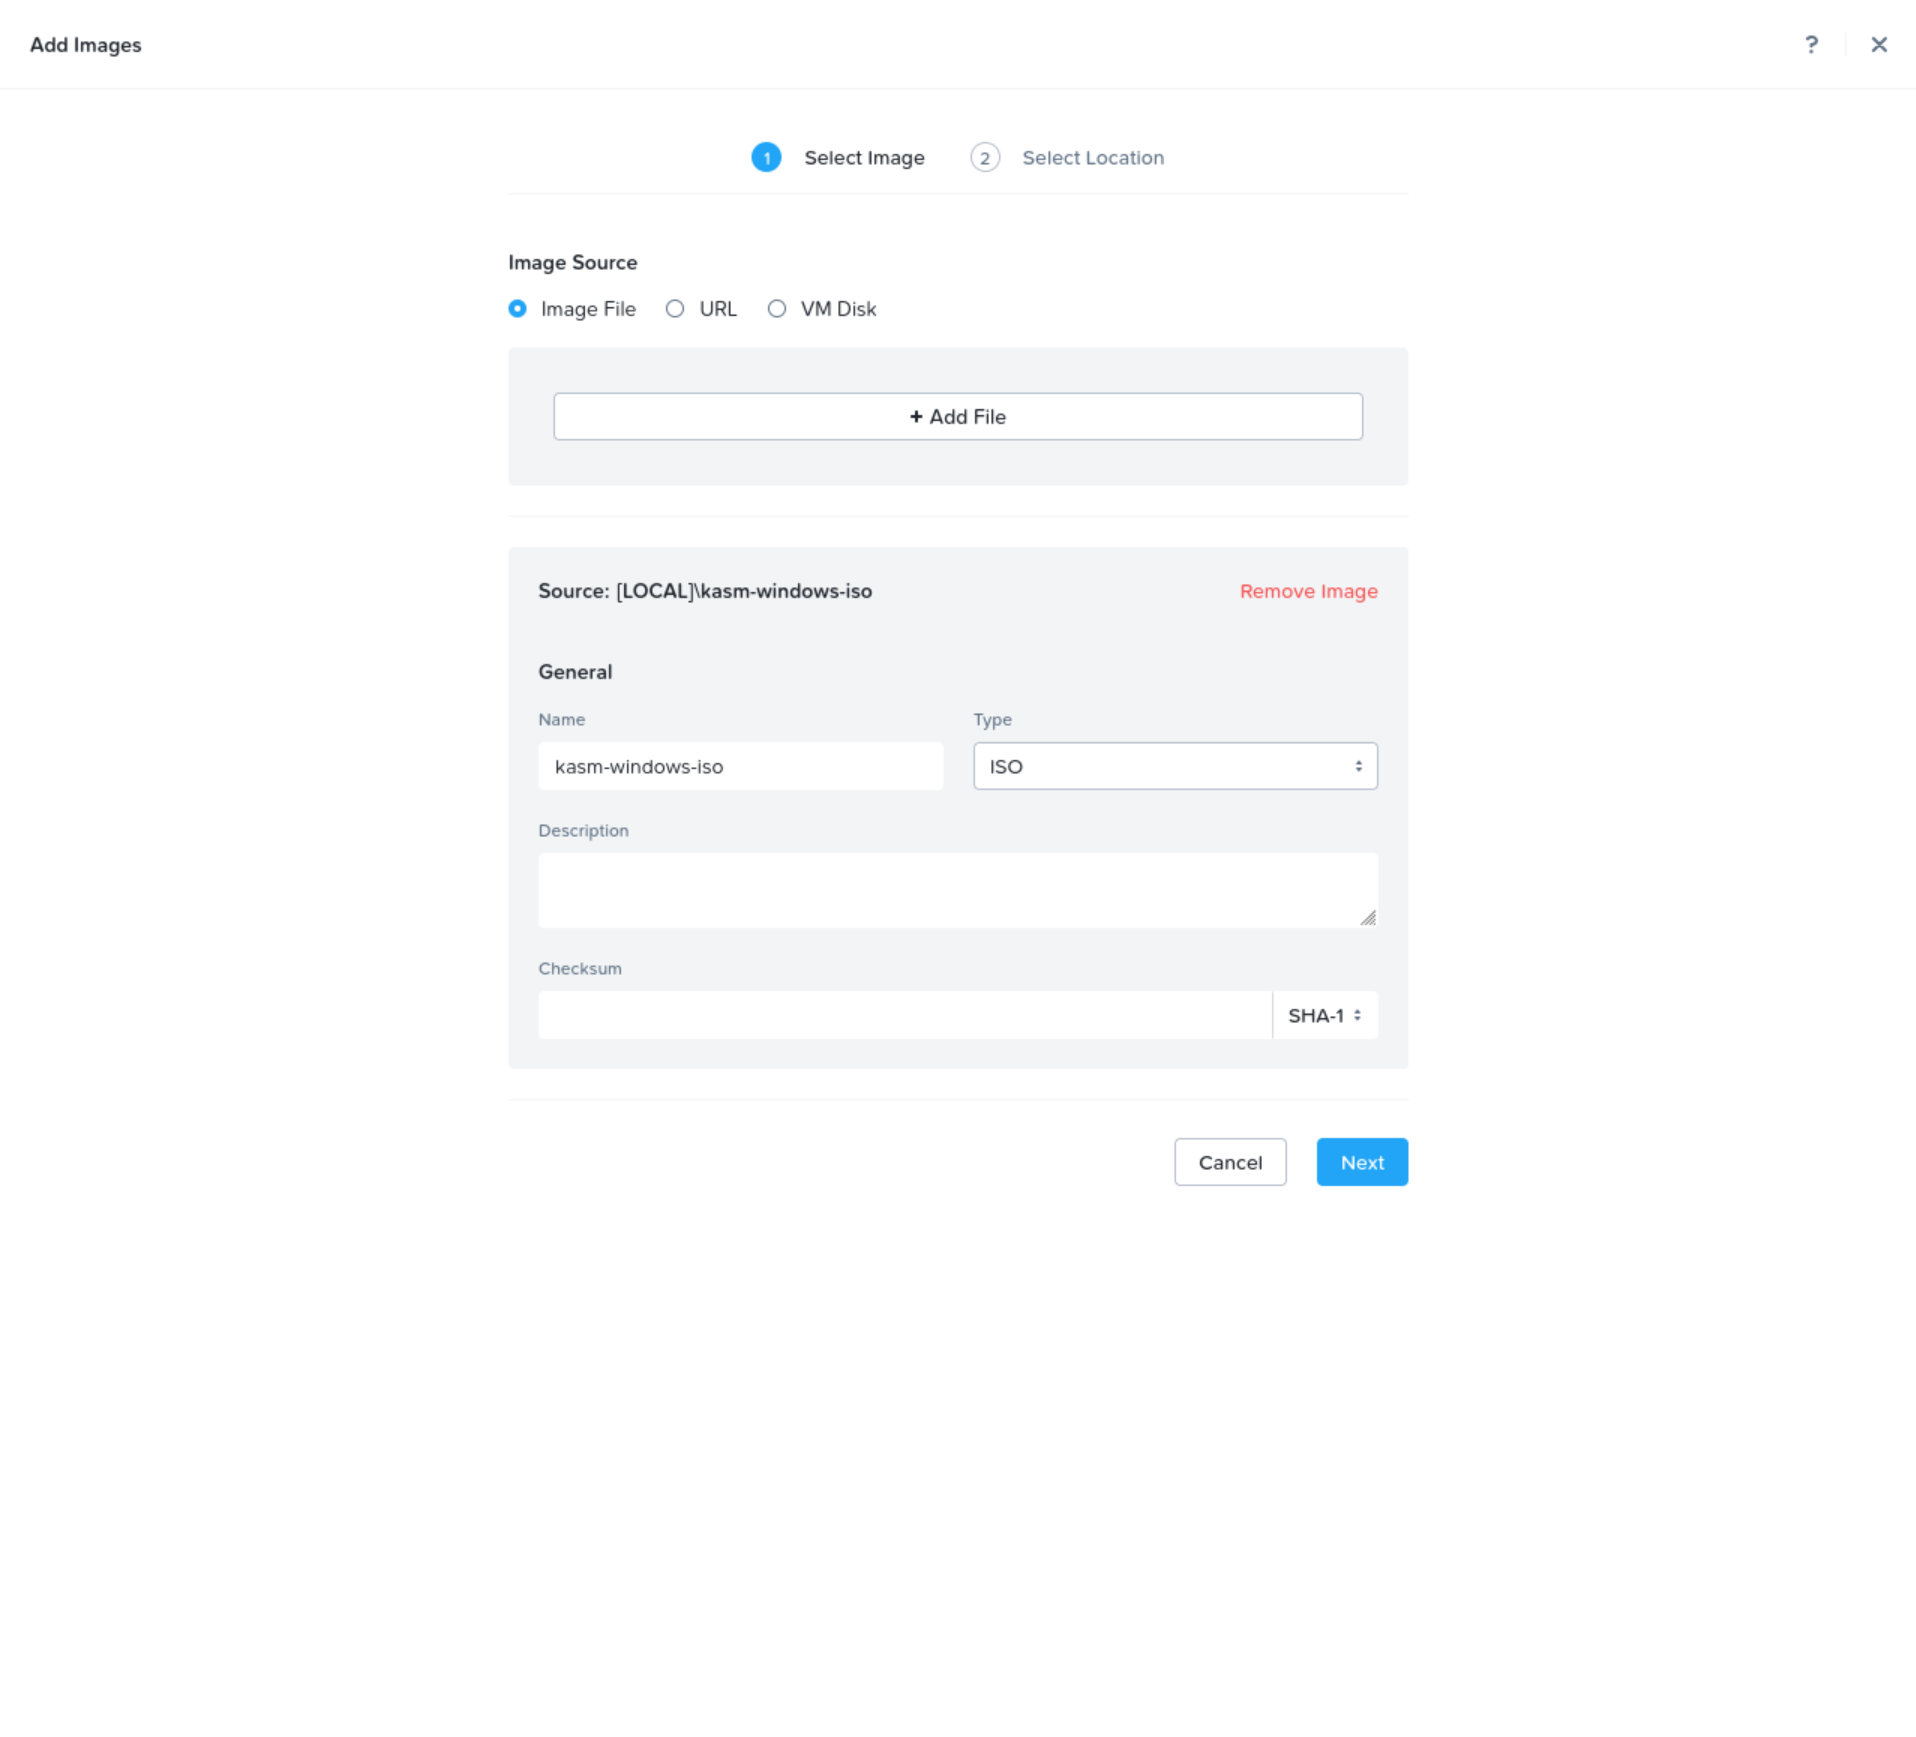
- Enter the name for the ISO in the Name field, for example
kasm-windows-iso. - Ensure that ISO is selected from the Type drop-down menu.
- Select Next.
- Select Save.
- Wait for the upload to complete.
Next, upload the VirtIO driver image that Windows needs to detect the SCSI disk.
- Log into your Nutanix Prism Central UI as an administrator.
- Navigate to the Infrastructure Center dashboard.
- Select Images > Add Image.
- From the Image Source options list, select the URL option.
- Enter the URL for a valid VirtIO driver ISO in the Image URL field, for example the stable VirtIO Windows drivers.
- Select Add URL.
- Ensure that ISO is selected from the Type drop-down menu.
- Select Next.
- Select Save.
- Wait for the upload to complete.
Finally, build the virtual machine that becomes the Windows template.
- Log into your Nutanix Prism Central UI as an administrator.
- Navigate to the Infrastructure Center dashboard.
- Select VMs > Create VM.
- Enter a value for the Name field, for example
kasm-windows-template. - From the Project drop-down menu, select the Nutanix project you created, for example
kasm-autoscale. - From the Cluster drop-down menu, select the Nutanix cluster that will provision Kasm AutoScale resources.
- In the Cores Per CPU section, enter the number of cores to provision for this VM, for example
4. - In the Memory section, enter the amount of memory to provision for this VM, for example
4.
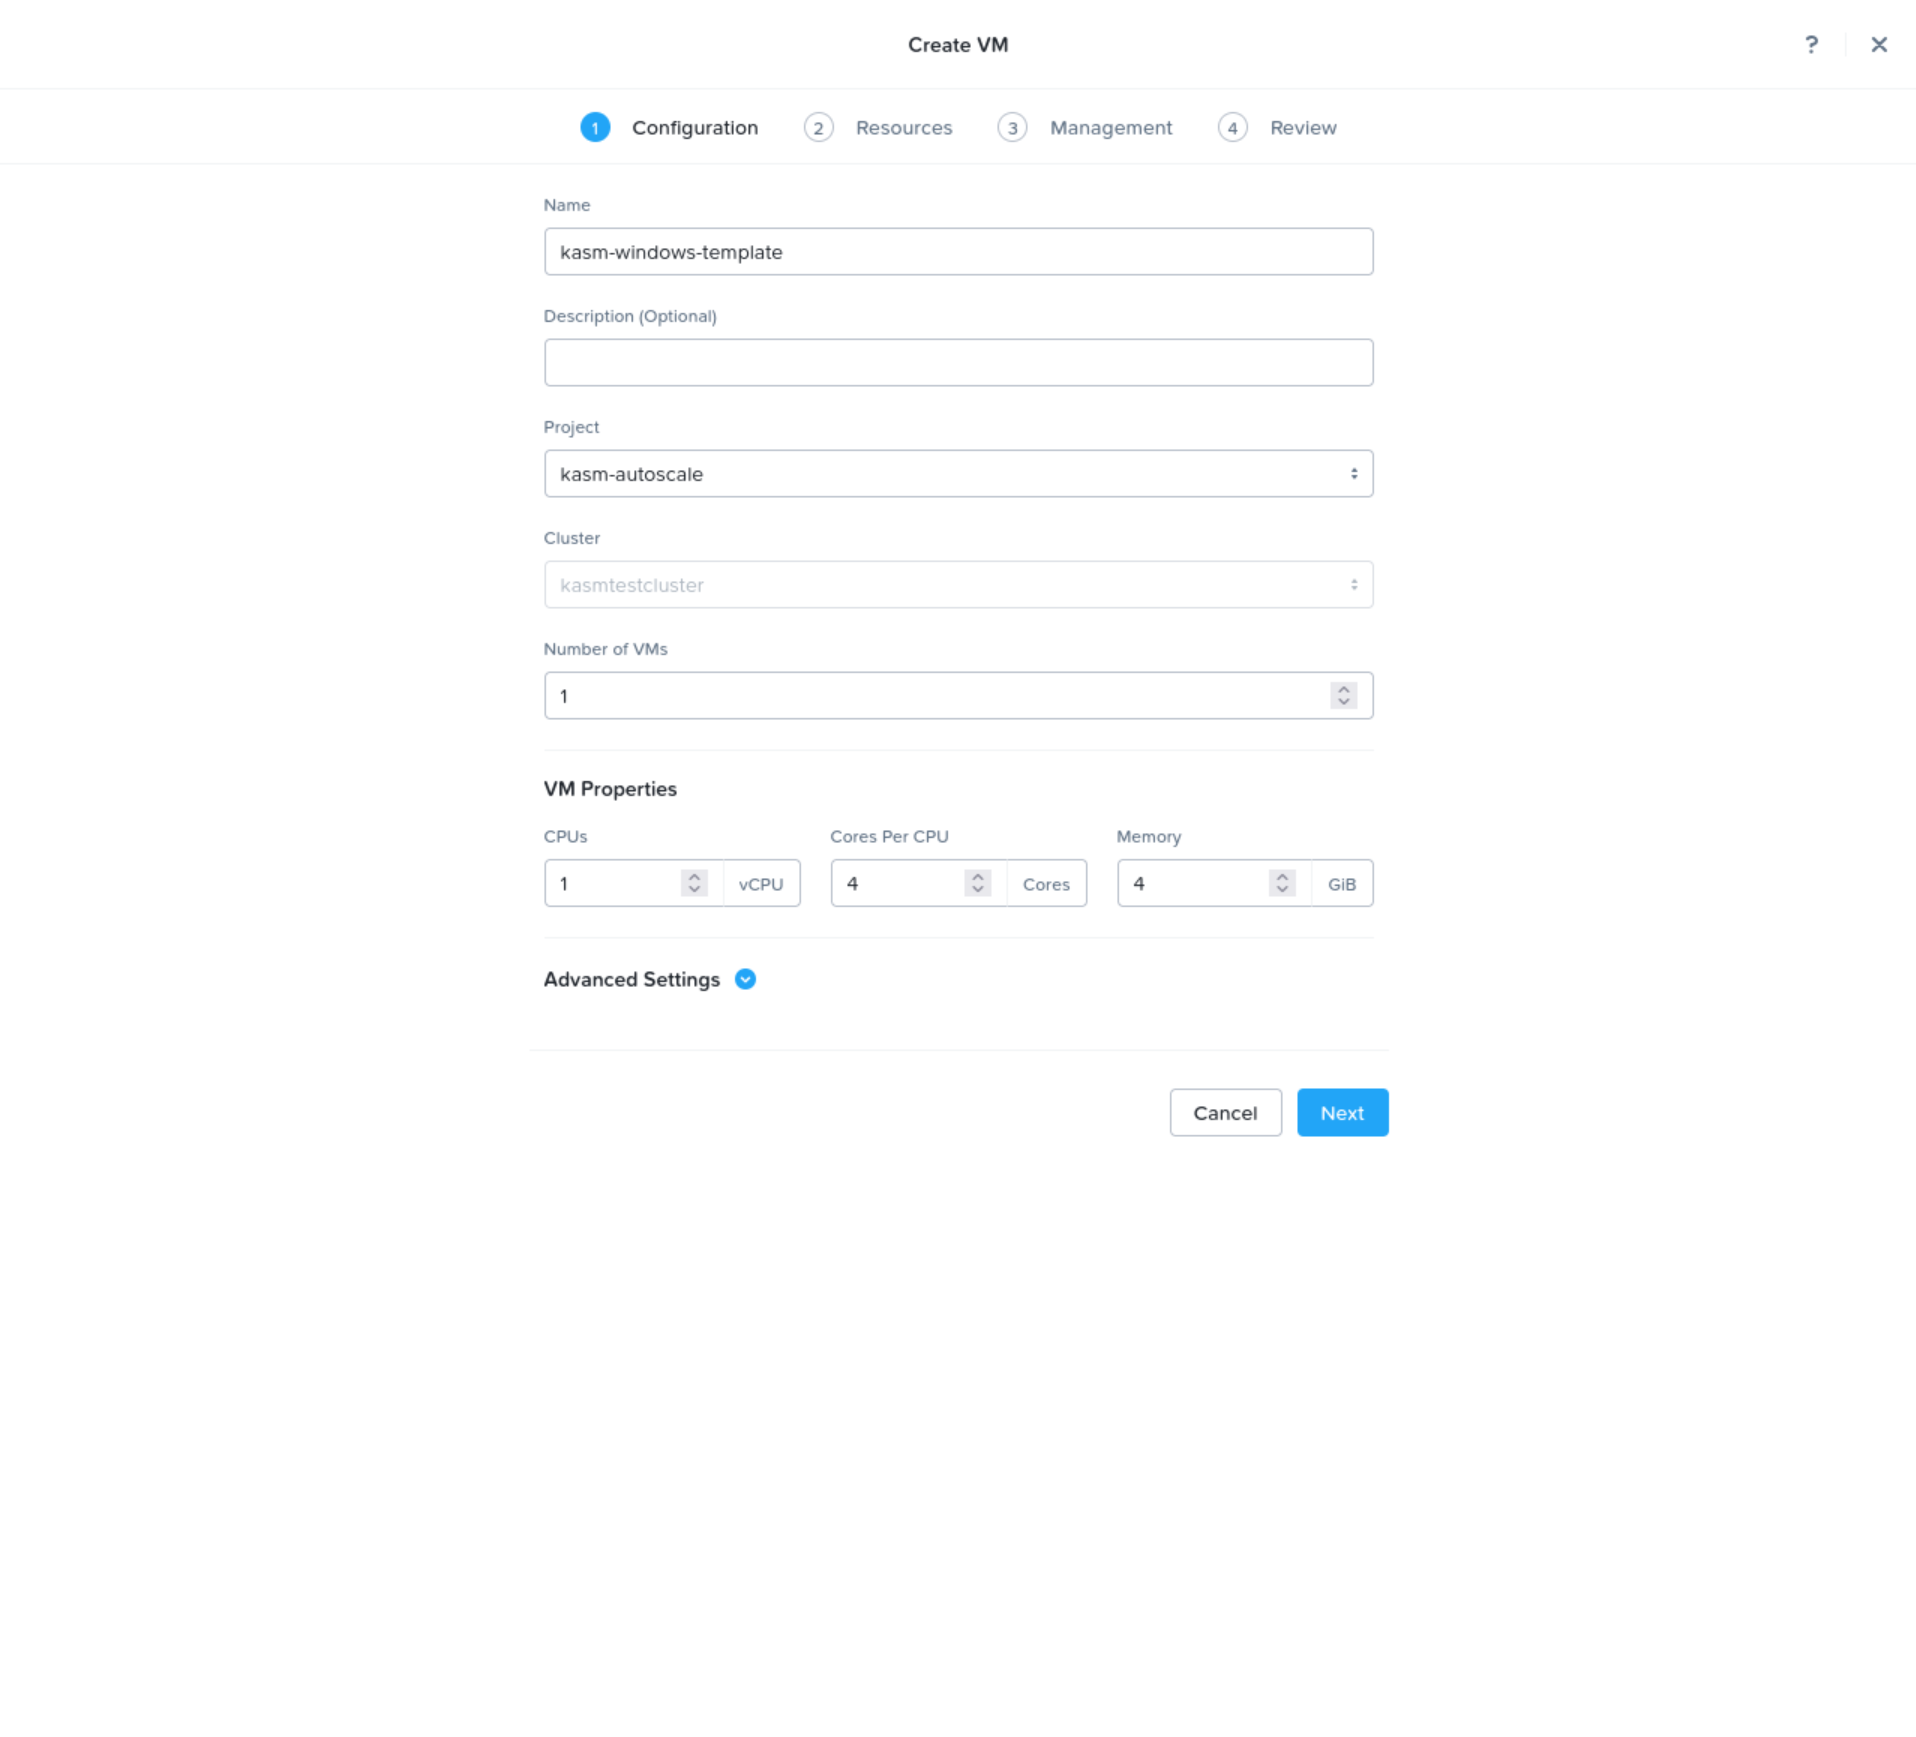
- Select Next.
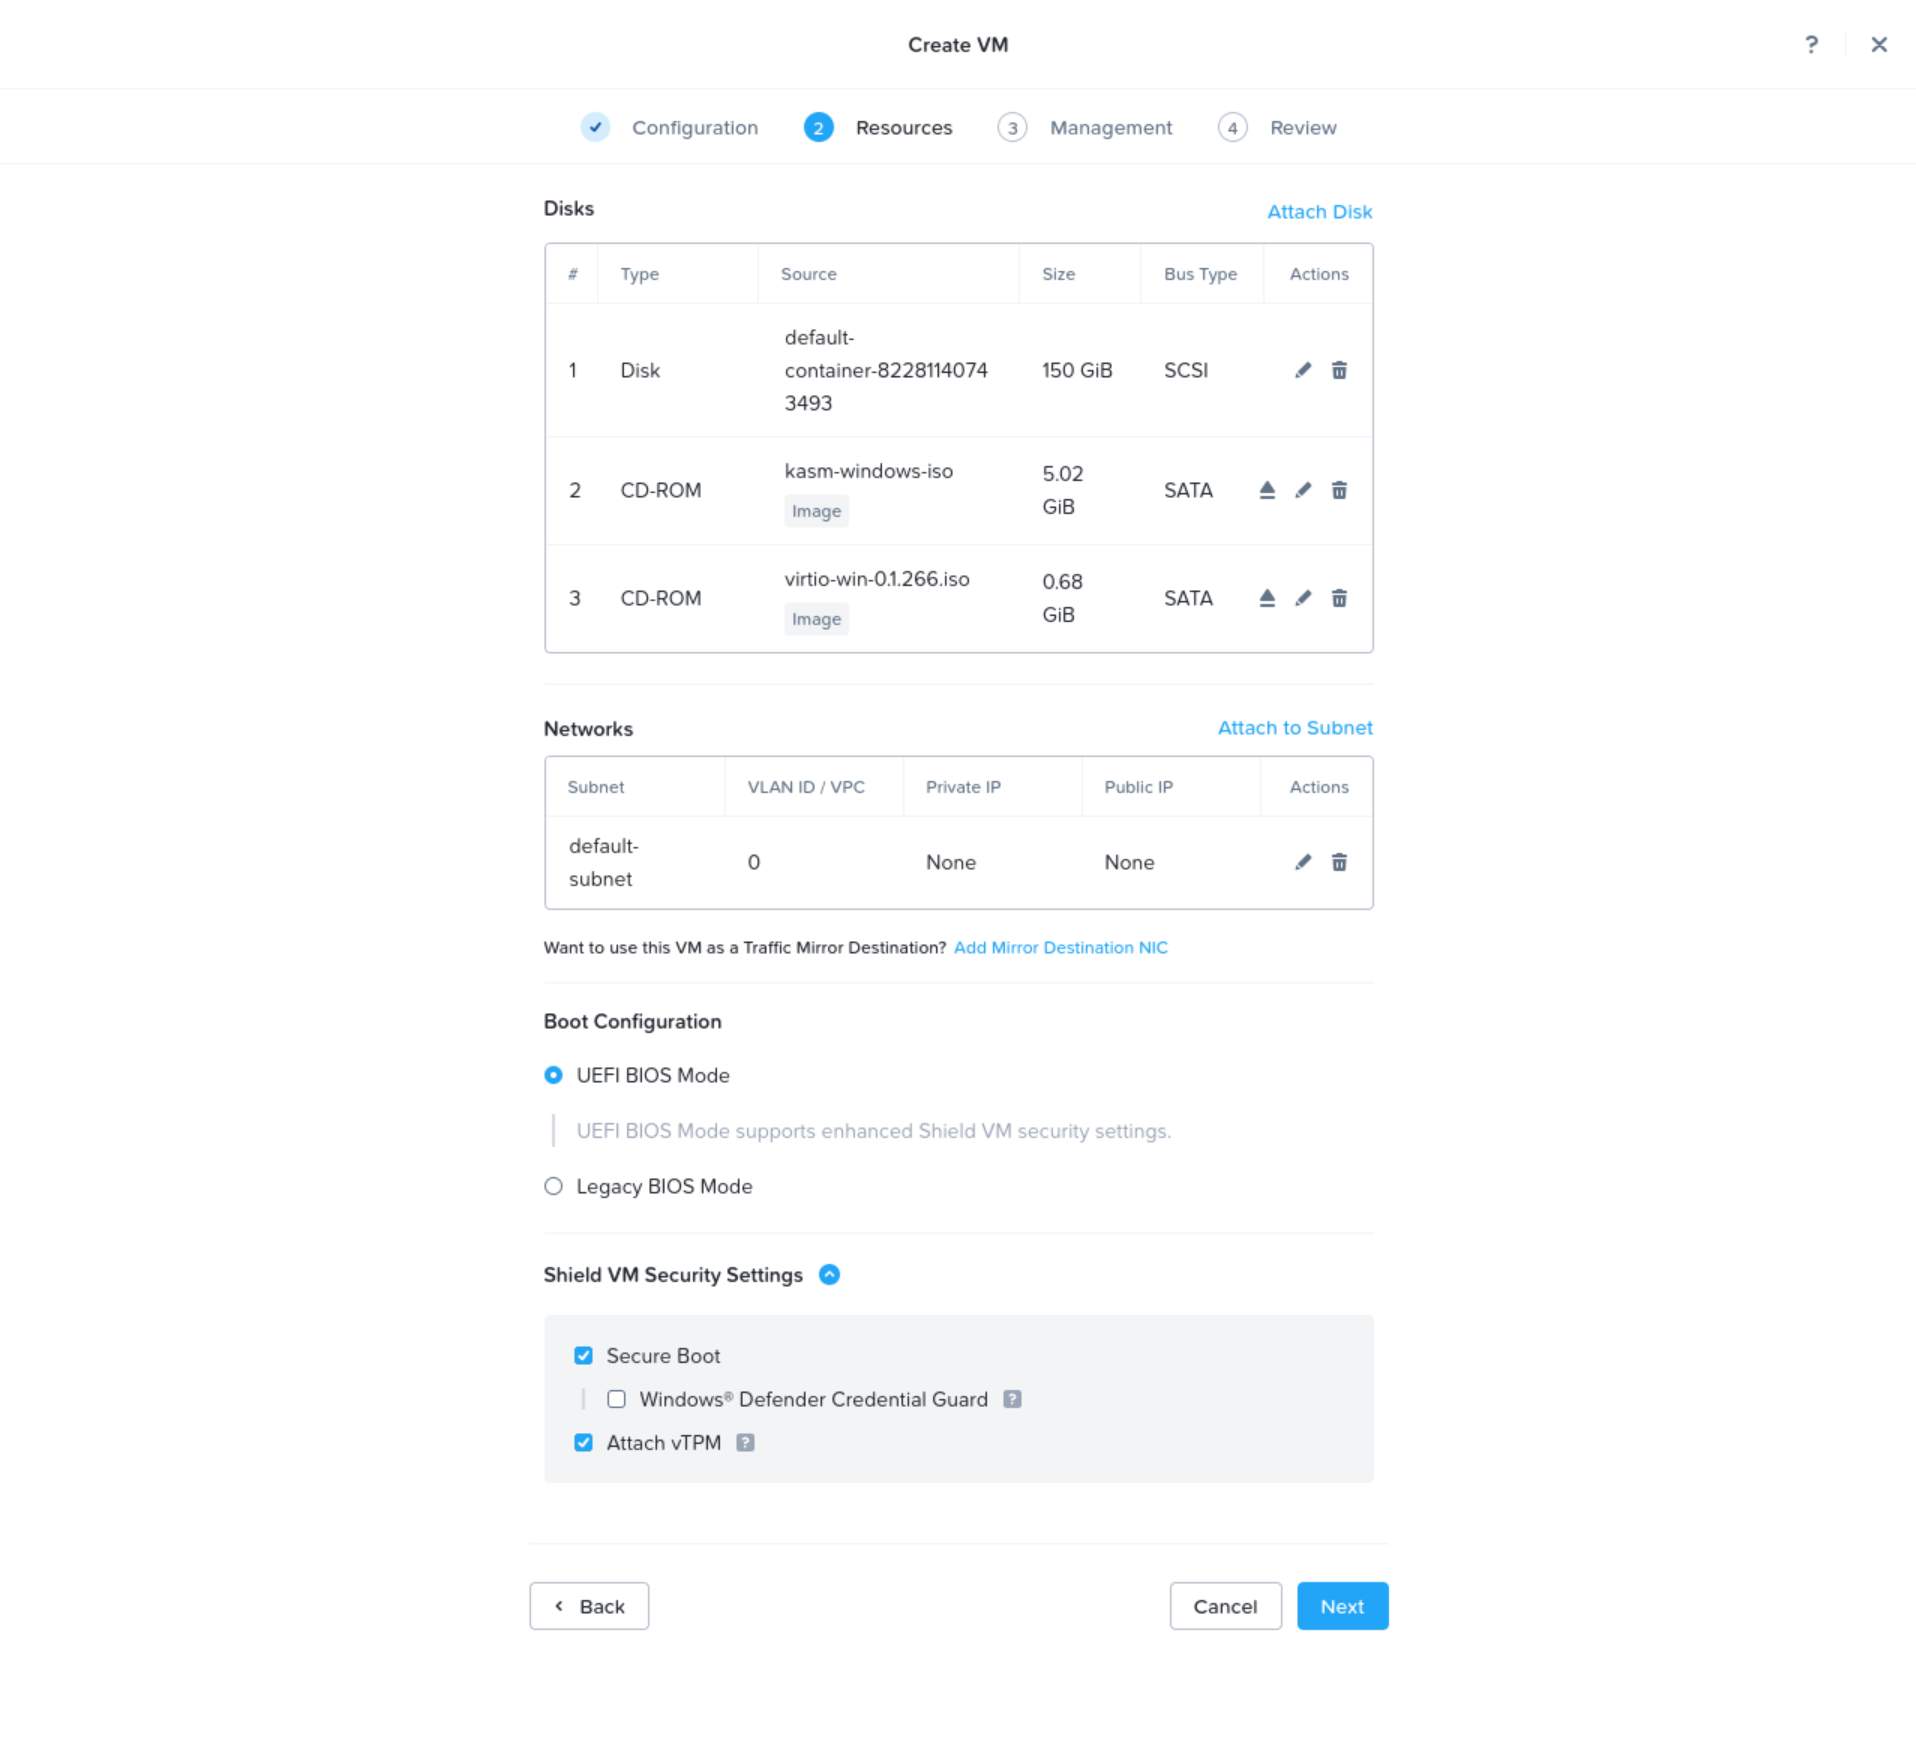
- Select Attach Disk.
- Ensure that Disk is selected from the Type drop-down menu.
- Ensure that Allocate from Storage Container is selected from the Operation drop-down menu.
- From the Storage Container drop-down menu, select the Nutanix storage container to use when provisioning this VM.
- In the Capacity section, enter the amount of storage to provision for this VM, for example
150. - Ensure that SCSI is selected from the Bus Type drop-down menu.
- Select Save.
- Select Attach Disk.
- Ensure that CD-ROM is selected from the Type drop-down menu.
- Ensure that Clone from Image is selected from the Operation drop-down menu.
- From the Image drop-down, select the Windows installation image you uploaded previously.
- Ensure that SATA is selected from the Bus Type drop-down menu.
- Select Save.
- Select Attach Disk.
- Ensure that CD-ROM is selected from the Type drop-down menu.
- Ensure that Clone from Image is selected from the Operation drop-down menu.
- From the Image drop-down, select the VirtIO driver image you uploaded previously.
- Ensure that SATA is selected from the Bus Type drop-down menu.
- Select Save.
- Select Attach to Subnet.
- From the subnet drop-down, select the Nutanix subnet to use when provisioning this VM.
- Ensure that Connected is selected from the Network Connection State drop-down menu.
- Select Save.
- Ensure that Secure Boot is enabled.
- Ensure that Attach vTPM is enabled.
- Select Next.
- Select Next.
- Select Create VM.
- From the list of VMs, right-click the new VM, select Power Operations, and then select Power On.
- From the list of VMs, right-click the new VM and select Launch Console.
- When prompted, press any key to boot from CD or DVD.
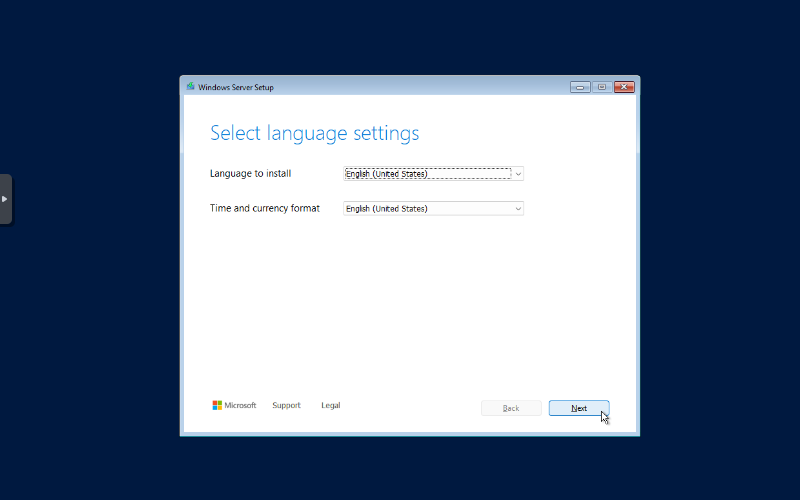
- Select Next.
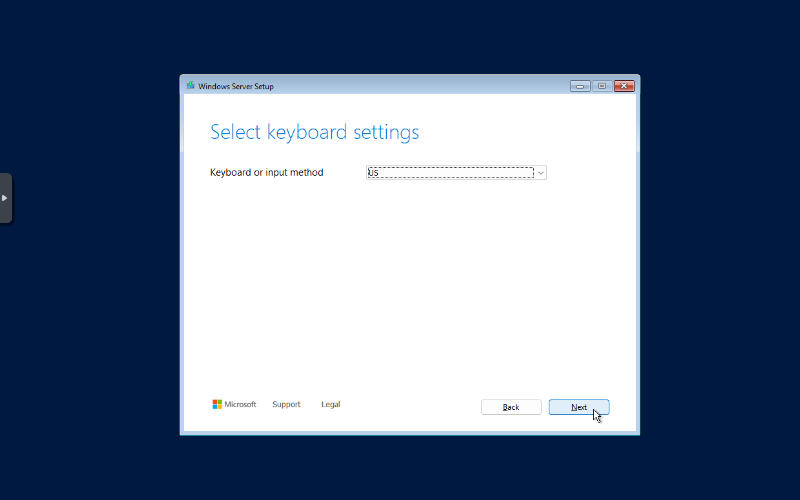
- Select Next.
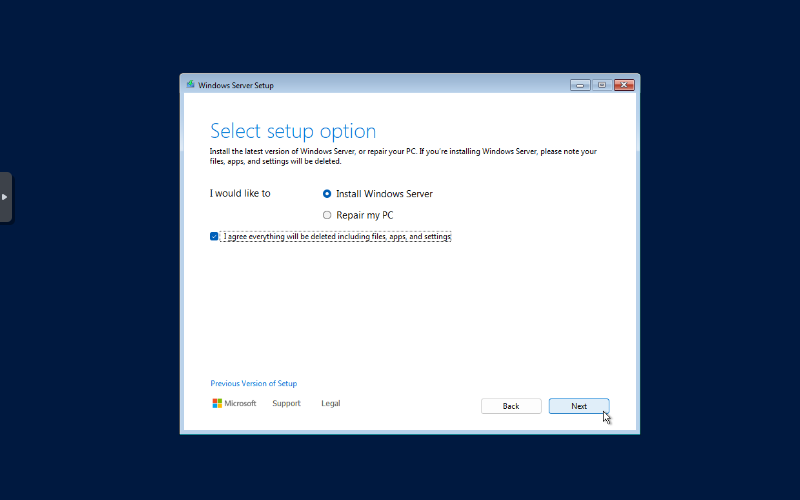
- Select the checkbox that starts with I agree.
- Select Next.
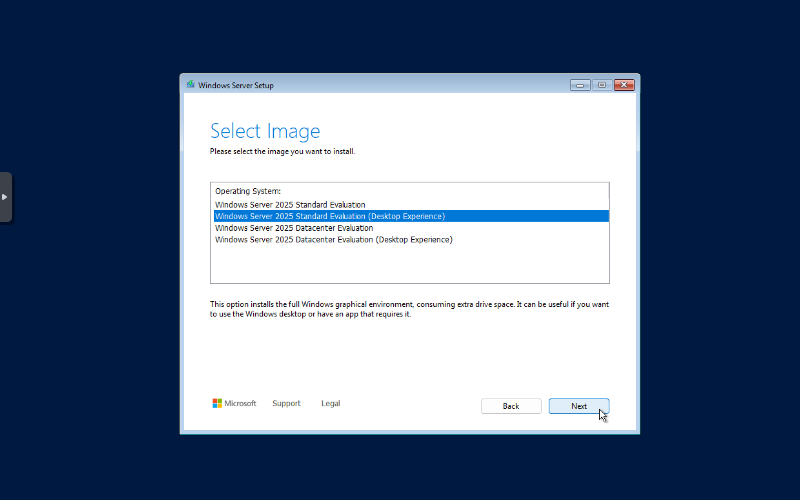
- Select Windows Server 2025 Standard Evaluation (Desktop Experience).
- Select Next.
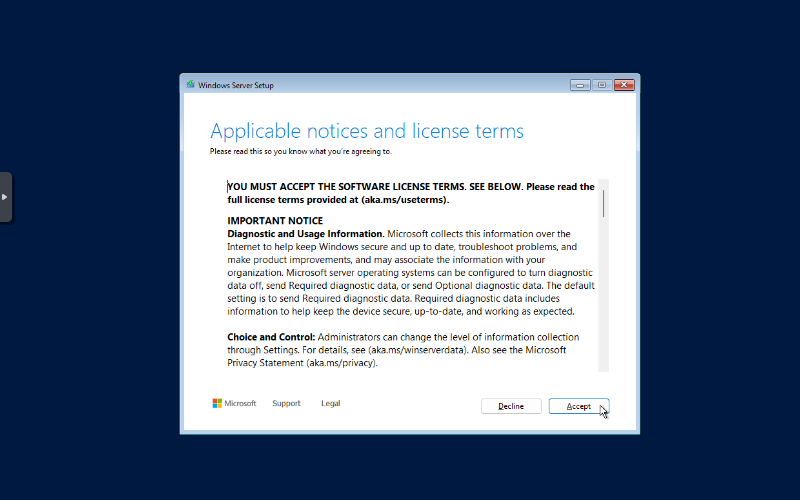
- Select Accept to agree to the applicable notices and license terms.
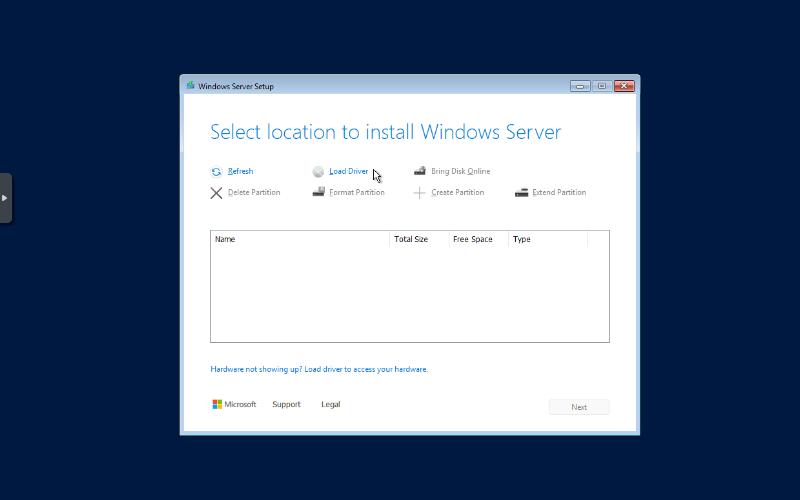
- Select Load Driver.
- Select Browse.
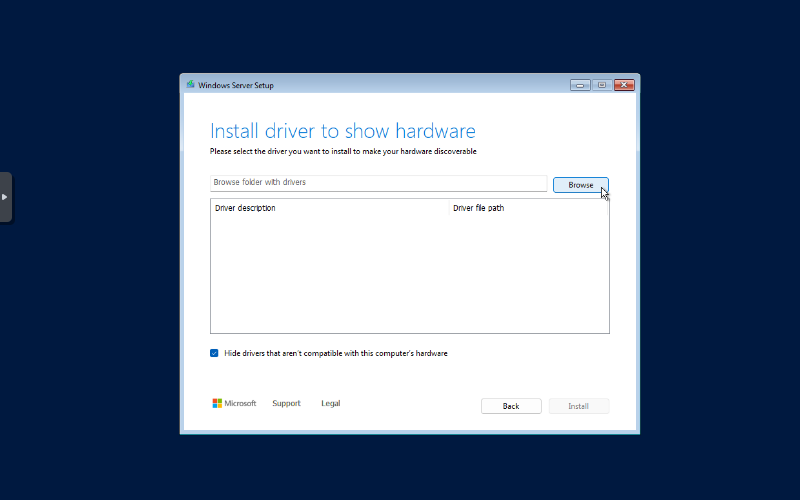
- Expand the CD drive that contains the VirtIO drivers.
- Navigate to the vioscsi/2k25/amd64 folder.
- Select Ok.
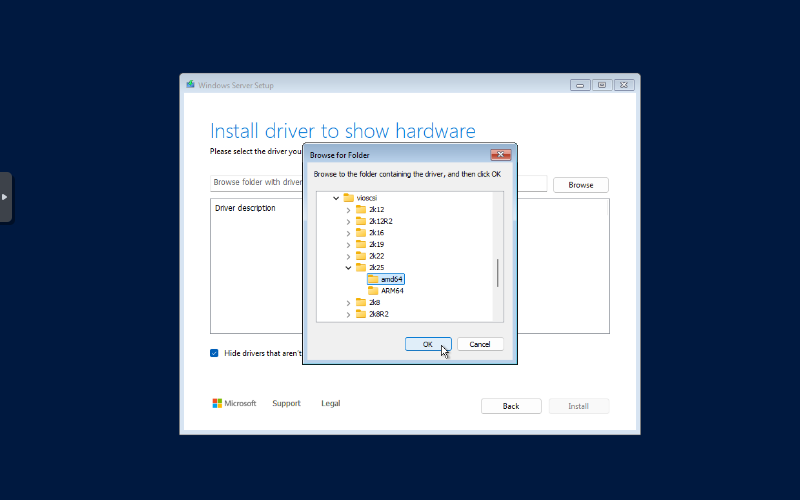
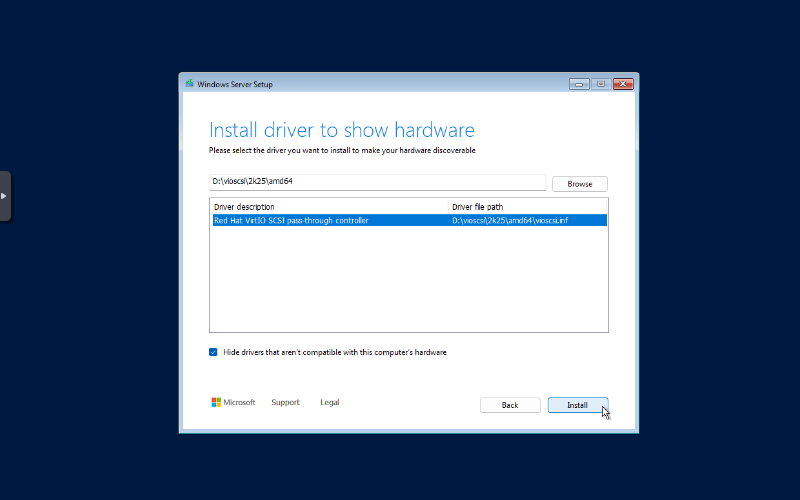
- Select Red Hat VirtIO SCSI pass-through controller.
- Select Install.
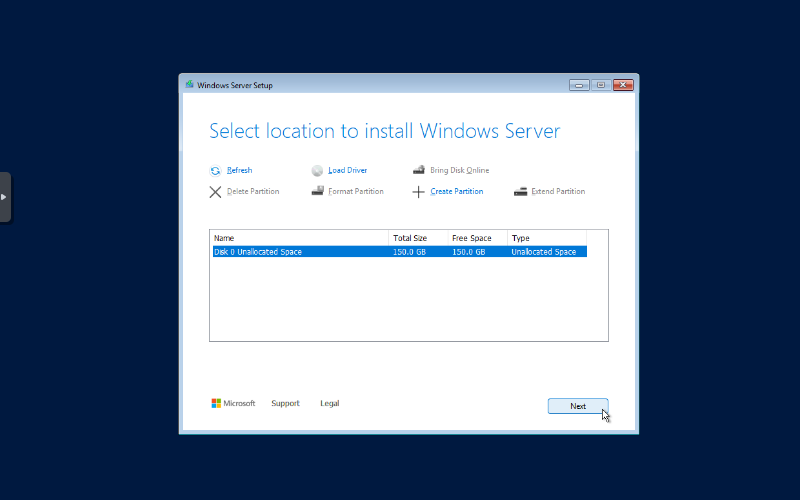
- Select Next.
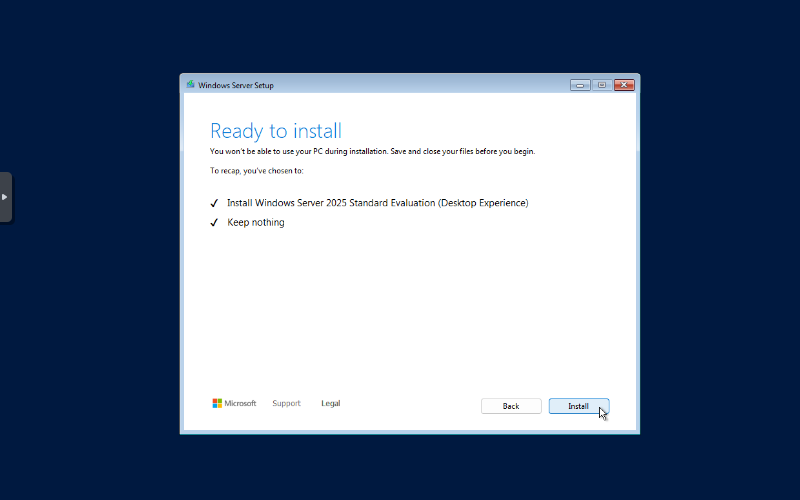
- Select Install.
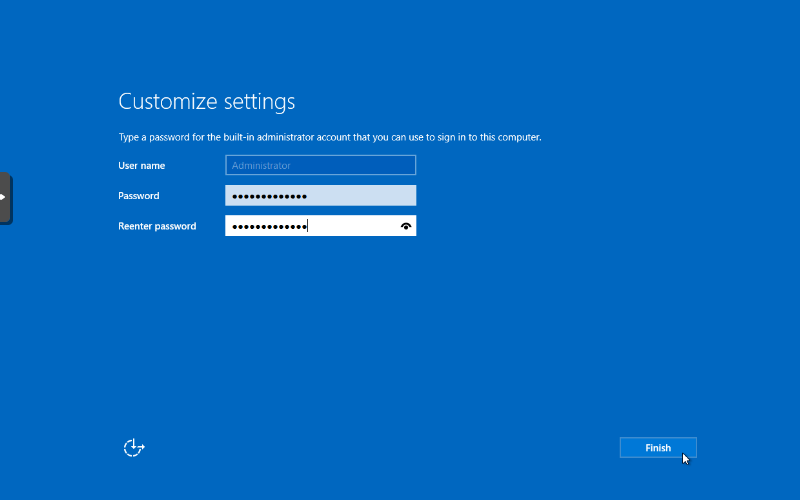
- Enter a valid password for the built-in Administrator.
- Confirm the password.
- Select Finish.
- Select the Ctrl-Alt-Del icon in the console menu to send Ctrl-Alt-Del.
- Enter the Administrator password.
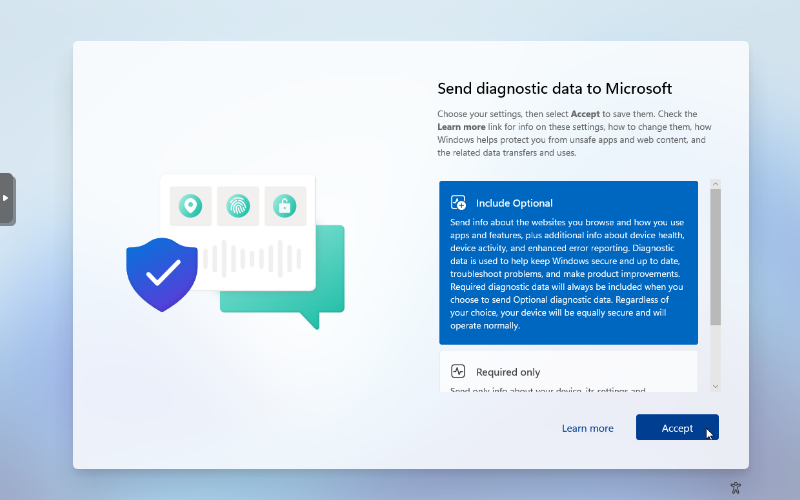
- Select Accept.
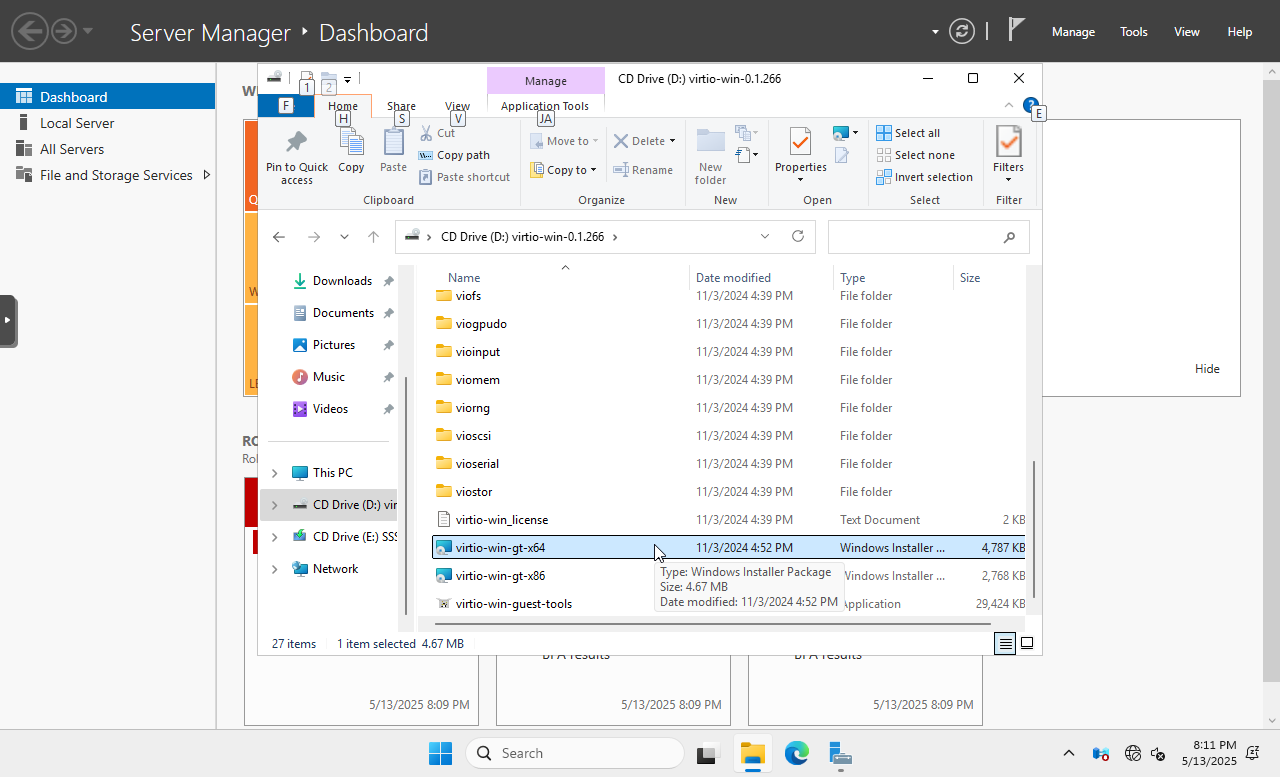
- Launch File Explorer.
- Navigate to the CD drive that contains the VirtIO drivers.
- Launch the virtio-win-gt-x64 installer.
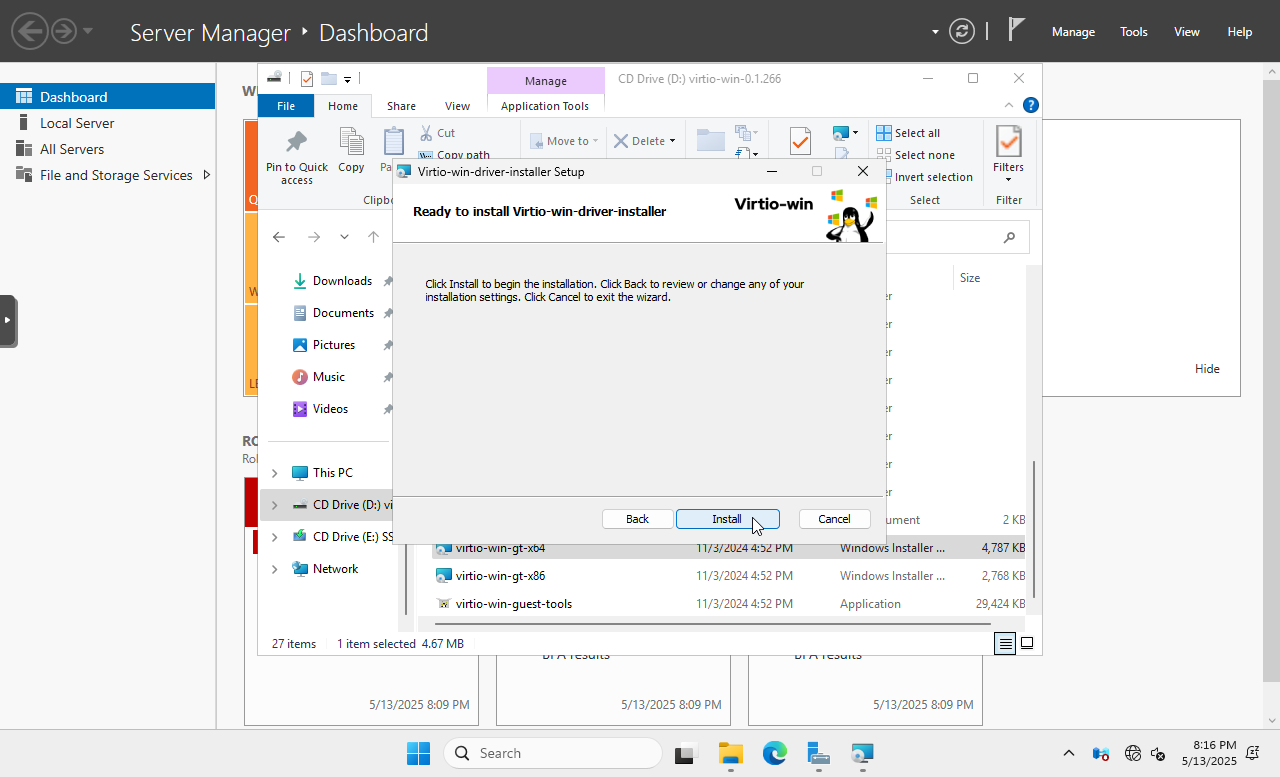
- Select Next.
- Select the checkbox that starts with I accept.
- Select Next.
- Select Next.
- Select Install.
- Select Finish.
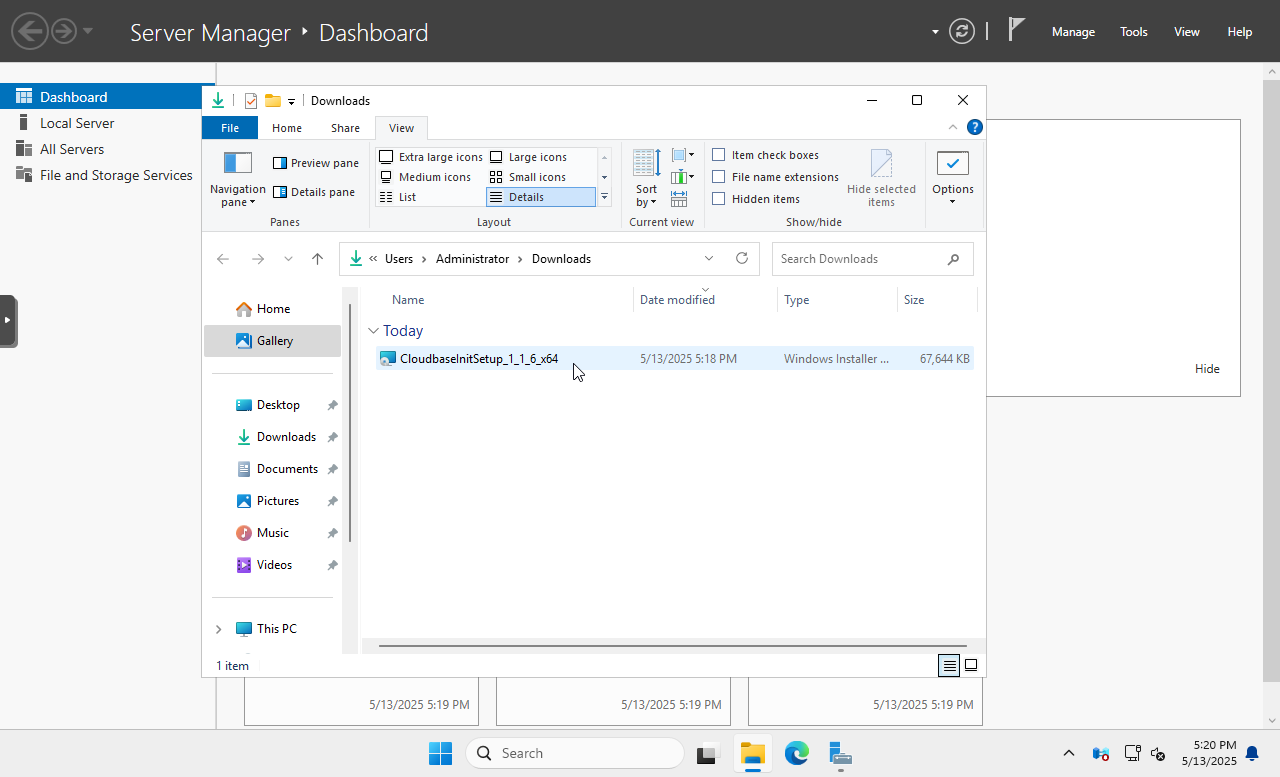
- Download a valid Windows Cloudbase-Init installer from the Cloudbase-Init project.
- Launch the installer.
- Select Next.
- Select the checkbox that starts with I accept.
- Select Next.
- Select Next.
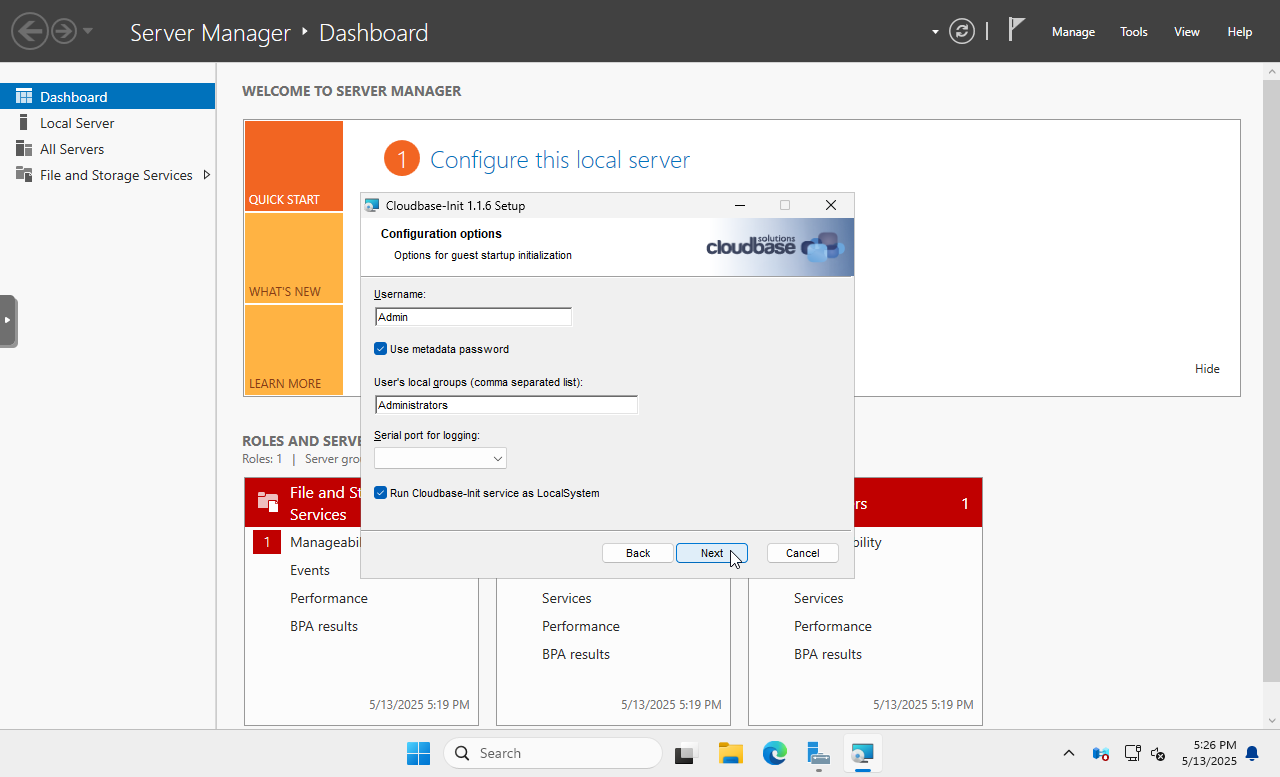
- Ensure that Run Cloudbase-init service as LocalSystem is enabled.
- Select Next.
- Select Install.
- Allow any Windows User Account Control prompts that request changes to the system.
- Select Finish.
- Select Local Server from the Server Manager.
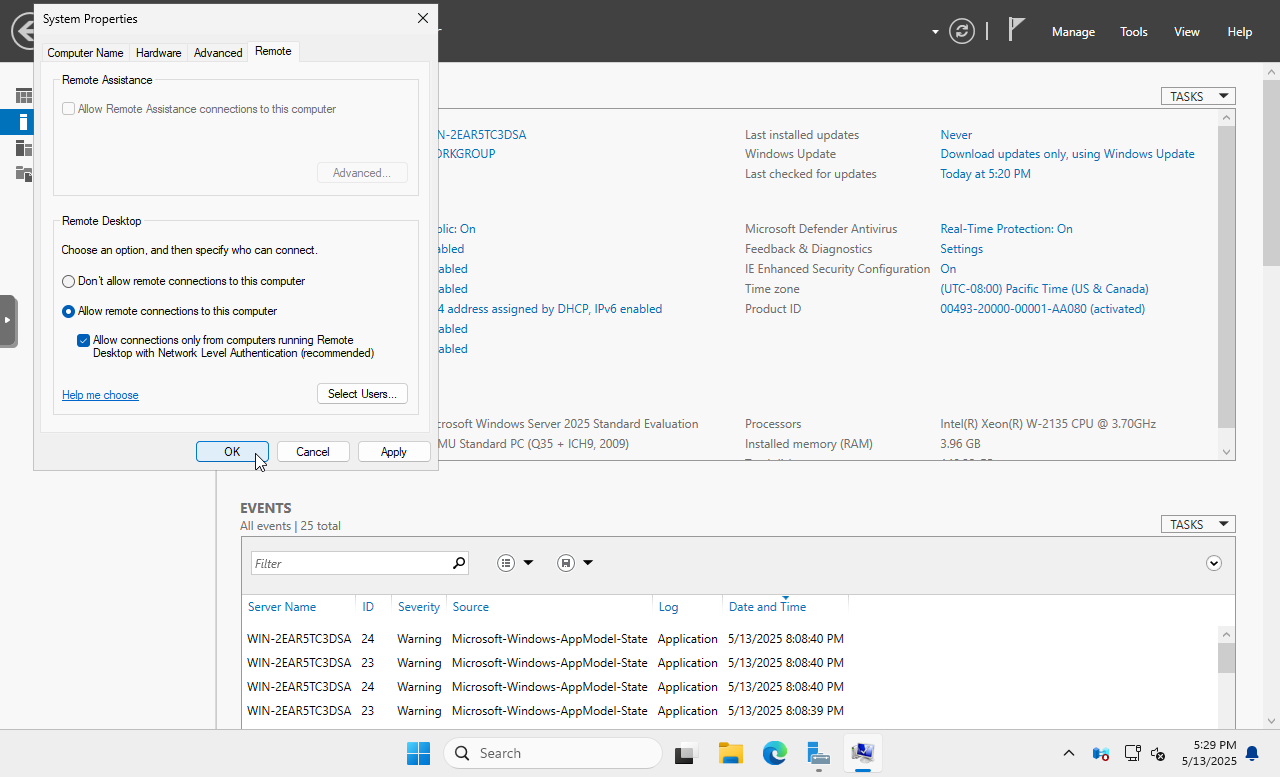
- Select the Disabled link next to Remote Desktop.
- Select Allow remote connections to this computer.
- Select Ok.
- Select Ok.
- Open the Start menu.
- Enter the value
powershellinto the search field. - Select Run as administrator from the Windows PowerShell application menu.
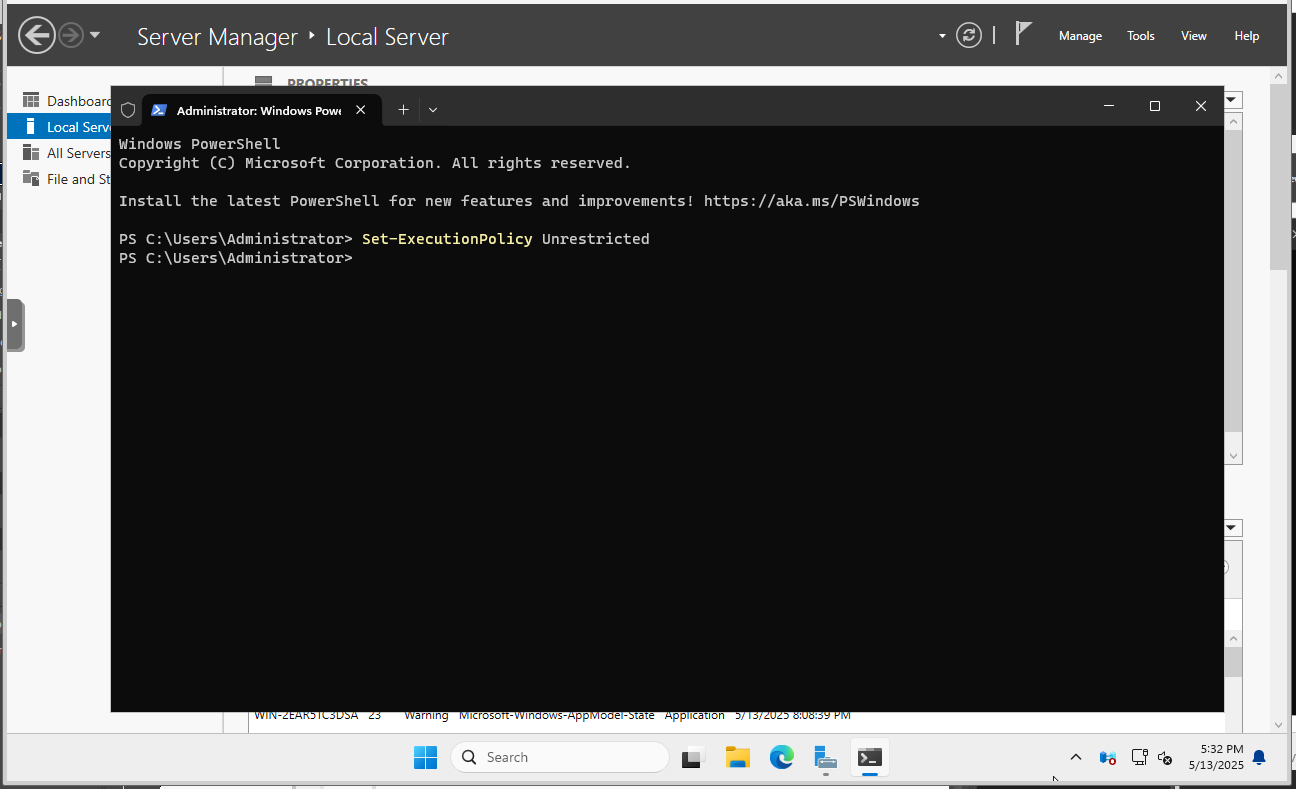
- Run the following command in the PowerShell console:
Set-ExecutionPolicy Unrestricted
- Shut down Windows.
- From the list of VMs, right-click the new VM and select Update.
- Select Next.
- In the list of Disks, select the delete icon next to the CD-ROM that contains the Windows installation image.
- In the list of Disks, select the delete icon next to the CD-ROM that contains the VirtIO driver image.
- Select Save.
Configure the Nutanix VM provider in Kasm
Add a Nutanix provider in Kasm so AutoScale clones the template and provisions agents on demand.
- Follow AutoScale settings for an Agent Pool or AutoScale settings for a Server Pool to create a new AutoScale config. Select Create New under VM Provider Configs if you already have one.
- Set the provider to Nutanix.
- Configure the following settings:
| Setting | Description |
|---|---|
| Name | An identifying name for this provider configuration e.g. Nutanix Docker Agent AutoScale Provider |
| Max Instances | The maximum number of autoscale instances to be provisioned, regardless of other settings |
| Host | The IP or FQDN of the Nutanix Prism Central server (e.g. 192.168.100.40 or nutanix.example.com) |
| Port | The listening port to the Nutanix Prism Central server. This is usually 9440 |
| Username | The name of the user that Kasm will use to access the Nutanix Prism Central server |
| Password | The Password of the user that Kasm will use to authenticate against the Nutanix Prism Central server |
| Verify SSL | Whether to validate SSL certificates. Set to False to enable self-signed certificates. Defaults to True |
| API Version | The API version used to communicate with Prism Central. v3 is recommended, v4 compatibility is currently in Preview |
| VM Candidate Name | The name of the VM used to clone new autoscaled VMs |
| VM Cores | The number of CPU cores to provision on the new autoscaled VMs |
| VM Memory | The amount of memory to provision on the new autoscaled VMs. The admin console accepts Bytes/MiB/GiB and stores the value as bytes (memory_bytes). API integrations must submit the number of bytes. |
| Startup Script | When VMs are provisioned, this script is executed and is responsible for installing and configuring the Kasm Agent for Docker Agent roles, or the Kasm Desktop Service for Windows VMs if desired. Bash scripts and cloud-config yaml formats are supported on a Linux host and Powershell scripts on Windows hosts Example scripts are available on our GitHub repository |
- Submit the provider configuration.
Support for Nutanix API version 4 is in preview.
Validate provisioning and downscaling
- If you configured non-zero standby or minimum available session values, agents begin provisioning immediately. Otherwise, generate demand with the following steps.
- Make one or more workspaces available. Open Workspaces > Registry and set the target workspaces to available.
- Open the Workspaces dashboard and launch enough sessions to exceed your standby thresholds.
- Monitor the new agents under Infrastructure > Agents as Kasm provisions them.
- Confirm that matching VM instances appear in Nutanix.
- Validate downscaling. Terminate the sessions to reduce resource usage, then confirm that Kasm removes the agents after the configured back-off period.
Required Permissions
Assign the operations below to the Nutanix role from the first phase. Add only the set that matches the API version you plan to use, and include any related operations that Nutanix prompts for.
API v3
- AHV VM
- Clone Virtual Machine
- Delete Virtual Machine
- Update Virtual Machine Categories
- Update Virtual Machine Power State
- View Virtual Machine
- Category
- Create Or Update Name Category
- Create Or Update Value Category
- Delete Name Category
- Delete Value Category
- View Name Category
- View Value Category
- Cluster
- View Cluster
- Image
- View Image
- Marketplace Item
- View Marketplace Item
- Project
- View Project
- Subnet
- View Subnet
- VPC
- View VPC
API v4
- AHV VM
- Associate Virtual Machine Categories
- Clone Existing Virtual Machine
- Delete Existing Virtual Machine
- Power On Virtual Machine
- View Existing Virtual Machine
- View Virtual Machine Disk
- Category
- Create Category
- Delete Category
- View Category
- Cluster
- View Cluster
- Image
- View Image
- Marketplace Item
- View Marketplace Item
- Project
- View Project
- Subnet
- View Subnet
- Storage Container
- View Storage Container
- Volume Group
- Attach Volume Group To AHV VM
- Detach Volume Group From AHV VM
- VPC
- View VPC
Common troubleshooting steps
- Virtual machines fail to provision. Confirm that the Kasm API user holds the role you created and that the role includes every required permission for your API version. Verify that the cluster, project, storage container, and subnet referenced in the provider configuration are valid.
- Provisioning fails with a permission error. Review the required permissions for your API version and confirm that related operations Nutanix prompted for were also added to the role.
- Agents provision but never register. Confirm that the template was cleaned correctly and that the provisioned agent can reach the Kasm Manager on the required ports. Review the AutoScale startup scripts for reference.
- Windows VMs fail to detect the disk during setup. Confirm that the VirtIO SCSI pass-through driver loaded during installation and that the VirtIO driver image was attached to the template.
- Agents do not downscale. Confirm that sessions have ended and that the configured back-off period has elapsed before Kasm removes the agents.