Configure Kasm Workspaces AutoScale on Proxmox VE Cluster
Overview
Workspace demand on a Proxmox VE cluster rises and falls through the day, and reserving fixed virtual machines for peak load wastes capacity during quiet periods. This guide configures Kasm Workspaces AutoScale to provision and destroy agents on Proxmox automatically in response to demand. The result is elastic, self-hosted capacity that meets peak load and reclaims compute between sessions. AutoScale on Proxmox supports bursty contractor, training, investigation, and AI workloads on your own infrastructure without manual provisioning.
Prerequisites
Confirm the following before you begin:
- Administrator access to a Proxmox VE environment with permission to manage permissions, pools, users, roles, and virtual machines.
- A working Kasm Workspaces deployment. See the single-server installation guide if you need to deploy Kasm first.
- Knowledge of the deployment zone and pool that the AutoScaled agents will join. A deployment zone is a logical grouping of Kasm infrastructure components, and a pool groups Docker Agents and Server Pools for load balancing.
- The target Proxmox cluster, resource pool, storage, and network for the provisioned virtual machines.
- A plan for the agent template, including the QEMU Guest Agent, which every AutoScaled virtual machine requires.
Solution approach
This guide progresses through the following phases:
- Prepare the Proxmox environment and permissions.
- Build the agent VM template.
- Configure the Proxmox VM provider in Kasm.
- Validate that provisioning and downscaling work.
Detailed steps
Prepare the Proxmox environment and permissions
Kasm authenticates to Proxmox with a dedicated user and API token that hold only the privileges AutoScale needs. The following steps create that least-privilege identity and scope it to the pool, storage, and network used for AutoScale.
-
Create a resource pool for AutoScale. In the Proxmox dashboard, go to Permissions > Pools > Create and create a new
kasm-autoscalepool.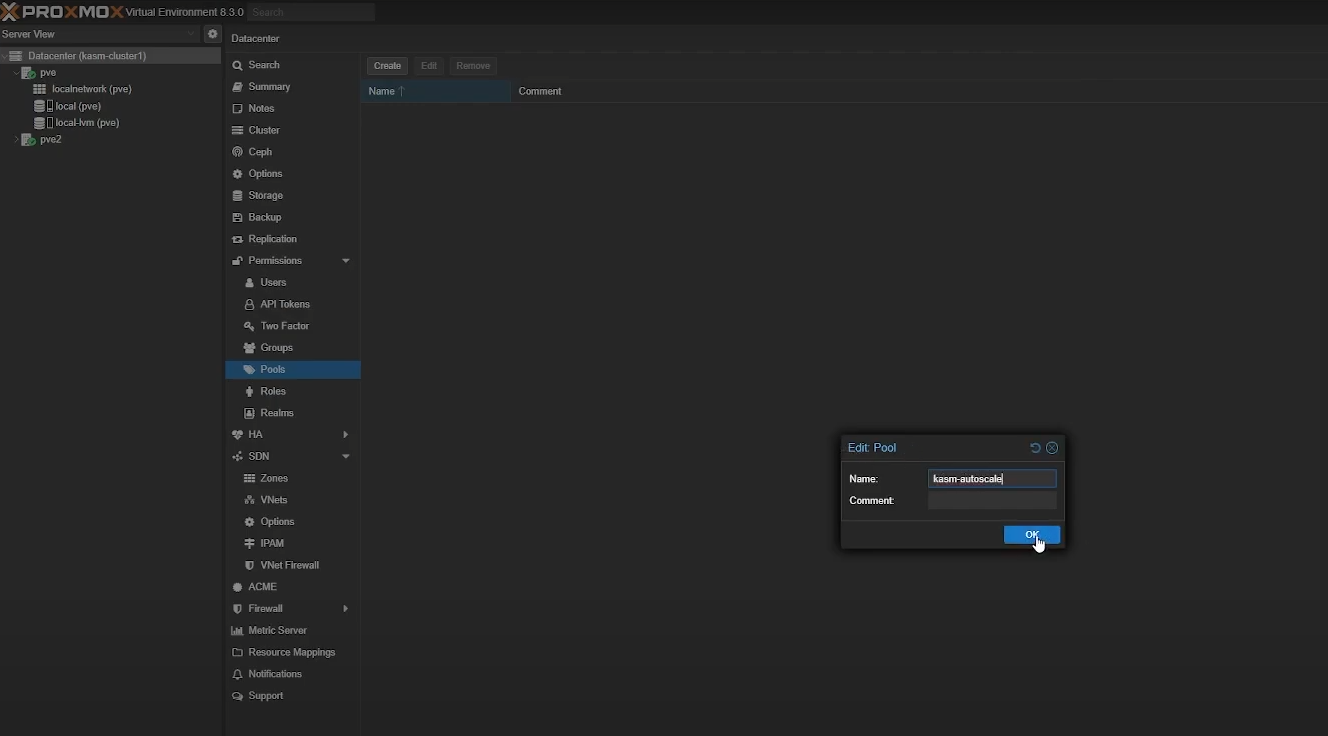
Create a pool in Proxmox -
Create a dedicated user. Go to Permissions > Users > Add and create a new user. A new account is not required for AutoScale, but a dedicated account is strongly recommended.
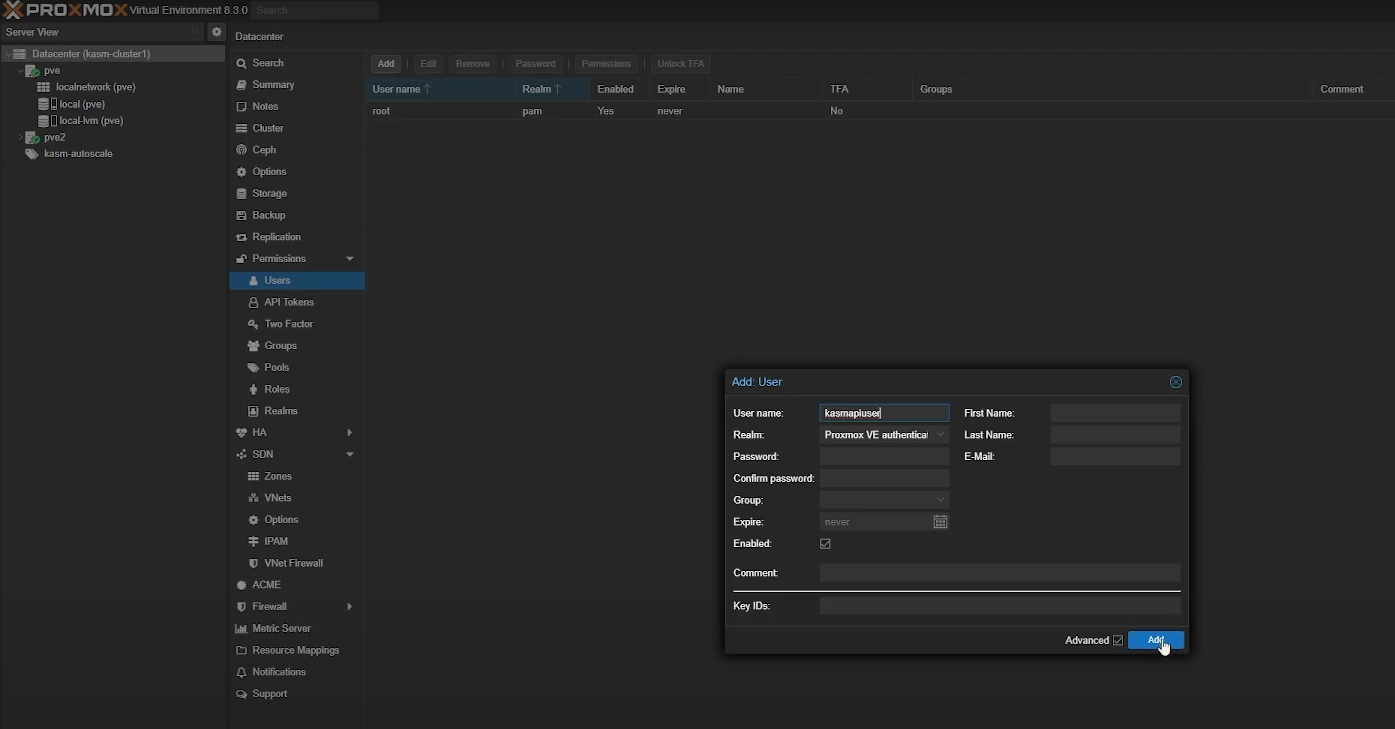
Create a user in Proxmox -
Create an API token. Go to Permissions > API Tokens > Add and create a new Proxmox API token for Kasm. For an existing Proxmox account, leave Privilege Separation enabled. For a dedicated Proxmox account, you can disable Privilege Separation. Save the generated Token ID and Secret securely, because Proxmox does not display them again.
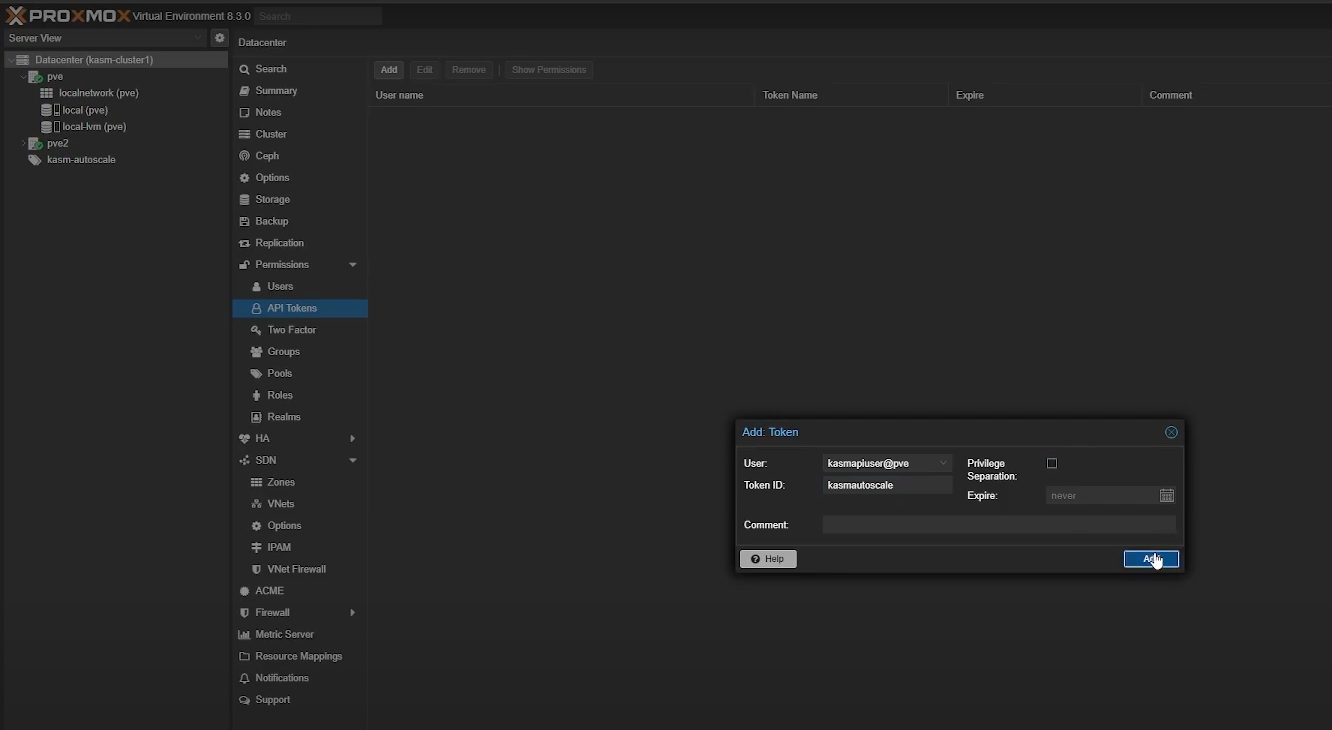
Create an API token in Proxmox -
Create a role with the required privileges. Go to Permissions > Roles > Create. Kasm AutoScale requires the privileges listed below for your Proxmox version.
Proxmox v8:
- Datastore.AllocateSpace
- Pool.Audit
- SDN.Use
- VM.Allocate
- VM.Audit
- VM.Clone
- VM.Config.CDROM
- VM.Config.CPU
- VM.Config.Disk
- VM.Config.HWType
- VM.Config.Memory
- VM.Config.Network
- VM.Config.Options
- VM.Monitor
- VM.PowerMgmt
Proxmox v9:
- Datastore.AllocateSpace
- Pool.Audit
- SDN.Use
- VM.Allocate
- VM.Audit
- VM.Clone
- VM.Config.CDROM
- VM.Config.CPU
- VM.Config.Disk
- VM.Config.HWType
- VM.Config.Memory
- VM.Config.Network
- VM.Config.Options
- VM.GuestAgent.Unrestricted
- VM.PowerMgmt
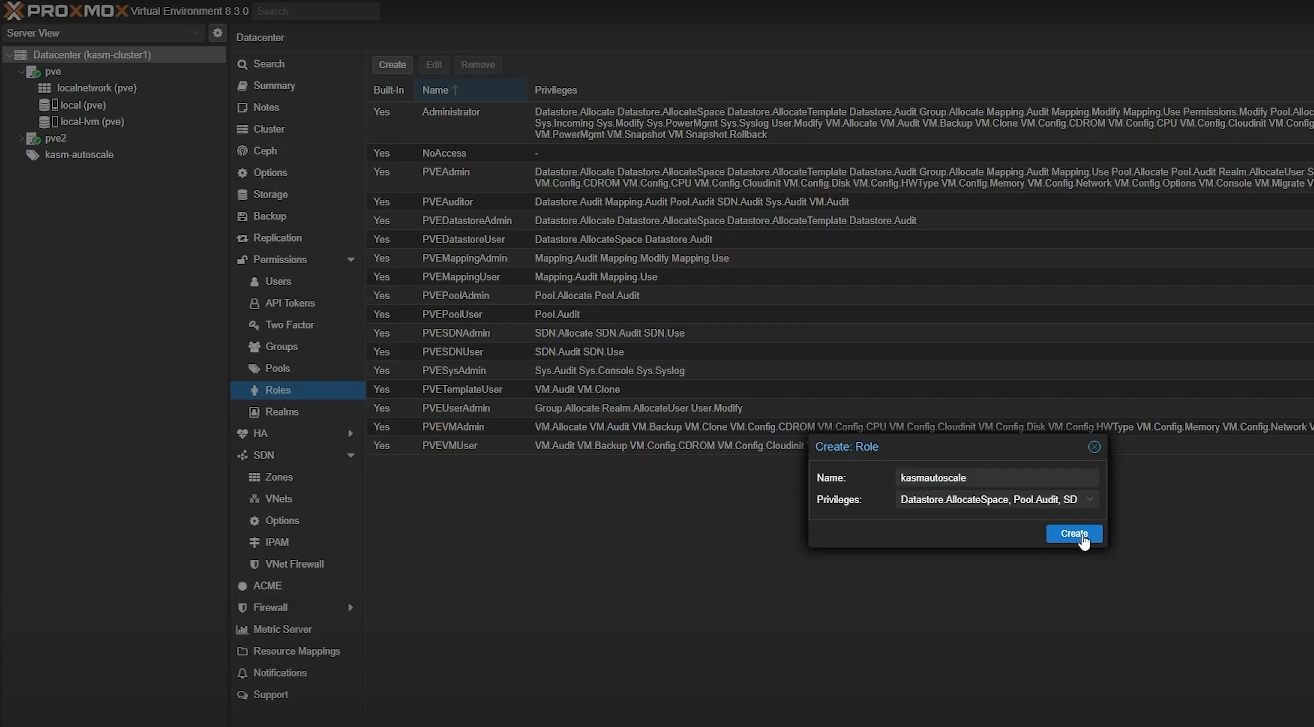
Create a Role in Proxmox -
Assign permissions to the user. Go to Permissions > Add > User Permission, select the user and role, and assign the following permissions:
- /sdn/zones/<networkzone>
- /storage/<storagepool>
- /pool/KasmPool
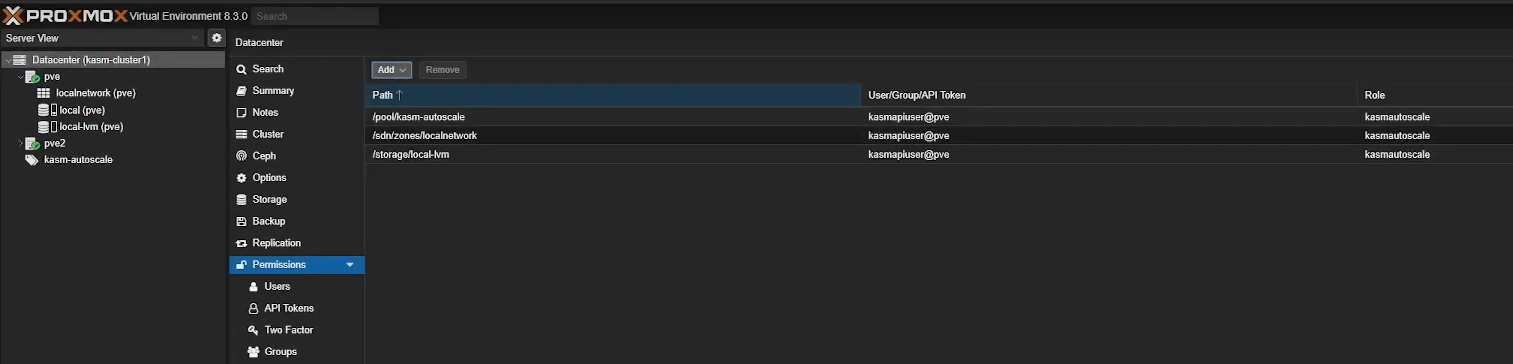
Assign permissions in Proxmox infoFor an existing account with privilege separation enabled, set these permissions from Permissions > Add > API Token Permission.
Build the agent VM template
AutoScale clones a prepared template each time it provisions an agent. Build the template that matches your deployment type. For Server AutoScaling, use the Windows template. For Docker Agent AutoScaling, use the Linux template.
- For Windows AutoScaling, follow the Windows templating guide.
- For Docker Agent AutoScaling, follow the Linux templating steps below.
Linux templating
-
Upload the Linux installation ISO. Go to your cluster, select local storage (for example,
local (pve)), and select Upload. You can download Ubuntu Server from the Ubuntu download page. For a different distribution, confirm it is a supported operating system. A pre-built or pre-configured Linux template, such as a cloud image, can be used instead of installing the operating system from scratch.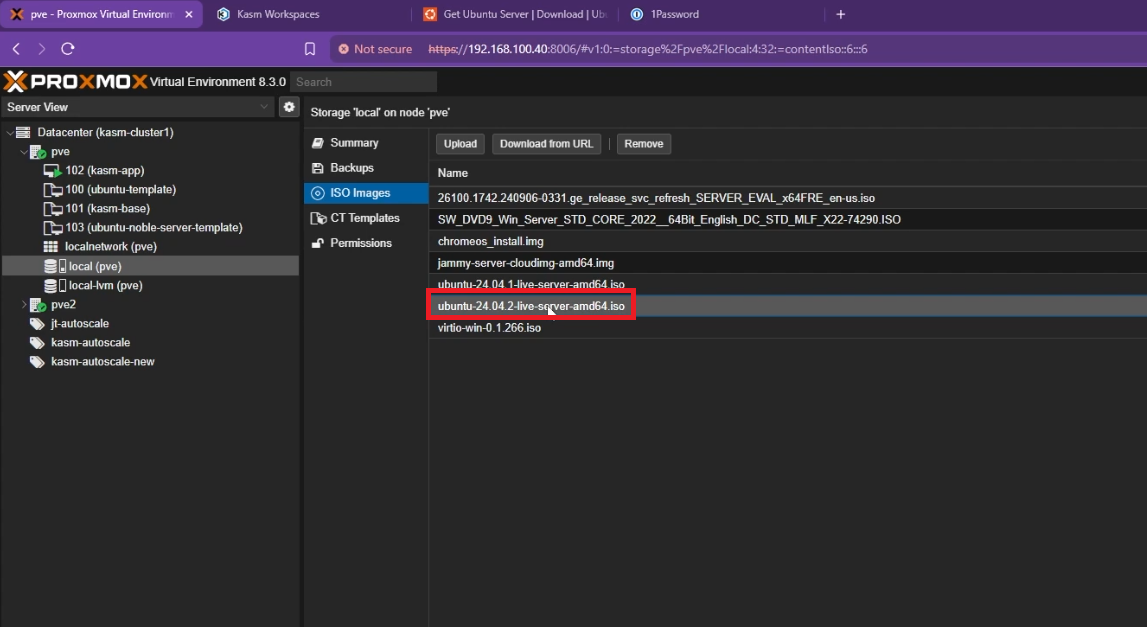
Upload Linux ISO file to Proxmox -
Create the virtual machine. Select Create VM in the top right corner and configure each tab as follows.
General Settings:
- Name: give the template a name (for example,
ubuntu-server-template). - Resource Pool: set it to the resource pool you created earlier.
- Select Next.
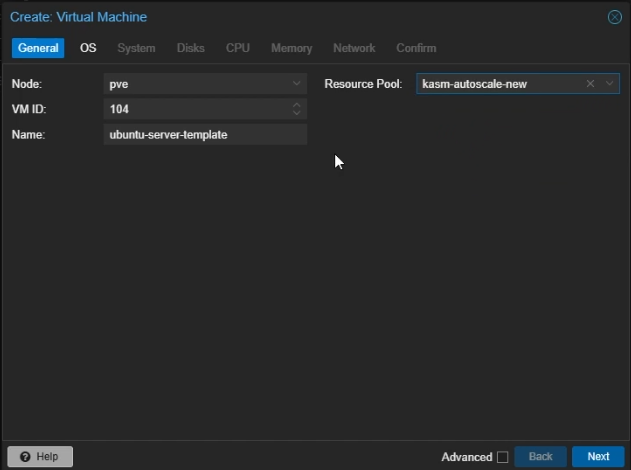
Create Proxmox Linux VM: General Settings OS Settings:
- Select Use CD/DVD disc image file (iso).
- Storage: select the local storage that holds your uploaded ISO file.
- ISO Image: select the Linux ISO image you uploaded.
- Guest OS Type: set to Linux.
- Select Next.
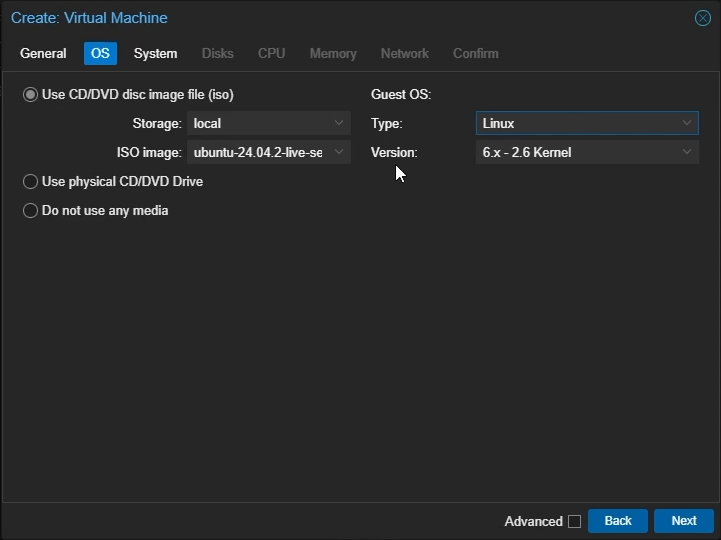
Create Proxmox Linux VM: OS Settings System Settings:
- Machine: select
q35. - SCSI controller: select
VirtIO SCSI single. - Enable
Qemu Agent. - Select Next.
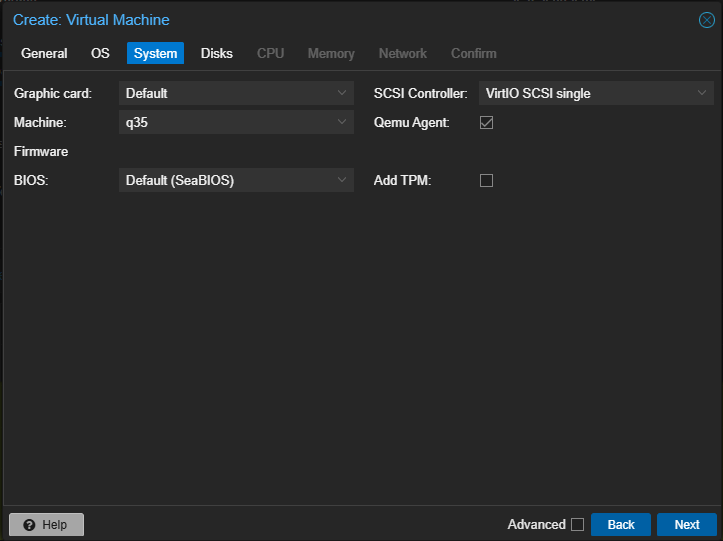
Create Proxmox Linux VM: System Settings Disk Settings:
- Bus/Device: select
VirtIO Block. - Disk Size: choose the amount of storage to allocate to the VM (for example, 45GB).
- Select Next.
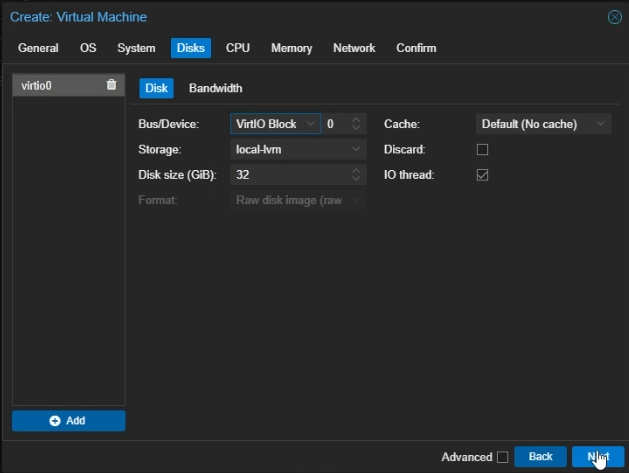
Create Proxmox Linux VM: Disk Settings CPU Settings:
- Cores: set the number of cores to allocate to the VM (for example, 4).
- Type: select
host. - Select Next.
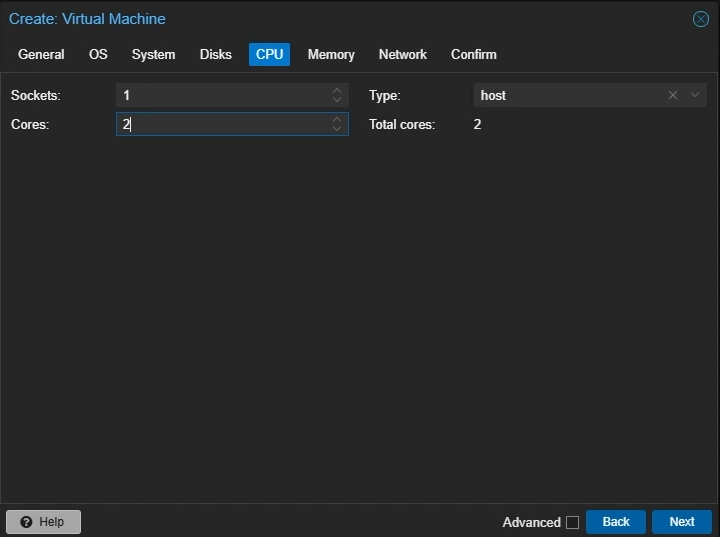
Create Proxmox Linux VM: CPU Settings Memory Settings:
- Memory: set the amount of memory to allocate to the VM in MiB (for example, 4096).
- Select Next.
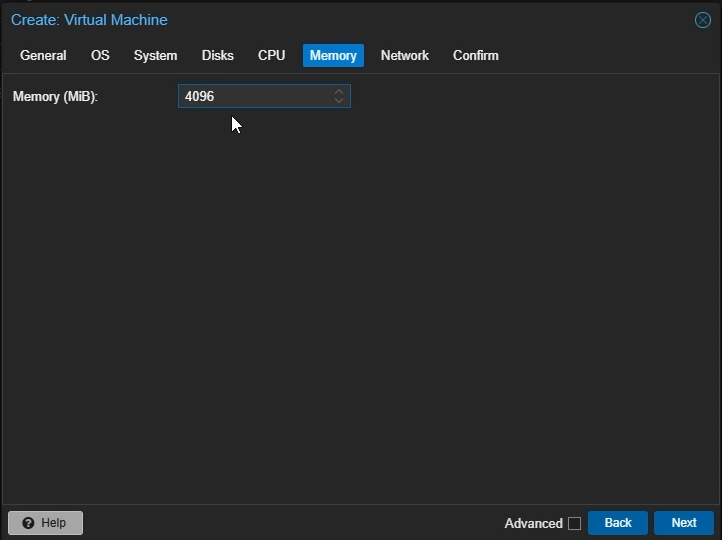
Create Proxmox Linux VM: Memory Settings Network Settings:
- Model: select
VirtIO (paravirtualized). - Select Next.
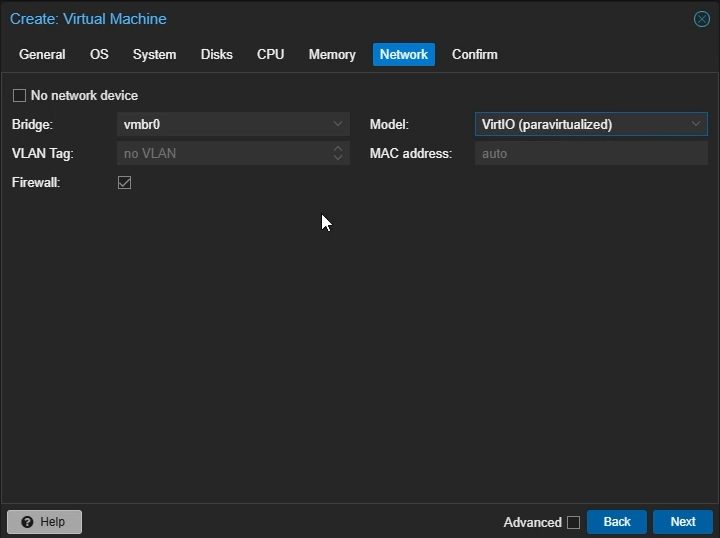
Create Proxmox Linux VM: Network Settings - Name: give the template a name (for example,
-
Confirm your settings and select Finish.
-
Install the operating system. Right-click the created VM and select Start, then double-click to open the noVNC window. Follow the on-screen instructions to install Ubuntu Server.
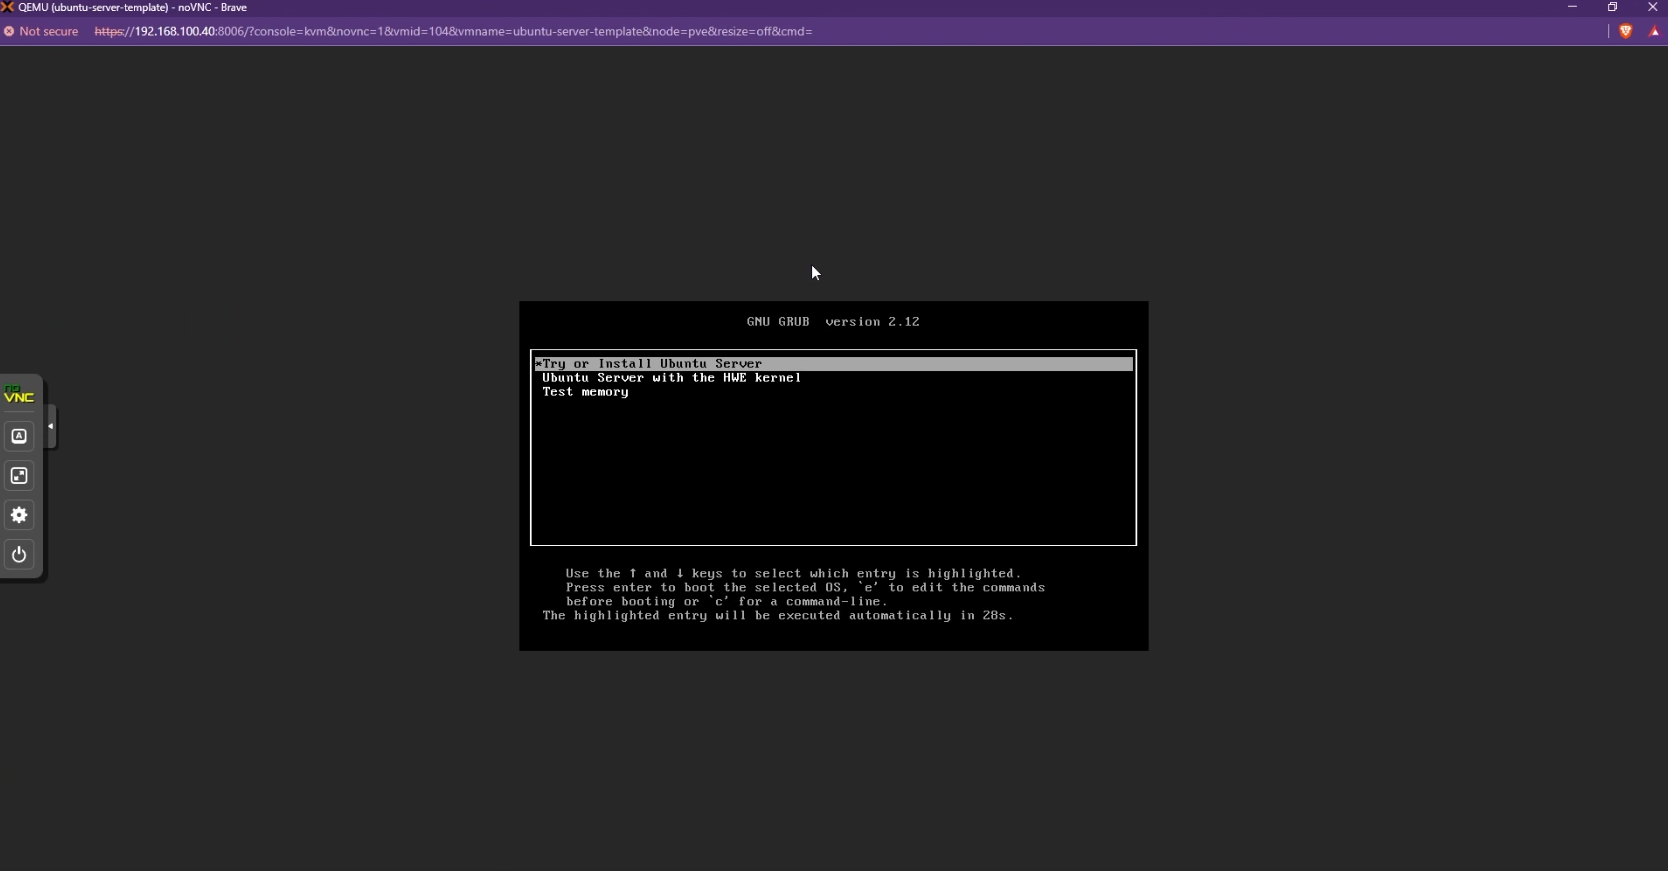
Install Ubuntu on Proxmox -
Select Install OpenSSH server so you can SSH into the AutoScaled agents.
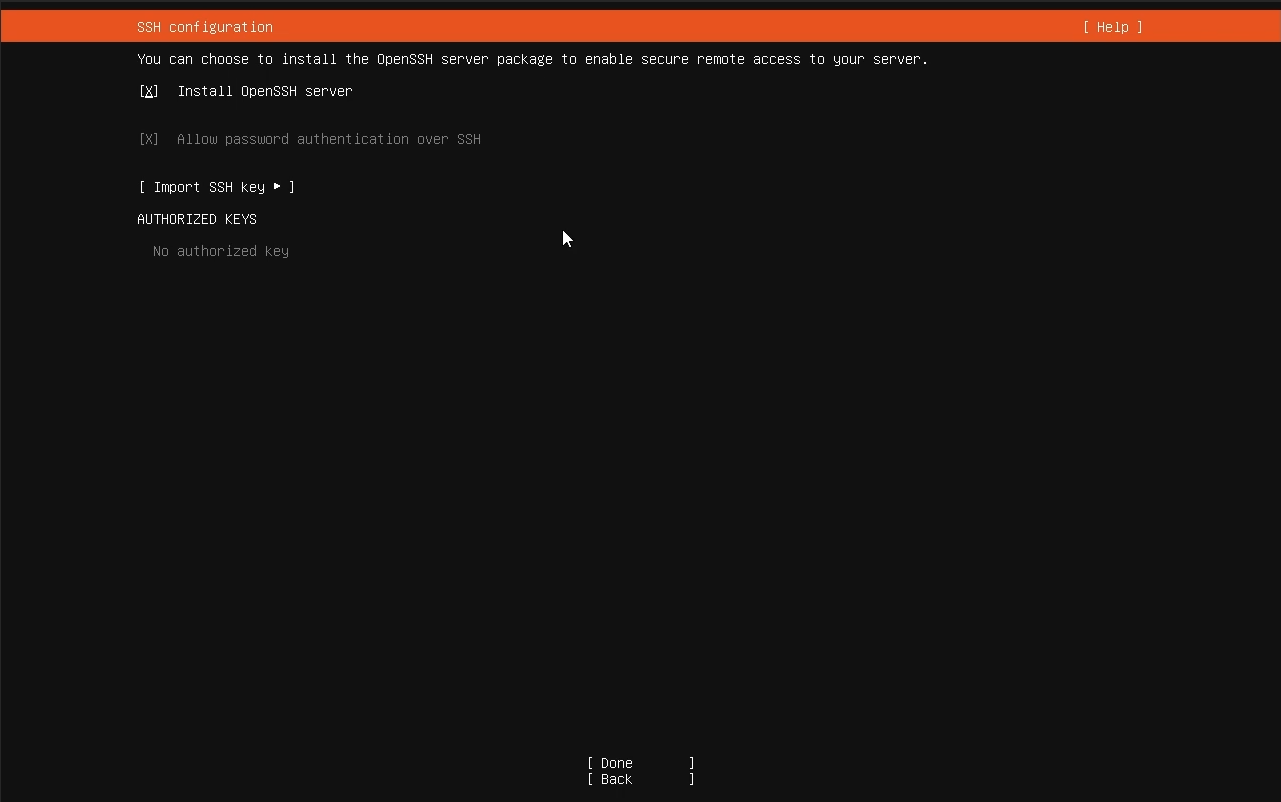
Select "Install OpenSSH server" -
When the installation finishes, select Reboot Now.
-
Remove the installation media. Go to your VM settings on Proxmox, select Hardware, double-click the
CD/DVD Drive, and select Do not use any media.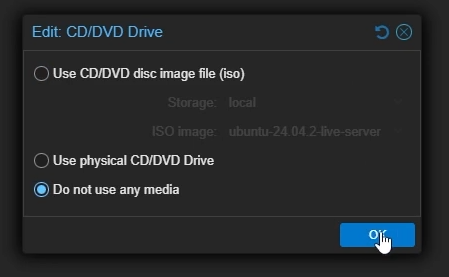
Remove Ubuntu ISO from your VM -
Connect to the VM. You can now SSH into the VM with your credentials instead of using noVNC.
-
Install and enable the QEMU Guest Agent. AutoScale relies on the guest agent to manage the provisioned VM.
sudo apt updatesudo apt install qemu-guest-agent -ysudo systemctl start qemu-guest-agentsudo systemctl enable qemu-guest-agentsudo reboot -
Reset the machine IDs to make the VM suitable for templating.
sudo truncate -s 0 /etc/machine-idsudo truncate -s 0 /var/lib/dbus/machine-id -
Optionally, pre-load workspace images on the agent VM so workspaces launch instantly after provisioning, without waiting for Kasm to pull the Docker images. See the pre-load workspace images on agents guide to learn more.
-
Shut down the VM.
-
Convert the VM to a template. Once the VM is powered off, right-click it and select Convert to template.
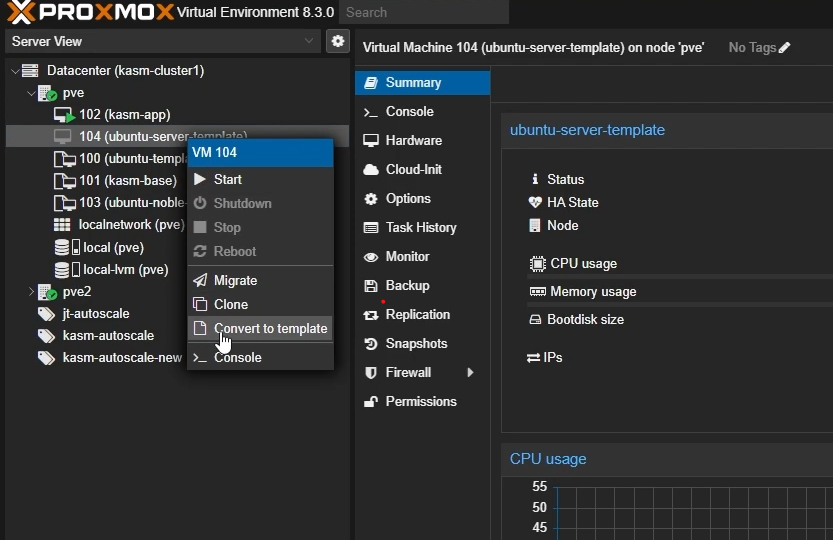
Create VM template in Proxmox
Windows templating
For an overview of Windows templating and its prerequisites, see the Windows AutoScale template creation guide.
-
Upload the installation media. Go to your cluster, select local storage (for example,
local (pve)), and select Upload. Upload the Windows installation ISO file. You can download Windows Server 2022 from the Microsoft evaluation center. Also upload the VirtIO drivers ISO file, which you can download from the VirtIO downloads archive.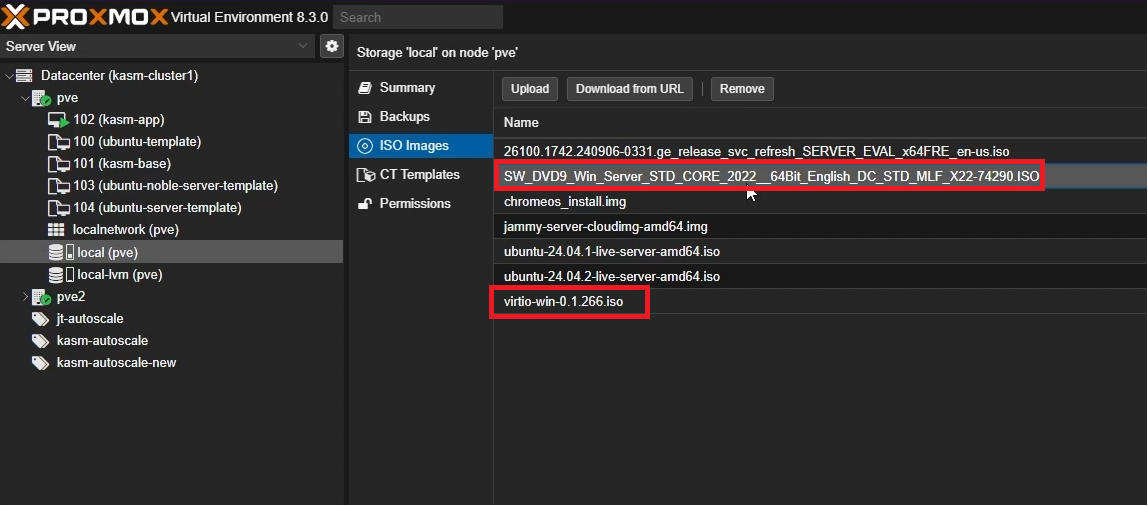
Upload Windows ISO and VirtIO ISO to Proxmox -
Create the virtual machine. Select Create VM in the top right corner and configure each tab as follows.
General Settings:
- Name: give the template a name (for example,
windows-server-2022-template). - Resource Pool: set it to the resource pool you created earlier.
- Select Next.
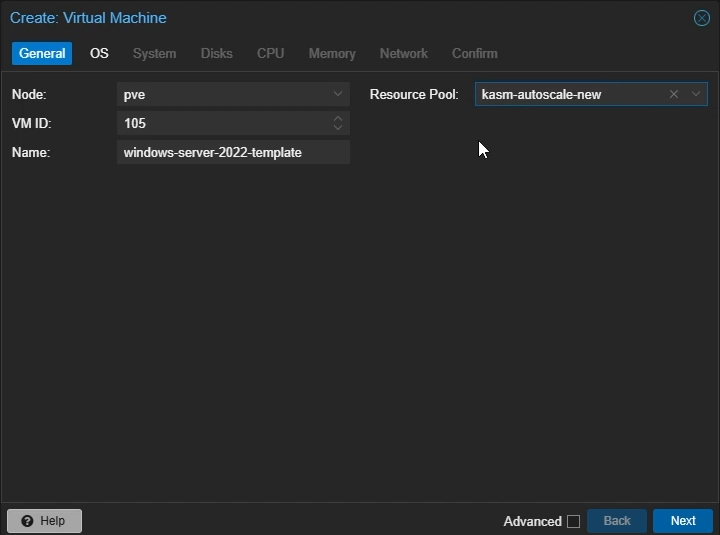
Create Proxmox Windows VM: General Settings OS Settings:
- Select Use CD/DVD disc image file (iso).
- Storage: select the local storage that holds your uploaded ISO file.
- ISO Image: select the Windows Server ISO image you uploaded.
- Guest OS Type: set to
Microsoft Windows. - Select Add additional drive for VirtIO drivers.
- ISO Image: select the VirtIO ISO image you uploaded.
- Select Next.
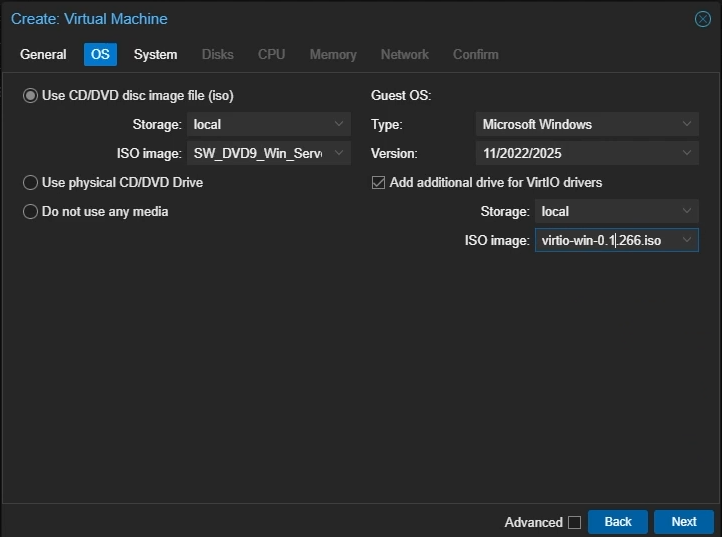
Create Proxmox Windows VM: OS Settings System Settings:
- Machine: select
q35. - SCSI controller: select
VirtIO SCSI single. - Enable
Qemu Agent. - Disable
Add EFI Disk. - Disable
Add TPM. - Select Next.
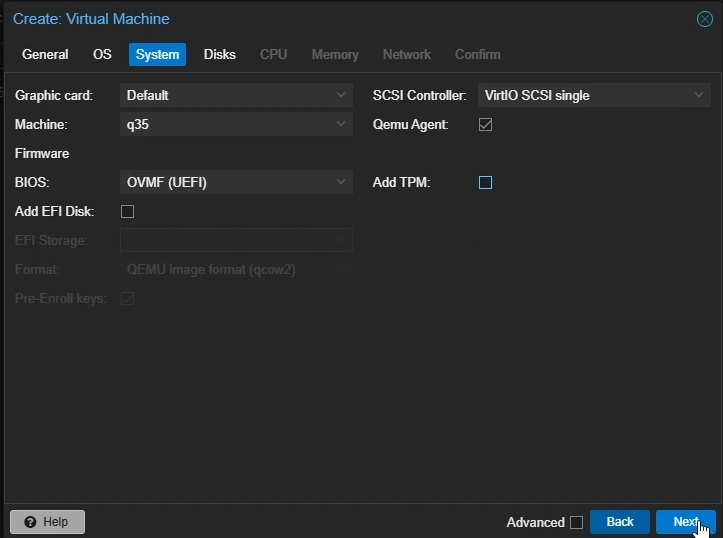
Create Proxmox Windows VM: System Settings Disk Settings:
- Bus/Device: select
SCSI. - Cache: select
Write back. - Disk Size: choose the amount of storage to allocate to the VM (for example, 45GB).
- Select Next.
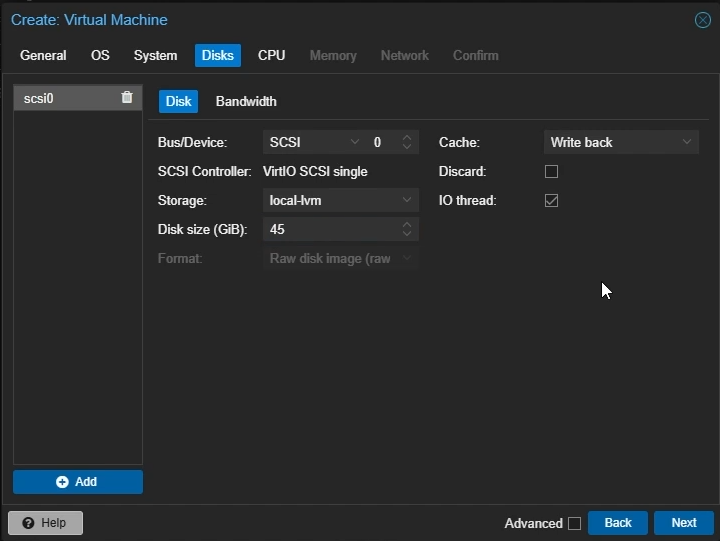
Create Proxmox Windows VM: Disk Settings CPU Settings:
- Cores: set the number of cores to allocate to the VM (for example, 4).
- Type: select
host. - Select Next.
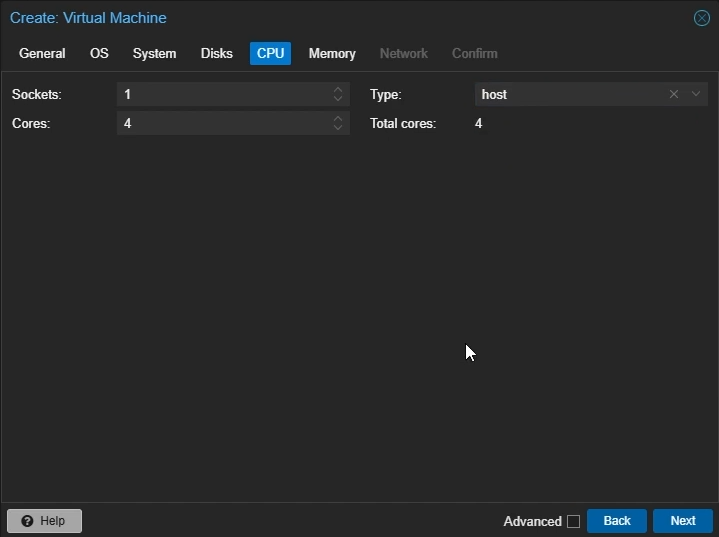
Create Proxmox Windows VM: CPU Settings Memory Settings:
- Memory: set the amount of memory to allocate to the VM in MiB (for example, 4096).
- Select Next.
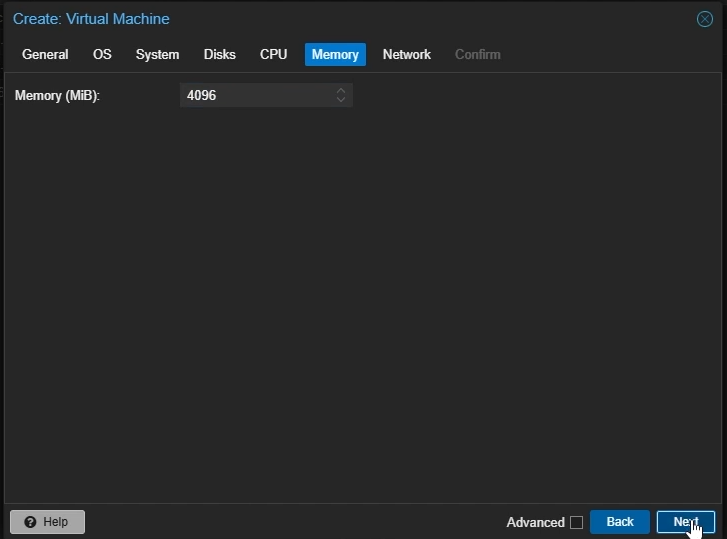
Create Proxmox Windows VM: Memory Settings Network Settings:
- Model: select
VirtIO (paravirtualized). - Select Next.
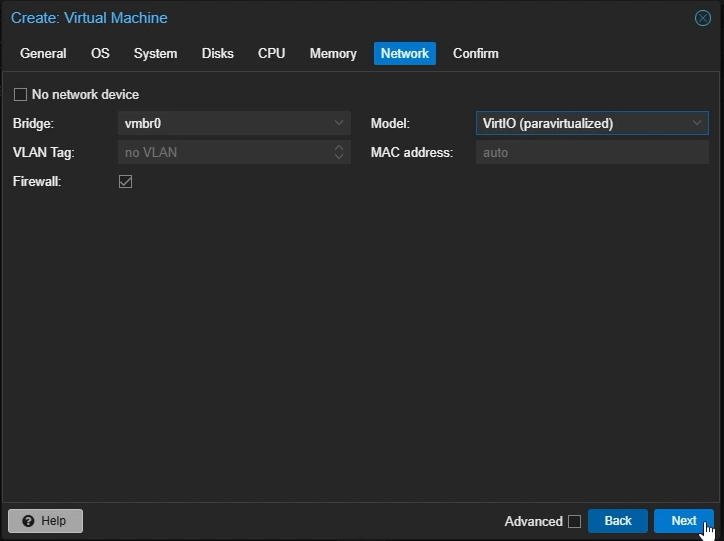
Create Proxmox Windows VM: Network Settings - Name: give the template a name (for example,
-
Confirm your settings and select Finish.
-
Boot the installer. Right-click the created VM and select Start, then double-click to open the noVNC window. Press any key to boot from the attached Windows installation media. The Windows installation screen appears. Proceed with the installation.
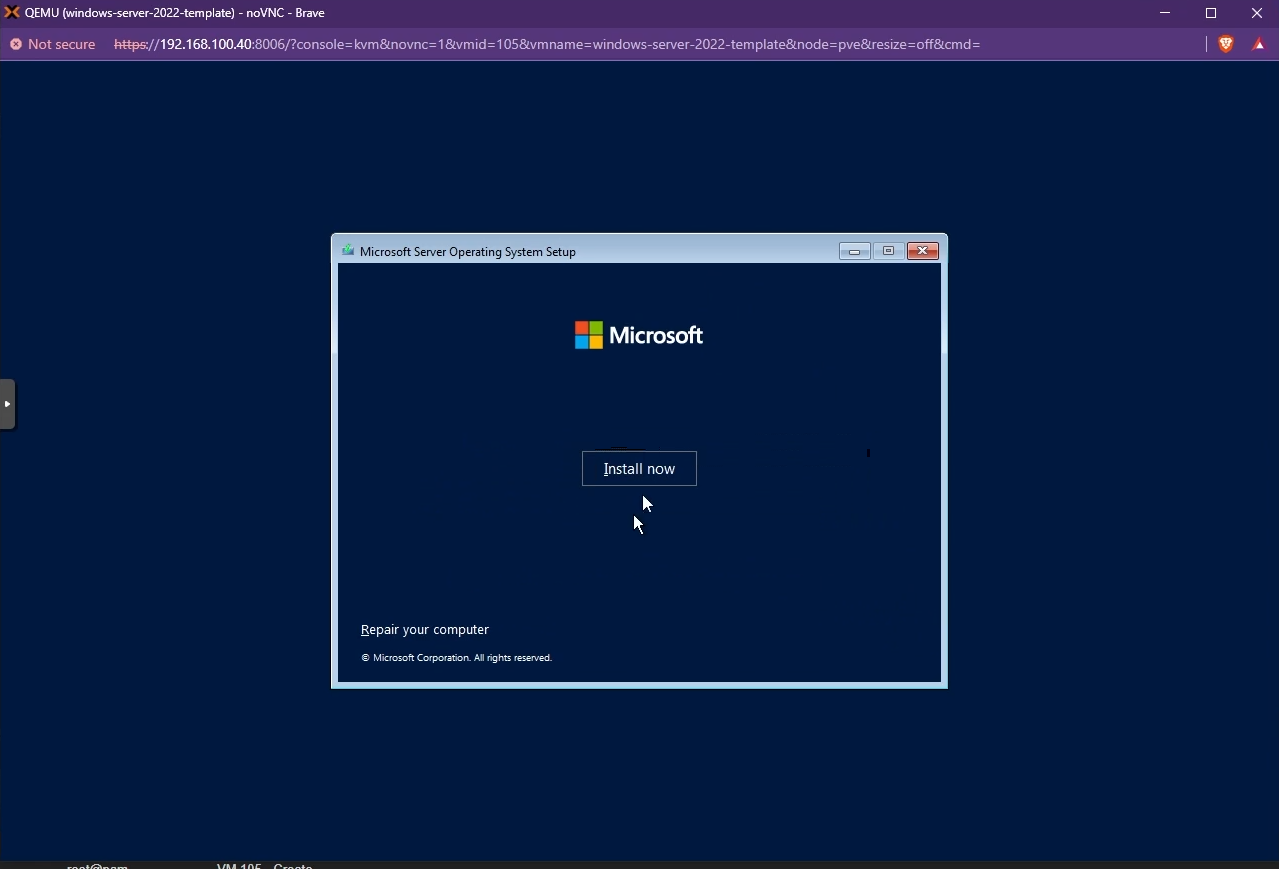
Follow on-screen instructions to Install Windows -
Load the VirtIO SCSI driver. By default, the available disks may not appear. Select Load driver to list the compatible VirtIO SCSI controllers and install the appropriate driver.
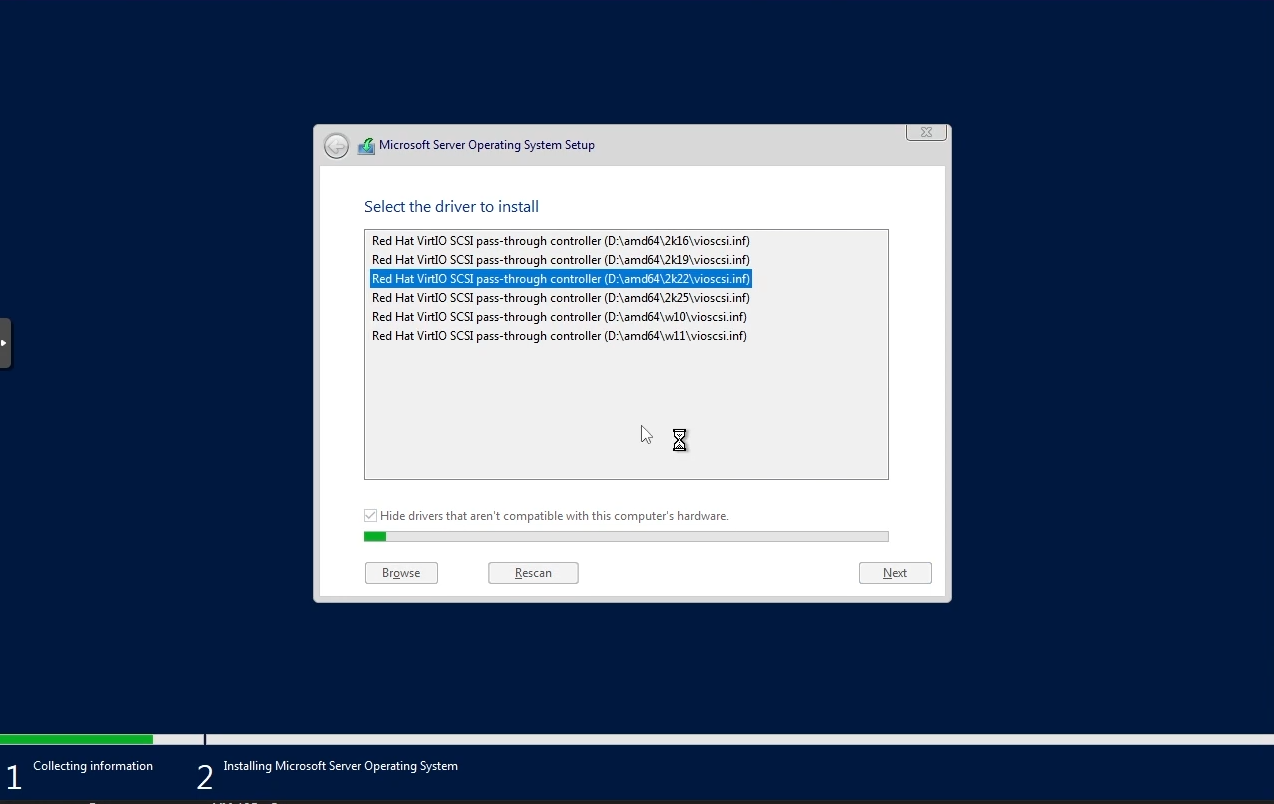
Install the appropriate VirtIO SCSI controller -
Select the boot disk. The available disks now appear. Choose the Windows boot disk you created and install Windows.
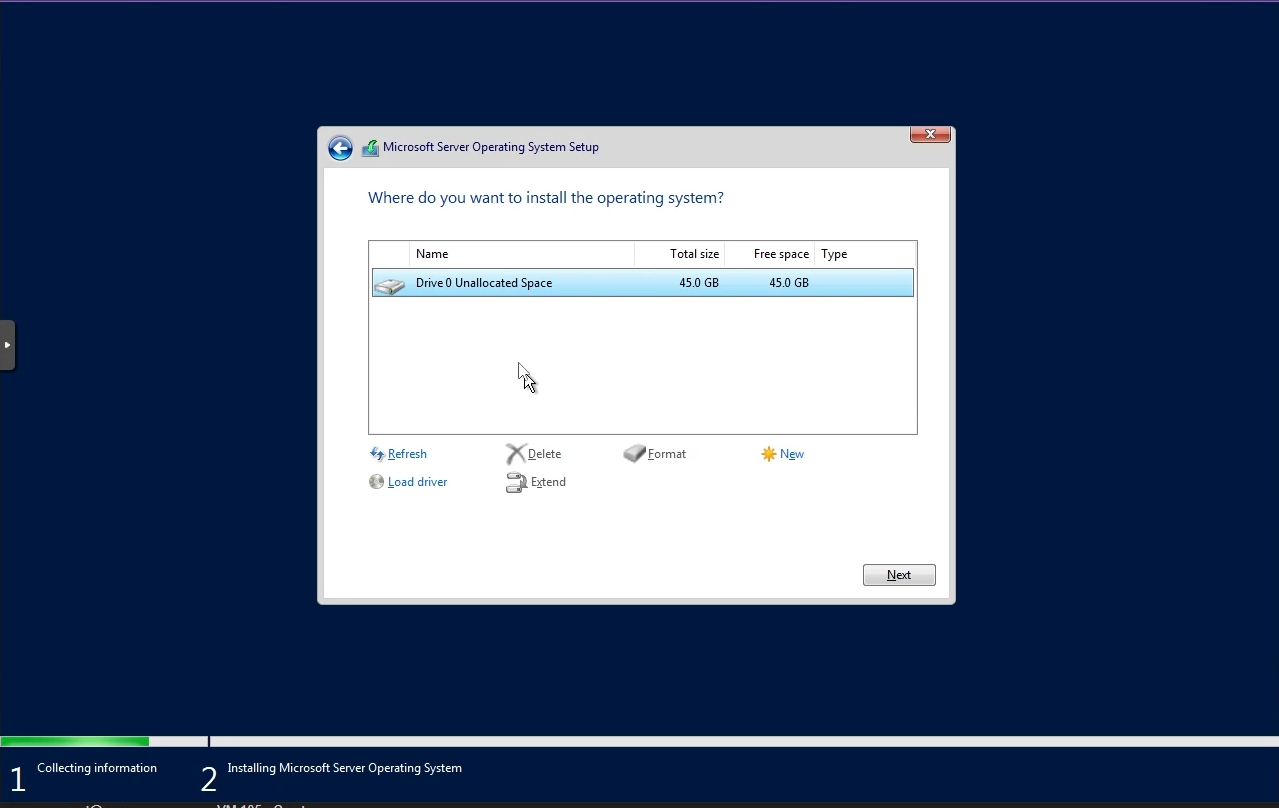
Install Windows -
Install the remaining VirtIO drivers. After Windows is installed, install the other VirtIO drivers, such as the network driver. Navigate to the VirtIO disk in File Explorer and run the installer.
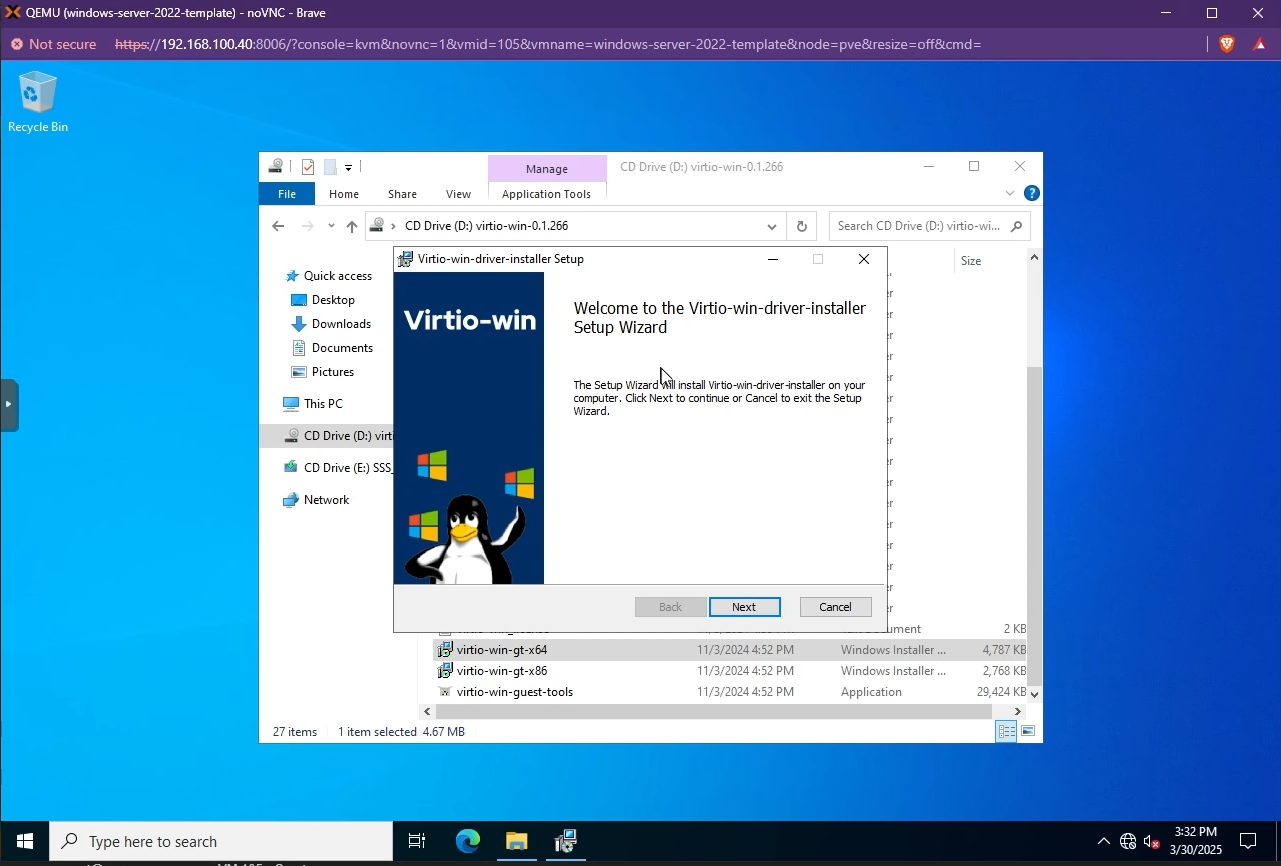
Install VirtIO drivers -
Install the QEMU Guest Agent tools. Find them in the same VirtIO drive in the
guest-agentfolder.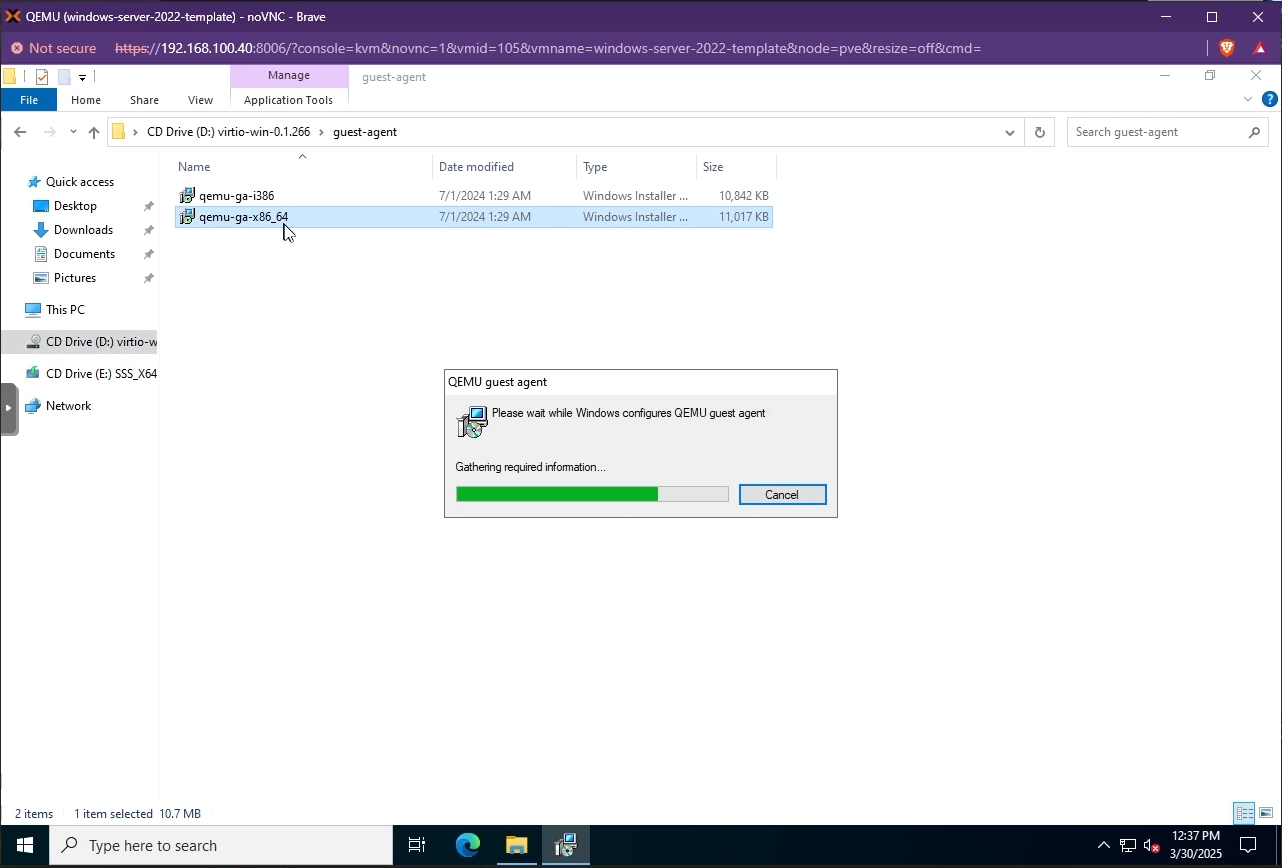
Install QEMU Guest Agent -
Reboot the VM.
-
Allow startup scripts to run. Open a PowerShell window as administrator and set the
ExecutionPolicytoUnrestrictedso Kasm can run the startup script when a VM is provisioned.Set-ExecutionPolicy Unrestricted -
Enable Remote Desktop. Search for Remote Desktop Settings and enable Remote Desktop on the VM.
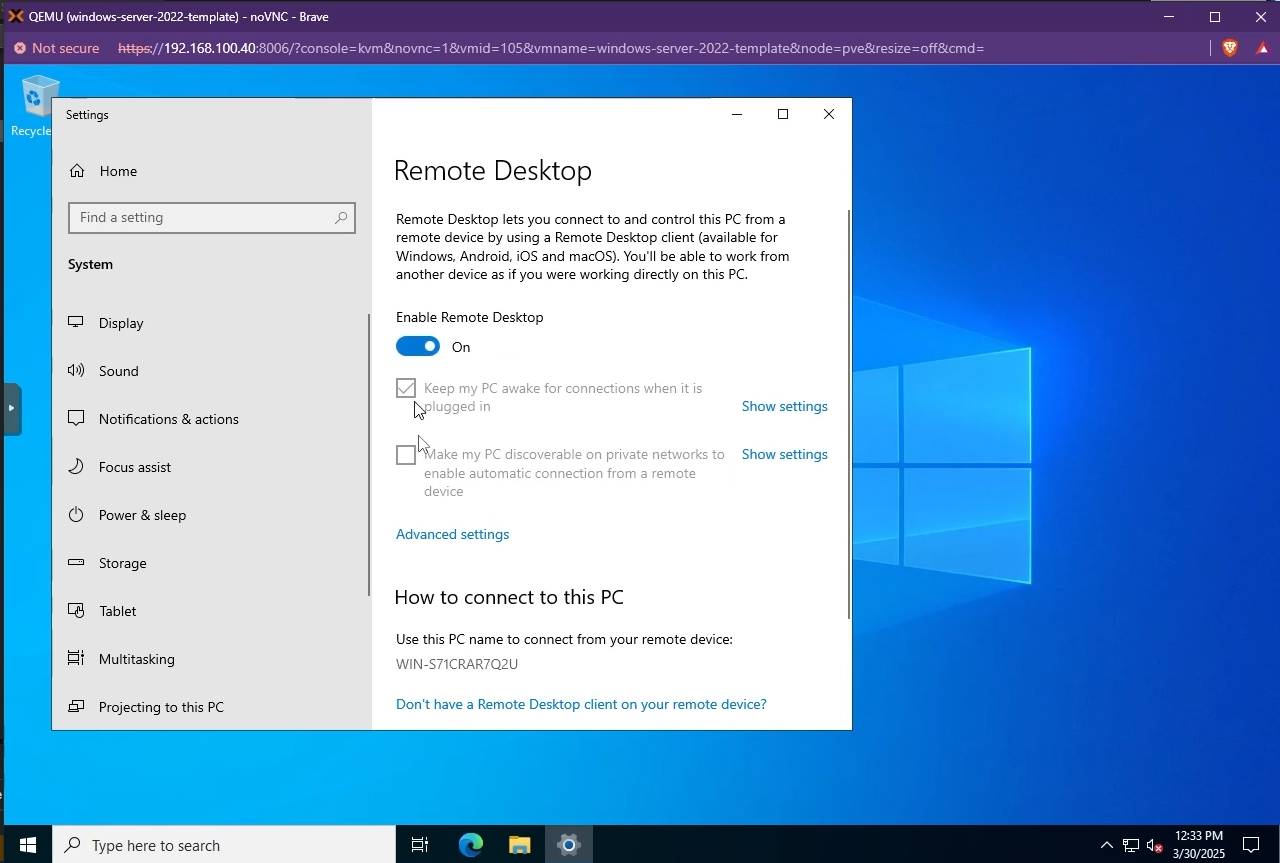
Enable Remote Desktop -
Install any custom software you want on the VM (for example, Microsoft Office).
-
Shut down the VM.
-
Convert the VM to a template. Once the VM is powered off, right-click it and select Convert to template.
-
Remove the installation media. Go to the created template, select Hardware, and remove the attached Windows ISO and VirtIO ISO disks.
Configure the Proxmox VM provider in Kasm
With the identity and template ready, register Proxmox as a VM provider so Kasm can clone the template on demand.
-
Create or open an AutoScale config. Follow AutoScale config (Docker) or AutoScale config (Server) to create a new AutoScale config, or select Create New in VM Provider Configs if you already have one.
-
Set Provider to Proxmox.
-
Configure the following settings:
Setting Description Name An identifying name for this provider configuration e.g. Proxmox Docker Agent AutoScale Provider Max Instances The maximum number of autoscale instances to be provisioned, regardless of other settings Host The hostname or IP and port of your Proxmox instance (e.g. 192.168.100.40:8006) Username The name of the autoscale user in Proxmox, including the auth realm (e.g. KasmUser@pve) Token Name The name of the API token associated with the user (e.g. kasm_token and not KasmUser@pve!kasm_token) Token Value The secret value of the API token associated with the user Verify SSL Whether or not to verify the SSL certs in the Proxmox environment. Disable if you are using self-signed certs VMID Range Lower The start of the VMID range for Kasm to use for autoscale agents. Must not overlap with any other Proxmox autoscale providers configured in Kasm VMID Range Upper The end of the VMID range for Kasm to use for autoscale agents. Must not overlap with any other Proxmox autoscale providers configured in Kasm Full Clone If enabled performs a full clone rather than a linked clone. A linked clone is faster to provision but will have reduced performance compared to a full clone Template Name The name of the VM template to use when cloning new autoscale agents Cluster Node Name The name of the Proxmox node containing the VM template Resource Pool Name Specify the resource pool to use for cloning the new autoscale agents Storage Pool Name Optionally specify a storage pool to use for cloning the new autoscale agents. This requires Full Clone to be enabled Target Node Name Optionally specify a cluster node to provision new autoscale agents on (defaults to the Cluster Node Name) VM Cores The number of CPU cores to configure for the autoscale agents VM Memory The amount of memory for the autoscale agents. The admin console accepts Bytes/MiB/GiB and stores the value as bytes ( memory_bytes). API integrations must submit the number of bytes.Installed OS Type Linux or Windows Startup Script Path The absolute path to where the startup script will be uploaded and run from, typically /tmpfor Linux orC:\windows\tempfor Windows. The path must exist on the template.Startup Script Bash (Linux) or Powershell (Windows) startup script to run after agent creation, typically to install the Kasm Agent and/or any other runtime dependencies. Example scripts are available on our GitHub repository -
Submit the Provider Config.
Validate provisioning and downscaling
Confirm that Kasm provisions agents under load and removes them when demand drops.
-
Provision a workspace. Go to Workspaces > Registry and make multiple workspaces available.
-
Generate load. Go to the Workspaces dashboard and launch enough workspace sessions to exceed your resource standby thresholds. If you configured non-zero Standby or Minimum Available Session values, agents begin provisioning immediately.
-
Monitor provisioning. Go to Infrastructure > Agents and watch new agents come online.
-
Verify the VMs. Confirm that new VM instances appear in Proxmox.
-
Check downscaling. Terminate sessions to reduce resource usage, then confirm that Kasm removes agents after the back-off period.
Common troubleshooting steps
- Agents fail to provision. Confirm the API token holds every privilege listed for your Proxmox version and that the user permissions cover the SDN zone, storage pool, and
kasm-autoscalepool. For an existing account with privilege separation enabled, set the permissions as API Token Permissions. - The Token ID or Secret is rejected. Regenerate the API token in Proxmox and update the VM Provider Config, because the secret is shown only once at creation.
- Provisioned VMs never become reachable. Confirm the QEMU Guest Agent is installed and enabled in the template and that the network model is
VirtIO (paravirtualized). - Windows agents do not run the startup script. Confirm
Set-ExecutionPolicy Unrestrictedwas applied and Remote Desktop is enabled in the template before conversion. - Cloned VMs share an identity or address. For Linux templates, confirm the machine IDs were truncated before the VM was converted to a template.
- Agents stay running after sessions end. Allow time for the configured back-off period to elapse before expecting downscaling.