AutoScale Windows and Linux servers in Kasm Workspaces
Overview
Kasm Workspaces can AutoScale virtual machines across supported cloud providers and hypervisors, treating each provisioned VM as an individual server reached over RDP. This guide configures AutoScale for a Windows or Linux server pool, so capacity expands and contracts with user demand instead of running fixed infrastructure around the clock. Kasm distributes user sessions across the pool and provisions new VMs as the number of available sessions runs low. AutoScale is not a supported way to scale RDS deployments.
AutoScale is available in the Community and Enterprise editions only.
Prerequisites
- A working Kasm Workspaces deployment, Community or Enterprise edition, with administrator access.
- A supported VM provider, cloud provider or hypervisor, with credentials available.
- A chosen authentication method. See Windows authentication or Linux authentication.
- For Active Directory domain join, an LDAP configuration with a service account that can create and remove computer objects.
Solution approach
This guide progresses through the following phases:
- Create a server pool for AutoScale.
- Create the AutoScale configuration.
- Configure the VM provider.
- Configure the VM startup script.
- Join servers to Active Directory, when domain membership is required.
- Enable FSLogix profile containers, when persistent Windows profiles are required.
- Publish the pool as a Workspace.
Detailed steps
Create a server pool for AutoScale
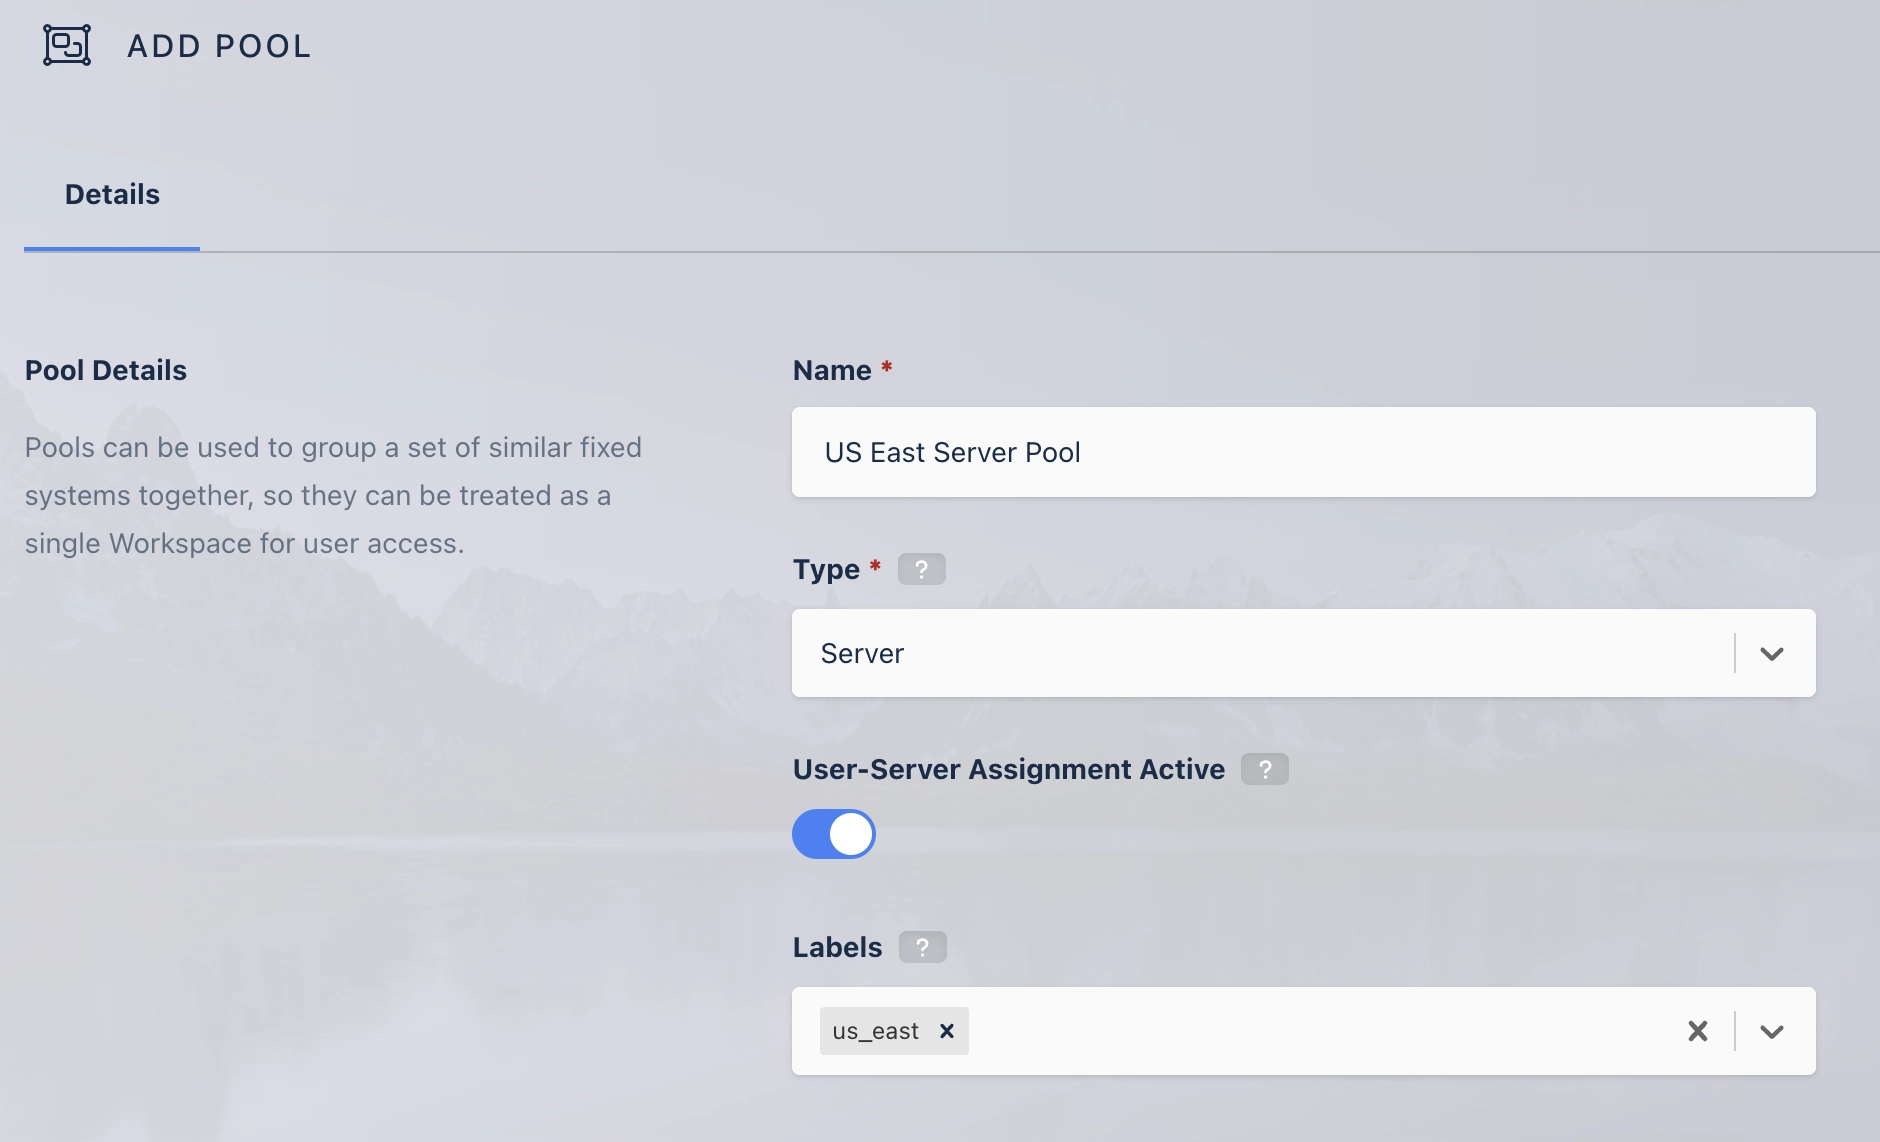
Before you create an AutoScale configuration, create a pool to be the target of AutoScale. A pool can hold multiple AutoScale configurations. For example, one pool can AutoScale servers in both Azure and AWS so that users draw from the same combined pool. A more typical pattern is one pool per cloud environment, per region.
- In the Admin dashboard, go to Infrastructure, then Pools, and click Add on the pool list.
- Provide a name.
- Select Server as the type.
- Click Save.
Create the AutoScale configuration
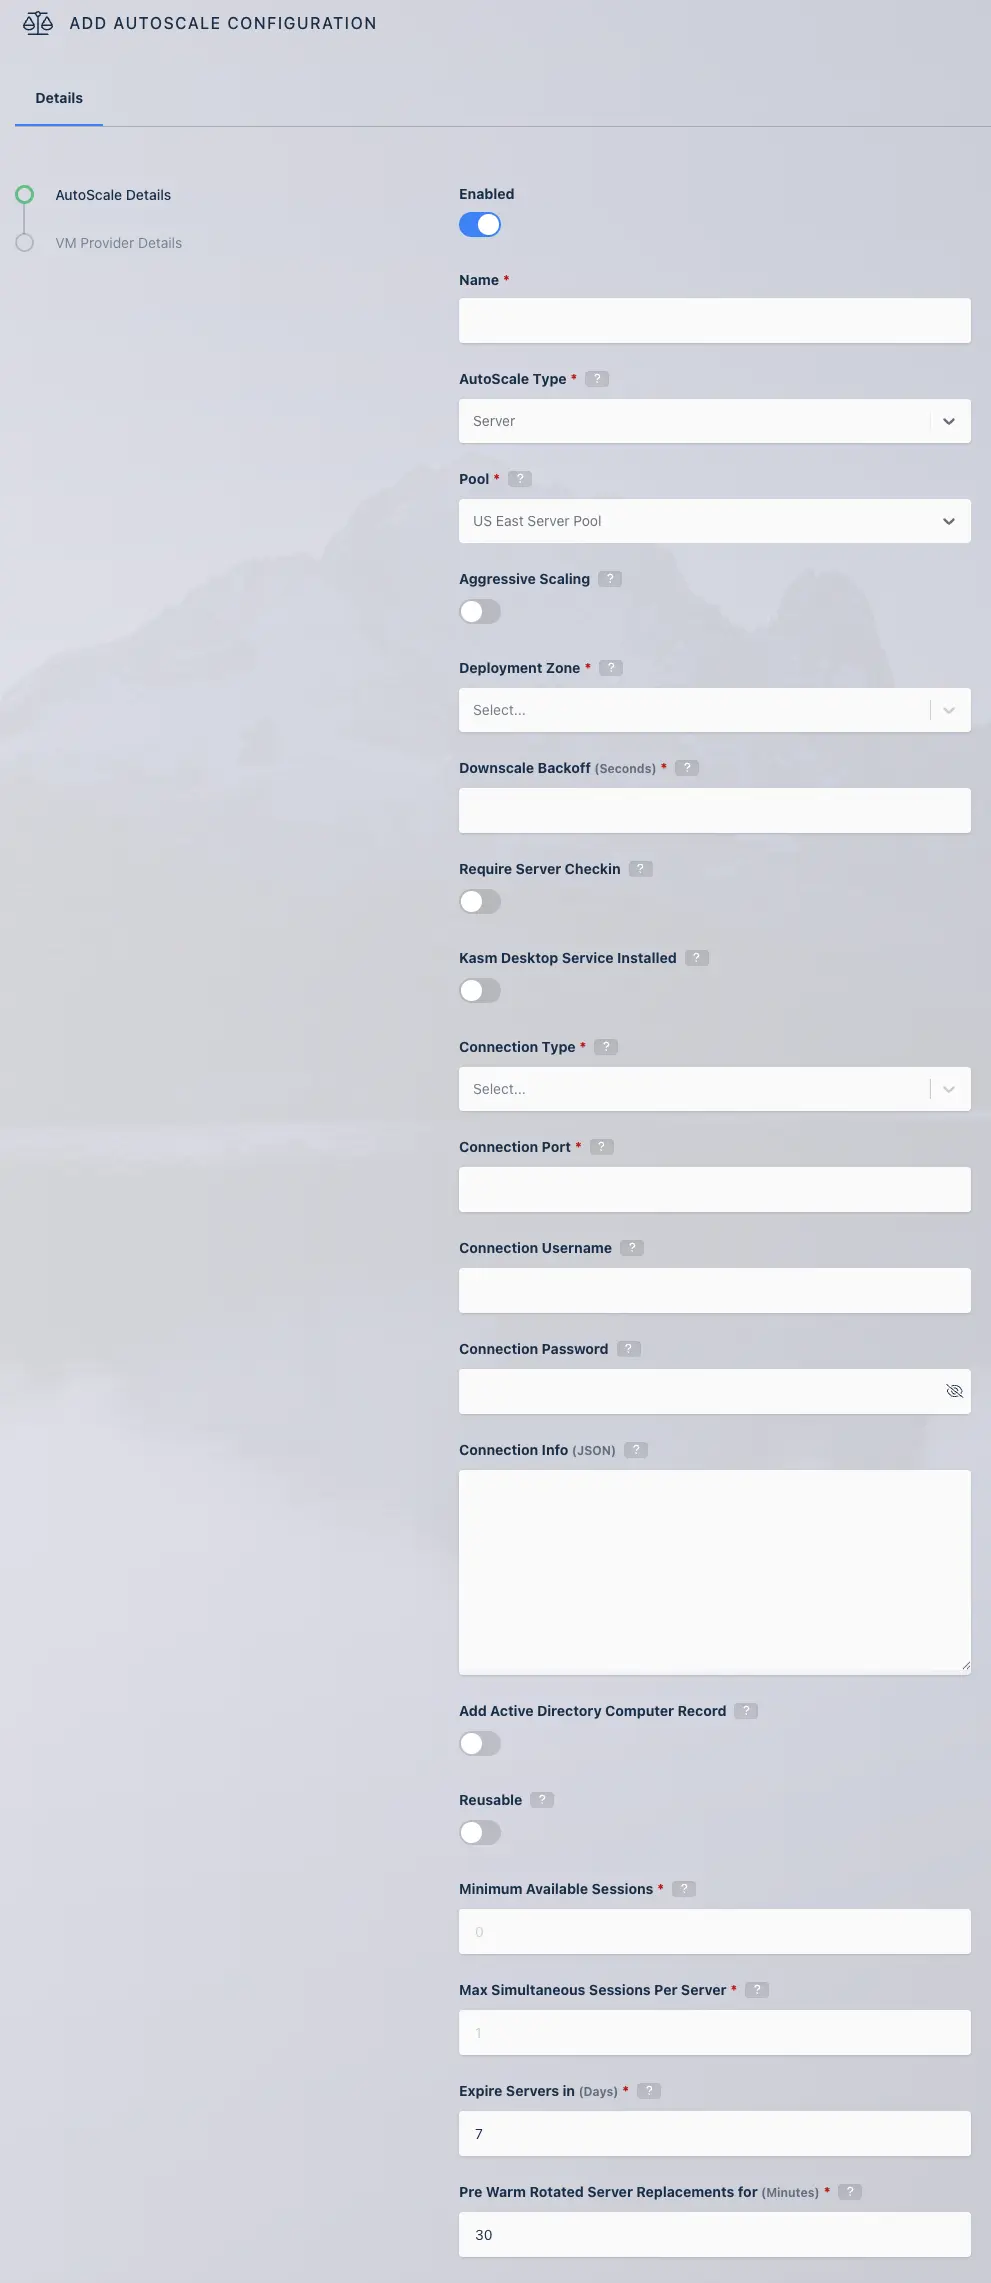
An AutoScale configuration has two parts, the AutoScale details and the VM provider details. The AutoScale details are common to every cloud provider and hypervisor.
To start an AutoScale configuration:
- Navigate to Infrastructure, then Pools.
- From the pool list, click the arrow icon next to the pool and click Edit.
- Scroll to the AutoScale Configuration list at the bottom of the pool configuration page and click Add.
Complete the common settings:
- Enter a name.
- Check the Enabled box.
- Select the deployment zone. By default there is one zone, named
default. - Select RDP as the connection type.
- Enter the connection port. RDP uses port 3389 by default.
- Enter the username and password values for the authentication method. See Windows authentication or Linux authentication.
Complete the platform-specific settings:
- Windows
- Linux
- Leave the connection info empty, unless you use RemoteApp.
- To join each VM to a domain, enable Create Active Directory Computer Record. See Join servers to Active Directory for details.
- Check the reusable box to reuse VMs after a user ends a session. For privacy, reuse servers only when Single Sign-On (SSO) is configured. See Windows authentication for SSO guidance.
- Leave the connection info empty.
- Check the reusable box to reuse VMs after a user ends a session. For privacy, reuse servers only when SSO is configured. See Linux authentication for SSO guidance.
Set the capacity limits:
- Set Minimum Available Sessions to the number of available sessions to keep at all times. For example, if each server supports 4 concurrent sessions and you set this value to 10, Kasm keeps at least 10 open sessions available across all servers. When available sessions drop below this number, Kasm provisions additional VMs.
- Set Max Simultaneous Sessions Per Server to the per-server limit. Kasm assigns each server no more than this maximum.
Multiple concurrent RDP sessions require a Windows operating system that supports the feature. Kasm assigns each server no more than the maximum number of concurrent user sessions specified.
Configure the VM provider
The VM provider configuration settings are specific to the cloud provider or hypervisor used for AutoScale. Kasm Workspaces supports AutoScale across several providers. For the full list and detailed setup instructions, see the VM provider configs reference.
Configure the VM startup script
Each VM provider has specific caveats for how startup scripts are handled. See the VM provider configs reference for your target environment. The startup script has access to the Kasm-managed variables listed below.
- Windows
- Linux
Windows startup scripts use PowerShell and can use the following variables:
| Variable name | Description |
|---|---|
| ad_join_credential | When the AutoScale configuration joins the VM to an Active Directory domain, Kasm creates the AD record and sets a random password usable only for the domain join. A PowerShell startup script uses this value to complete the domain join. |
| checkin_jwt | JSON Web Token used to register components such as the Kasm Desktop Service. |
| connection_username | The static username for Kasm user sessions, when the AutoScale configuration uses one. |
| connection_password | The static password for Kasm user sessions, when the AutoScale configuration uses one. |
| domain | The domain name, when the AutoScale configuration joins the VM to an Active Directory domain. |
| server_id | The UUID Kasm creates for the new server, found in the server's Server Id field in the Kasm UI. |
| server_hostname | The server name Kasm generates for the AutoScaled VM. This is also the computer object name added to Active Directory when Create Active Directory Computer Record is enabled. |
| upstream_auth_address | The resolvable hostname, IP address, or FQDN of the Kasm API server, found in the Upstream Auth Address field of the zone configuration in the Kasm UI. |
Linux startup scripts use bash and can use the following variables:
| Variable name | Description |
|---|---|
| connection_username | The static username for Kasm user sessions, when the AutoScale configuration uses one. |
| connection_password | The static password for Kasm user sessions, when the AutoScale configuration uses one. |
| ad_join_credential | When the AutoScale configuration joins the VM to an Active Directory domain, Kasm creates the AD record and sets a random password usable only for the domain join. |
| domain | The domain name, when the AutoScale configuration joins the VM to an Active Directory domain. |
| upstream_auth_address | The resolvable hostname, IP address, or FQDN of the Kasm API server. |
| checkin_jwt | The registration token (JWT) Kasm creates for the new server. |
When a Linux startup script uses curly brackets other than Kasm variables, escape them by doubling them up.
configure_xyz() {{
  echo "[INFO] ..."
}}
Join servers to Active Directory
AutoScaled servers can join Active Directory automatically. The process has two steps. First, Kasm creates a computer object in a specified AD container and generates a random, single-use password that can only join the computer to the domain. The startup script then completes the domain join.
For a complete example, see the domain join section in the Kasm Windows VM startup script repository.
For Kasm to create the computer object and generate the domain-join credential, an LDAP configuration must be defined.
You can reuse the LDAP configuration that authenticates users, or create a separate LDAP configuration only for joining and removing systems. When you use a separate configuration, leave it disabled so that it cannot be used for authentication.
- Create an LDAP configuration for user authentication to Kasm.
- Create an LDAP configuration to create computer objects in Active Directory. The service account for this configuration must have permission to create and remove computers in the domain.
- In the AutoScale configuration, select SSO User Accounts for the Connection Credential Type.
- In the AutoScale configuration, enable Add Active Directory Computer Record.
- In LDAP Config, select the LDAP configuration created in step 2.
- In Active Directory Computer OU DN, enter the AD organizational unit distinguished name. For example,
OU=Computers,DC=example,DC=local. - Enable Recursively Cleanup Active Directory Computer Record when computer objects can have child objects. This prevents
notAllowedOnNonLeaferrors when cleaning Azure VMs. - Click Next to save the AutoScale configuration.
- The next page is the VM provider configuration. Scroll to the startup script. See the example in Configure the VM startup script, a PowerShell script that adds the VM to the domain specified by the LDAP configuration. Each VM provider has different caveats for script format and execution. See the VM provider configs reference for your target environment.
Enable FSLogix profile containers
AutoScaled Windows VMs can use FSLogix profile containers to maintain persistent user profiles across sessions, which provides a consistent experience as servers are created and assigned. When you provide a profile storage location, the Kasm VM startup script installs the latest version of FSLogix and configures the VM to use FSLogix profile containers.
To use FSLogix with Kasm AutoScale startup scripts:
- Confirm that the FSLogix prerequisites are met.
- Create a storage location, either Azure Files or an SMB share.
- Provide the storage location as an argument to the startup script. For examples and additional options, see the FSLogix section of the Kasm Windows VM startup script repository.
Publish the pool as a Workspace
To provide users access to the AutoScaled server pool, create a Workspace.
- Navigate to Workspaces, then Workspaces.
- Click Add Workspace at the top of the workspaces list.
- Select Pool from the Workspace Type.
- Provide a friendly name and description.
- Check the Enabled box.
- In the Pool drop-down, select the pool you created earlier.
- In the RDP Client Options drop-down, select one of the following:
- Web native client to access the instance through the in-browser access method.
- RDP local client to access the instance through the endpoint's RDP client software, authenticated by the Kasm Connection Proxy.
- Click Save.
The Workspace now appears on the user dashboard.
Common troubleshooting steps
- VMs are not provisioned. Confirm the AutoScale configuration is enabled, verify the VM provider credentials, and confirm that Minimum Available Sessions is greater than the current available sessions.
- The domain join fails. Confirm the LDAP service account can create computer objects, verify the Active Directory Computer OU DN, and review the PowerShell startup script output.
- Windows profiles do not persist. Confirm the FSLogix prerequisites are met and verify that the startup script received a valid storage location.
- Only one concurrent session is allowed per server. Confirm the Windows operating system supports concurrent RDP sessions and set Max Simultaneous Sessions Per Server accordingly.