Add static Windows and Linux servers to Kasm Workspaces
Overview
Static servers let Kasm Workspaces broker user access to existing Windows and Linux machines, whether they run on-premises, in the cloud, or on physical hardware. These servers are also called fixed servers, in contrast to auto-scaled servers that Kasm provisions and destroys on demand. This guide adds a static server to a deployment, optionally groups servers into a pool for load balancing, and publishes the server to users as a Workspace. The result is governed, audited access to persistent backend servers through the same browser-based or RDP client experience that Kasm provides for containers.
The video above walks through adding static Windows servers to a Workspaces deployment.
Prerequisites
- A working Kasm Workspaces deployment with administrator access.
- A Windows or Linux server that is reachable from the Kasm deployment over RDP, which uses port 3389 by default.
- A chosen authentication method for the server. See Windows authentication or Linux authentication.
- For multiple concurrent Windows sessions, a Windows operating system that supports concurrent RDP sessions, with Single Sign-On (SSO) configured for authentication from Kasm.
Solution approach
This guide progresses through the following phases:
- Group servers into a pool, when load balancing is required.
- Add the server to Kasm.
- Publish the server as a Workspace.
- Control access with groups.
Detailed steps
Group servers into a pool
Server pools are optional for static servers. A pool groups several servers so that you grant users access to the pool rather than to individual servers. When a Workspace targets a pool, Kasm load balances users across the pooled servers. Kasm tracks how many concurrent sessions each server allows and which users hold a session on each server. Users can hold multiple sessions to different servers when the configuration allows it. For details, see Pools.
To create a pool:
- Go to Infrastructure, then Pools, and click Add in the pools list.
- Provide a name for the pool.
- Select Server in the Type drop-down.
- Click Save.
- On the edit pool page, add or remove servers as needed.
Add the server to Kasm
A server in Kasm is an individual system that Kasm brokers a user connection to. A Workspace can point to an individual server or to a pool of servers.
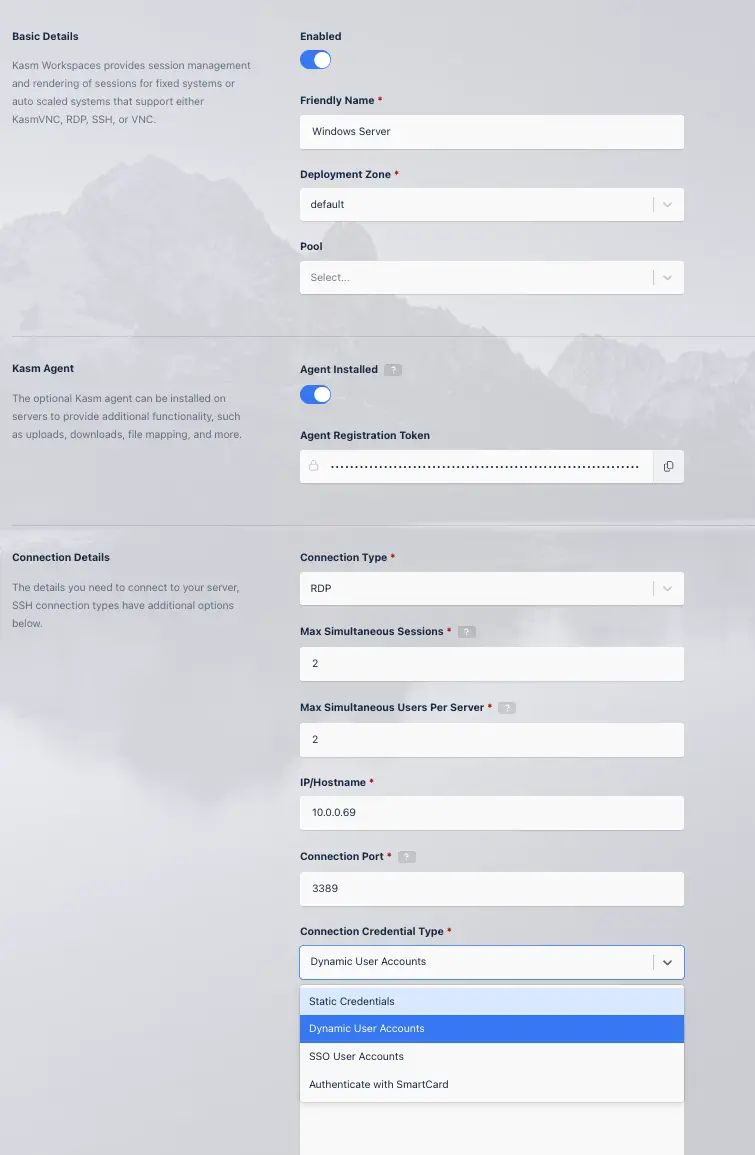
To add a server, go to Infrastructure, then Servers, and click Add in the server list. Complete the common settings first:
- Provide a name and an IP address or hostname for the server.
- Select RDP from the connection type drop-down.
- Configure the port for the RDP connection. The default RDP port is 3389.
- Select the deployment zone. By default there is one zone, named
default.
Complete the platform-specific settings:
- Windows
- Linux
- Select an authentication method. The example below uses a static username and password.
- Enter the maximum number of concurrent sessions the server allows. Static credentials allow only a single concurrent session. To allow more than one simultaneous session, configure SSO for authentication to Windows from Kasm and use a Windows operating system that supports concurrent RDP sessions.
Multiple concurrent RDP sessions require a Windows operating system that supports the feature. Kasm assigns each server no more than the maximum number of concurrent user sessions specified.
- Select an authentication method.
- Enter the maximum number of concurrent sessions the server allows. Confirm that the Linux system supports concurrent RDP sessions.
- Enter the maximum number of simultaneous users per server. Static credentials allow only a single user.
Click Save to create the server.
Publish the server as a Workspace
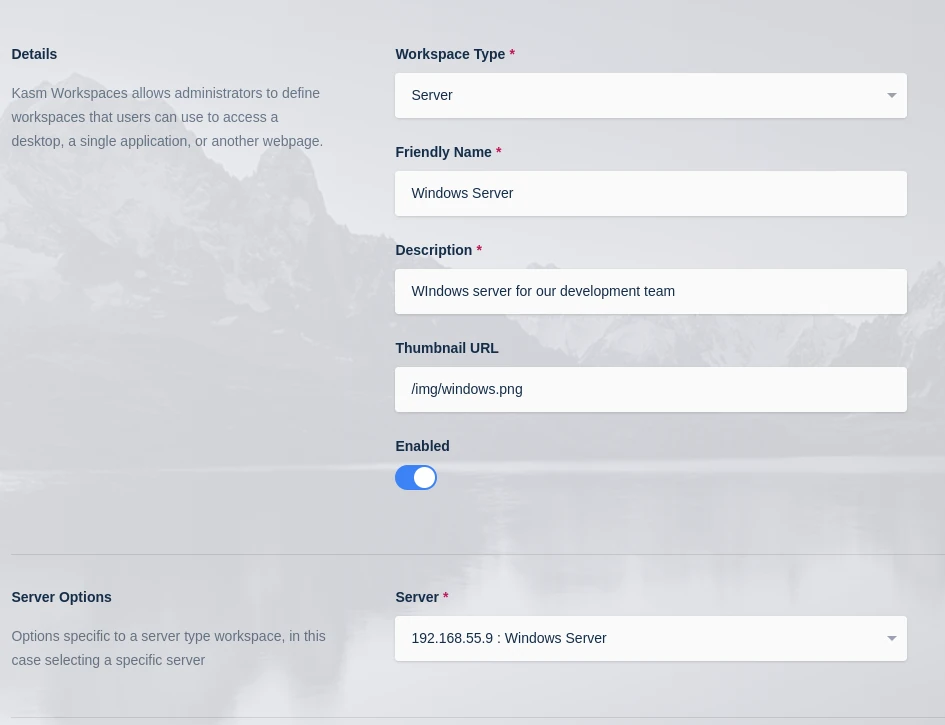
A Workspace is how you provide end users with access to a resource such as a server. The Workspace defines the user-facing name, description, categories, and thumbnail image. To create a Workspace, go to Workspaces, then Workspaces in the Admin dashboard, and click Add Workspace in the workspaces list.
- Select Server from the Type drop-down. Select Pool when you target a pool of servers.
- Provide a short, user-friendly name for the Workspace.
- Provide a description of the Workspace.
- Provide a thumbnail URL to display to the user.
- Check the Enabled checkbox.
- Select the target server or pool from the drop-down.
- In the RDP Client Options drop-down, select one of the following:
- Web native client to access the instance through the in-browser access method.
- RDP local client to access the instance through the endpoint's RDP client software, authenticated by the Kasm Connection Proxy.
- Optionally provide one or more categories. Users can search for the Workspace by category.
- Click Save.
Control access with groups
By default, new Workspaces are added to the All Users group, so every user can access any newly defined Workspace. To change this behavior, clear the Add Images to Default Group checkbox in Server Settings under Images. In more secure environments, clear that setting, remove all Workspaces from the All Users group, and add each Workspace to individual groups as needed.
Common troubleshooting steps
- The connection to the server fails. Confirm the IP address or hostname, verify that the RDP port (3389 by default) is open, and confirm that the server is reachable from the server's deployment zone.
- Only one concurrent Windows session is allowed. Static credentials limit the server to a single session. Configure SSO for authentication to Windows and use a Windows operating system that supports concurrent RDP sessions.
- Users do not see the Workspace. Confirm that the Workspace is enabled, check the group membership of the affected users, and review the Add Images to Default Group setting.